Page 270 of 481

269 Controls in detail
Useful features
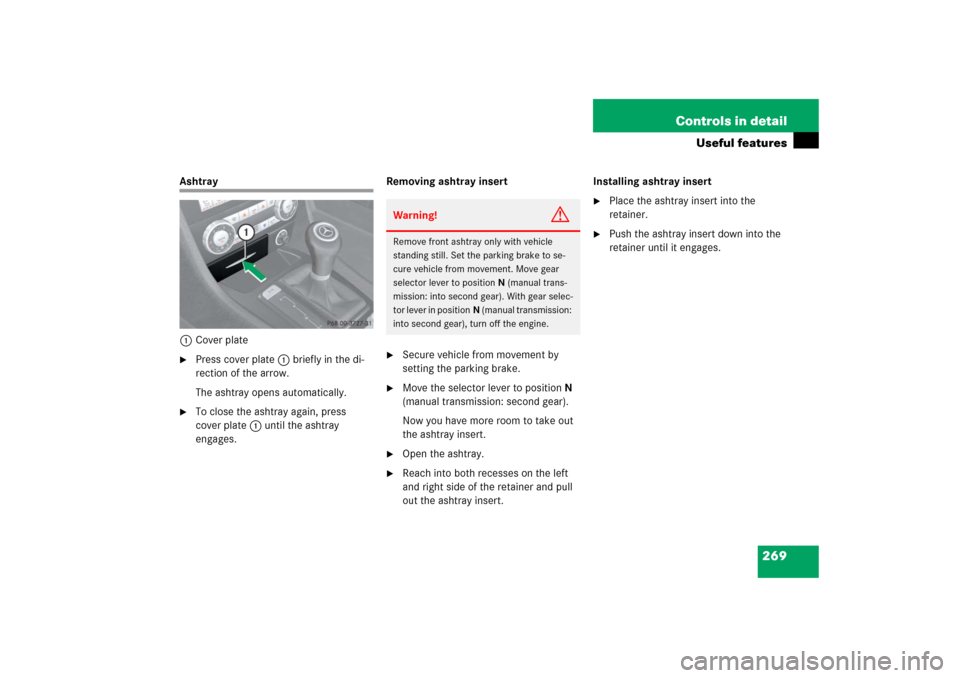
Ashtray
1Cover plate�
Press cover plate1 briefly in the di-
rection of the arrow.
The ashtray opens automatically.
�
To close the ashtray again, press
cover plate1 until the ashtray
engages.Removing ashtray insert
�
Secure vehicle from movement by
setting the parking brake.
�
Move the selector lever to positionN
(manual transmission: second gear).
Now you have more room to take out
the ashtray insert.
�
Open the ashtray.
�
Reach into both recesses on the left
and right side of the retainer and pull
out the ashtray insert.Installing ashtray insert
�
Place the ashtray insert into the
retainer.
�
Push the ashtray insert down into the
retainer until it engages.
Warning!
G
Remove front ashtray only with vehicle
standing still. Set the parking brake to se-
cure vehicle from movement. Move gear
selector lever to positionN (manual trans-
mission: into second gear). With gear selec-
tor lever in positionN (manual transmission:
into second gear), turn off the engine.
Page 297 of 481

296 OperationDriving instructionsDriving off
Apply the brakes to test them briefly after
driving off. Perform this procedure only
when the road is clear of other traffic.
Warm up the engine smoothly. Do not
place full load on the engine until the oper-
ating temperature has been reached.
When starting off on a slippery surface, do
not allow a drive wheel to spin for an ex-
tended period with the ESP
® switched off.
Doing so may cause serious damage to the
drivetrain which is not covered by the
Mercedes-Benz Limited Warranty.
Parking
!Simultaneously depressing the acceler-
ator pedal and applying the brake re-
duces engine performance and causes
premature brake and drivetrain wear.
Warning!
G
Do not park this vehicle in areas where com-
bustible materials such as grass, hay or
leaves can come into contact with the hot
exhaust system, as these materials could be
ignited and cause a vehicle fire.
To reduce the risk of personal injury as a re-
sult of vehicle movement, before
turning off
the engine and leaving the vehicle always:
�
Keep right foot on brake pedal.
�
Pull the parking brake lever up as many
notches as possible.
�
Move the selector lever to positionP
(manual transmission: first or reverse
gear).
�
Slowly release brake pedal.
�
When parked on an incline, turn front
wheels towards the road curb.
�
Turn the SmartKey in the starter switch
to position0 and remove the SmartKey
from the starter switch.
�
Take the SmartKey and lock vehicle
when leaving.!Set the parking brake whenever park-
ing or leaving the vehicle. In addition,
place gear selector lever* in positionP
(manual transmission: move gearshift
lever to first or reverse gear).
In addition, when parking on hills, turn
front wheel towards the road curb.
Page 300 of 481

299 Operation
Driving instructions
SLK 280, SLK 350
SLK 280 with Sport Package*
SLK 350 with Sport Package*
Your vehicle is factory equipped with
“W”-rated tires, which have a tire speed
rating of 168 mph (270 km / h).
An electronic speed limiter prevents your
vehicle from exceeding a speed of
155 mph (250 km/h).
SLK 55 AMG
Your vehicle is factory equipped with
“Y”-rated tires, which have a tire speed
rating of 186 mph (300 km / h).
An electronic speed limiter prevents your
vehicle from exceeding a speed of
155 mph (250 km/h).SLK 55 AMG with Performance
Package*
Your vehicle is factory equipped with
“Y”-rated tires, which have a tire speed
rating of 186 mph (300 km / h).
An electronic speed limiter prevents your
vehicle from exceeding a speed of
174 mph (280 km/h).
Winter driving instructions
The most important rule for slippery or icy
roads is to drive sensibly and to avoid
abrupt acceleration, braking and steering
maneuvers. Do not use the cruise control
system under such conditions.
When the vehicle is in danger of skidding,
move gear selector lever* to positionN or
declutch in case of manual transmission.
Try to keep the vehicle under control by
corrective steering action.
iFor information on speed rating for
winter tires, see “Winter tires”
(�page 348).
For additional general information on
tire speed markings on tire sidewall,
see “Tire speed rating” (
�page 334).
iFor information on driving with snow
chains, see “Snow chains”
(�page 349).
Warning!
G
On slippery road surfaces, never downshift
in order to obtain braking action. This could
result in drive wheel slip and reduced vehi-
cle control. Your vehicle’s ABS will not pre-
vent this type of control loss.
Page 397 of 481
396 Practical hintsUnlocking/locking in an emergency1Locking�
Insert the mechanical key into the
driver’s door lock until it stops.
�
Turn the mechanical key clockwise to
position1.
The driver’s door is locked.Manually unlocking the gear selector
lever (automatic transmission*)
In case of power failure, the gear selector
lever can be manually unlocked, e.g. to tow
the vehicle.
1Gear selector lever cover
2Release
�
Insert flat, blunt object (e.g. screwdriv-
er) into the left edge of cover1 at the
position indicated by the arrows.
�
Loosen cover1 using this object.
�
Using your hands, pull cover1 out
and remove.
�
Push down and hold release2 in di-
rection of arrow.
�
Simultaneously move gear selector le-
ver out of positionP.
The gear selector lever is unlocked
now.iThe gear selector lever is locked again
as soon as you place it in positionP
again.
��
Page 409 of 481
408 Practical hintsFlat tireThe SLK 55 AMG with Performance
Package* is equipped with a TIREFIT kit.Preparing the vehicle�
Park the vehicle as far as possible from
moving traffic on a hard surface.
�
Turn on the hazard warning flashers.
�
Turn the steering wheel so that the
front wheels are in a straight ahead po-
sition.
�
Set the parking brake (
�page 52).
�
Move the gear selector lever* toP
(manual transmission to first or reverse
gear).
�
Turn off the engine (
�page 61).
�
Remove the SmartKey from the starter
switch.
�
Have any passenger exit the vehicle at
a safe distance from the roadway.
Sealing tires with TIREFIT
Small tire punctures, particularly those in
the tread, can be sealed with TIREFIT.
TIREFIT can be used in ambient tempera-
tures down to -4°F (-20°C).
iOpen door only when conditions are
safe to do so.
iSLK 55 AMG with Performance
Package* only.Warning!
G
Keep TIREFIT away from sparks, open flame
or heat source.
Do not smoke.
Page 423 of 481

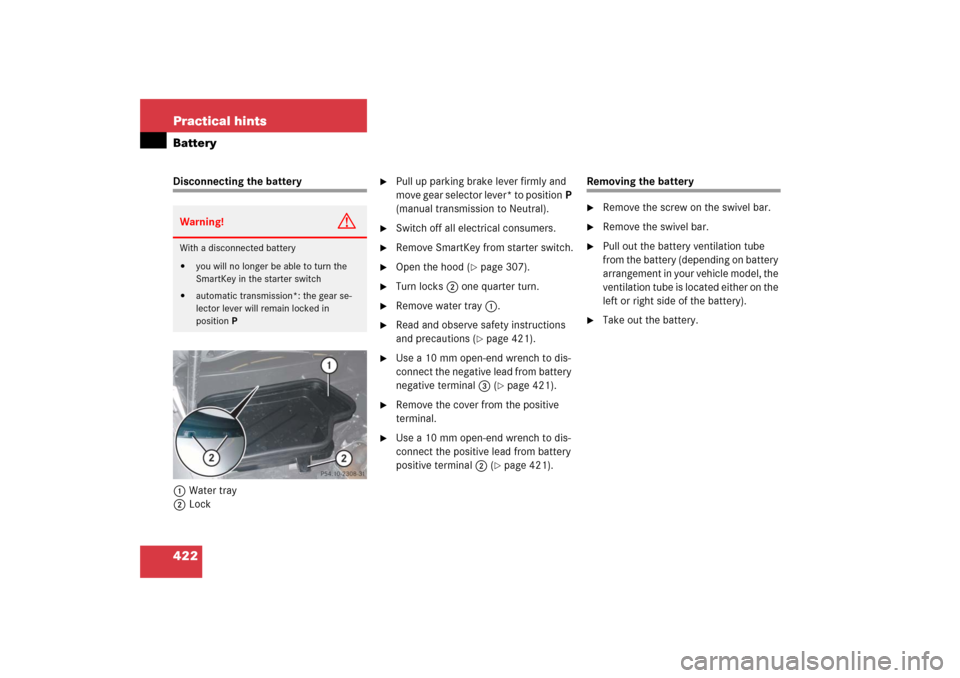
422 Practical hintsBatteryDisconnecting the battery
1Water tray
2Lock
�
Pull up parking brake lever firmly and
m o v e g e a r s e l e c t o r l e v e r * t o p o s i t i o nP
(manual transmission to Neutral).
�
Switch off all electrical consumers.
�
Remove SmartKey from starter switch.
�
Open the hood (
�page 307).
�
Turn locks2 one quarter turn.
�
Remove water tray1.
�
Read and observe safety instructions
and precautions (
�page 421).
�
Use a 10 mm open-end wrench to dis-
connect the negative lead from battery
negative terminal3 (
�page 421).
�
Remove the cover from the positive
terminal.
�
Use a 10 mm open-end wrench to dis-
connect the positive lead from battery
positive terminal2 (
�page 421).
Removing the battery�
Remove the screw on the swivel bar.
�
Remove the swivel bar.
�
Pull out the battery ventilation tube
from the battery (depending on battery
arrangement in your vehicle model, the
ventilation tube is located either on the
left or right side of the battery).
�
Take out the battery.
Warning!
G
With a disconnected battery�
you will no longer be able to turn the
SmartKey in the starter switch
�
automatic transmission*: the gear se-
lector lever will remain locked in
positionP
Page 426 of 481

425 Practical hints
Jump starting
�
Make sure the two vehicles do not
touch.
�
Turn off all electrical consumers.
�
Apply parking brake.
�
Shift gear selector lever* to positionP
(manual transmission to Neutral).
�
Open the hood (
�page 307).
�
Flip up cover from positive under hood
terminal2 in front of water tray1
(�page 422).1Positive terminal of charged battery
2Positive under hood terminal in front of
water tray
3Negative under hood terminal in front
of water tray
4Negative terminal of charged battery
�
Connect positive terminal1 of the
charged battery with positive under
hood terminal2 in front of the water
tray with one jumper cable. Clamp the
cable to positive terminal1 of the
charged battery first.
�
Start the engine of the vehicle with the
charged battery and run at idle speed.
�
Connect negative terminal4 of the
charged battery with negative under
hood terminal3 in front of the water
tray with the second jumper cable.
Clamp the cable to negative
terminal4 of the charged battery
first.
�
Start the engine of the disabled vehi-
cle.
You can now turn on the electrical con-
sumers. Do not turn on the lights under
any circumstances.
�
Remove the jumper cables first from
negative terminals3 and4 and then
from positive terminals2 and1.
You can now turn on the lights.
�
Have the battery checked at the near-
est authorized Mercedes-Benz Center.
Warning!
G
Keep flames or sparks away from battery.
Do not smoke.
Observe all safety instructions and precau-
tions when handling automotive batteries
(�page 314).
!Never invert the terminal connections.
iVehicles with automatic transmission*:
Do not tow-start vehicle.
Page 427 of 481

426 Practical hintsTowing the vehicleMercedes-Benz recommends that the vehi-
cle be transported with all wheels off the
ground using flatbed or appropriate wheel
lift/dolly equipment.When circumstances do not permit the
recommended towing methods, the vehi-
cle may be towed with all wheels on the
ground or front wheels raised only so far as
necessary to have the vehicle moved to a
safe location where the recommended
towing methods can be employed.
!Vehicles with automatic transmission*:
Do not tow-start vehicle.!Use flatbed or wheel lift/dolly equip-
ment with the SmartKey in the starter
switch in position0.
Do not tow with sling-type equipment.
Towing with sling-type equipment over
bumpy roads will damage radiator and
supports.
To prevent damage during transport,
do not tie down vehicle by its chassis or
suspension parts.
Switch off the tow-away alarm
(�page 88) and the automatic central
locking (
�page 101).
!To be certain to avoid a possibility of
damage to the transmission, however,
we recommend the drive shaft be dis-
connected at the rear axle drive flange
for any towing beyond a short tow to a
nearby garage.
!If the vehicle is towed with the front
axle raised, the engine must be shut off
(SmartKey in starter switch
position0or1). Otherwise, the ESP
®
will immediately be engaged and will
apply the rear wheel brakes.
When towing the vehicle with all wheels
on the ground, the gear selector lever*
must be in positionN (manual trans-
mission: gear shift lever in neutral posi-
tion) and the SmartKey must be in
starter switch position1.
When towing the vehicle with all wheels
on the ground or the front axle raised,
the vehicle may be towed only for dis-
tances up to 30 miles (50 km) and at a
speed not to exceed 30 mph
(50 km/h).