Page 358 of 481

357 Operation
Vehicle care
Headlamps, tail lamps, side makers,
turn signal lenses�
Use a mild car wash detergent, such as
Mercedes-Benz approved Car
Shampoo, with plenty of water.Cleaning the windows and the wiper
blades
�
Switch on the ignition (
�page 36).
�
Turn combination switch to wiper
settingII (
�page 56).
�
With wiper arms in vertical position,
switch off the ignition (
�page 36).
�
Fold the wiper arms forward until it
snaps into place.
�
Clean the wiper blade inserts with a
clean cloth and detergent solution.
�
Use a clean cloth and window cleaning
solution on all outside and inside glass
surfaces.
An automotive glass cleaner is recom-
mended.
!Only use window cleaners that are suit-
able for plastic lamp lenses. Window
cleaners which are not suitable may
damage the plastic lamp lenses of the
headlamps. Therefore, do not use abra-
sives, solvents or cleaners that contain
solvents.
Never apply strong force and use only a
soft, non-scratchy cloth when cleaning
the lenses. Do not attempt to wipe dirty
lenses with a dry cloth or sponge.
Otherwise you may scratch or damage
the lens surface.
!The windshield wipers must be in a ver-
tical position before folding them away
from the windshield. They could other-
wise damage the hood.
Never open the hood when the wiper
arms are folded forward.
Warning!
G
For safety reasons, switch off wipers and re-
move SmartKey from starter switch before
cleaning the windshield. Otherwise, the wip-
er motor could suddenly turn on and cause
injury.
��
Page 378 of 481

377 Practical hints
What to do if …
Display symbol
Display message
Possible cause/consequence
Possible solution
Ï
Coolant
Stop, engine off
The coolant is too hot.
�
Stop the vehicle and turn off the engine.
�
Only start the engine again after the mes-
sage disappears. You could otherwise dam-
age the engine.
/
Coolant
Check level
The coolant level is too low.
�
Add coolant (
�page 313).
�
If you have to add coolant frequently, have
the cooling system checked by an autho-
rized Mercedes-Benz Center.
Warning!
G
Driving when your engine is badly overheat-
ed can cause some fluids which may have
leaked into the engine compartment to
catch fire. You could be seriously burned.
Steam from an overheated engine can cause
serious burns and can occur just by opening
the hood. Stay away from the engine if you
see or hear steam coming from it. Turn off
the engine, get out of the vehicle and do not
stand near the vehicle until the engine has
cooled down.
The engine should not be operated with the
coolant temperature above 248°F (120°C).
Doing so may cause serious engine damage
which is not covered by the Mercedes-Benz
Limited Warranty.Warning!
G
Do not spill antifreeze on hot engine parts.
Antifreeze contains ethylene glycol which
may burn if it comes into contact with hot
engine parts. You can be seriously burned.
!Do not ignore the low engine coolant
level warning. Extended driving with
this message and symbol displayed
may cause serious engine damage not
covered by the Mercedes-Benz Limited
Warranty.
Do not drive without sufficient amount
of coolant in the cooling system. The
engine will overheat, causing major en-
gine damage.
Page 382 of 481

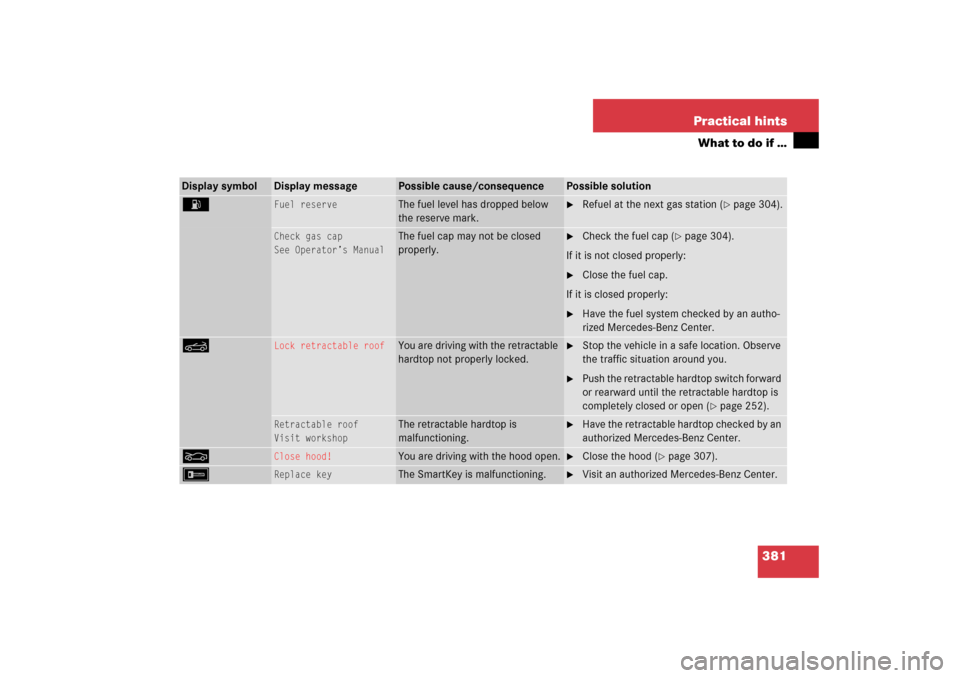
381 Practical hints
What to do if …
Display symbol
Display message
Possible cause/consequence
Possible solution
A
Fuel reserve
The fuel level has dropped below
the reserve mark.
�
Refuel at the next gas station (
�page 304).
Check gas cap
See Operator’s Manual
The fuel cap may not be closed
properly.
�
Check the fuel cap (
�page 304).
If it is not closed properly:
�
Close the fuel cap.
If it is closed properly:
�
Have the fuel system checked by an autho-
rized Mercedes-Benz Center.
K
Lock retractable roof
You are driving with the retractable
hardtop not properly locked.
�
Stop the vehicle in a safe location. Observe
the traffic situation around you.
�
Push the retractable hardtop switch forward
or rearward until the retractable hardtop is
completely closed or open (
�page 252).
Retractable roof
Visit workshop
The retractable hardtop is
malfunctioning.
�
Have the retractable hardtop checked by an
authorized Mercedes-Benz Center.
O
Close hood!
You are driving with the hood open.
�
Close the hood (
�page 307).
F
Replace key
The SmartKey is malfunctioning.
�
Visit an authorized Mercedes-Benz Center.
Page 404 of 481
403 Practical hints
Replacing bulbs
Replacing bulbs for front lamps
Before you start to replace a bulb for a
front lamp, do the following first:�
Turn the exterior lamp switch to
positionM (
�page 110).
�
Open the hood (
�page 307).
1Housing cover for low beam (halogen
headlamps only)
Housing cover for Bi-Xenon* head-
lamps. Do not remove.
2Bulb socket for turn signal lamp
3Bulb socket for high beam/high beam
flasher lamp
4Bulb socket for parking and standing
light lamp
5Bulb socket for low beam bulb
(Halogen headlamps only)
Warning!
G
Do not remove the cover1 for the
Bi-Xenon* headlamp. Because of high volt-
age in Bi-Xenon lamps, it is dangerous to re-
place the bulb or repair the lamp and its
components. We recommend that you have
such work done by a qualified technician.
Page 408 of 481

407 Practical hints
Replacing wiper blades
Installing wiper blades
1Cover
2Guide tab
3Attachment
4Tabs
�
Maintaining a tilted position of the
wiper blade, place cover1 onto
attachment3 so that guide tab2 is
under cover1.
�
Tilt the wiper blade in direction of the
arrow towards the wiper arm.
�
Simultaneously press tabs4 together
and let the wiper blade engage into
both recesses of attachment3.
�
Check if the wiper blade is securely
fastened.
�
Fold the wiper arm backward to rest on
the windshield.
Make sure you hold on to the wiper arm
when folding it back.
!Never open the hood when the wiper
arms are folded forward.
Hold on to the wiper when folding the
wiper arm back. If released, the force
of the impact from the tensioning
spring could crack the windshield.
Do not allow the wiper arms to contact
the windshield glass without a wiper
blade inserted.
Make sure the wiper blades are proper-
ly installed. Improperly installed wiper
blades may cause windshield damage.
For your convenience, you should have
this work carried out by an authorized
Mercedes-Benz Center.
Page 423 of 481

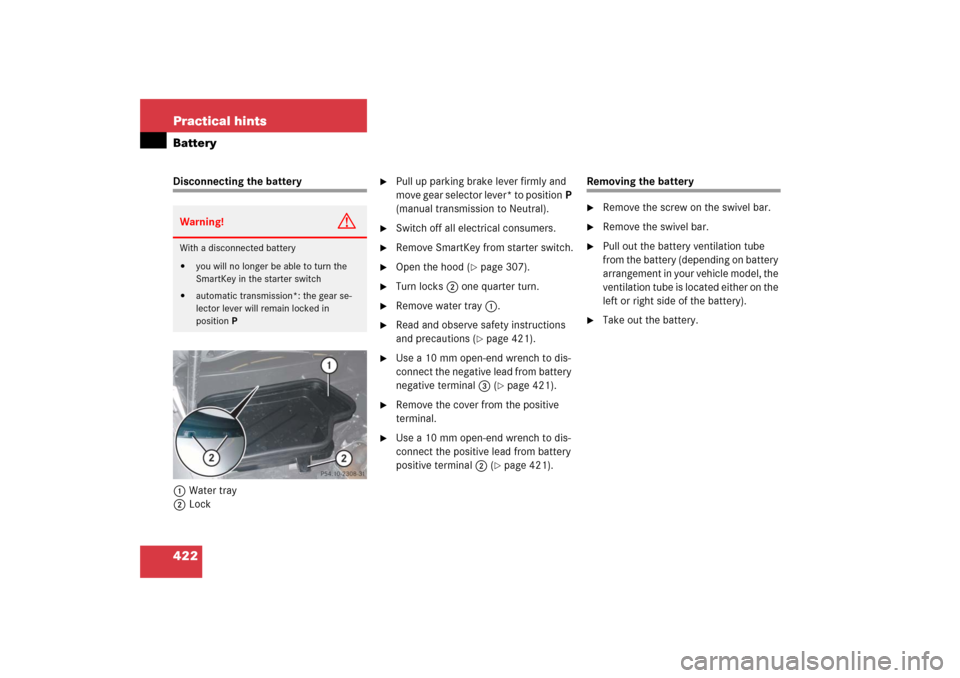
422 Practical hintsBatteryDisconnecting the battery
1Water tray
2Lock
�
Pull up parking brake lever firmly and
m o v e g e a r s e l e c t o r l e v e r * t o p o s i t i o nP
(manual transmission to Neutral).
�
Switch off all electrical consumers.
�
Remove SmartKey from starter switch.
�
Open the hood (
�page 307).
�
Turn locks2 one quarter turn.
�
Remove water tray1.
�
Read and observe safety instructions
and precautions (
�page 421).
�
Use a 10 mm open-end wrench to dis-
connect the negative lead from battery
negative terminal3 (
�page 421).
�
Remove the cover from the positive
terminal.
�
Use a 10 mm open-end wrench to dis-
connect the positive lead from battery
positive terminal2 (
�page 421).
Removing the battery�
Remove the screw on the swivel bar.
�
Remove the swivel bar.
�
Pull out the battery ventilation tube
from the battery (depending on battery
arrangement in your vehicle model, the
ventilation tube is located either on the
left or right side of the battery).
�
Take out the battery.
Warning!
G
With a disconnected battery�
you will no longer be able to turn the
SmartKey in the starter switch
�
automatic transmission*: the gear se-
lector lever will remain locked in
positionP
Page 426 of 481

425 Practical hints
Jump starting
�
Make sure the two vehicles do not
touch.
�
Turn off all electrical consumers.
�
Apply parking brake.
�
Shift gear selector lever* to positionP
(manual transmission to Neutral).
�
Open the hood (
�page 307).
�
Flip up cover from positive under hood
terminal2 in front of water tray1
(�page 422).1Positive terminal of charged battery
2Positive under hood terminal in front of
water tray
3Negative under hood terminal in front
of water tray
4Negative terminal of charged battery
�
Connect positive terminal1 of the
charged battery with positive under
hood terminal2 in front of the water
tray with one jumper cable. Clamp the
cable to positive terminal1 of the
charged battery first.
�
Start the engine of the vehicle with the
charged battery and run at idle speed.
�
Connect negative terminal4 of the
charged battery with negative under
hood terminal3 in front of the water
tray with the second jumper cable.
Clamp the cable to negative
terminal4 of the charged battery
first.
�
Start the engine of the disabled vehi-
cle.
You can now turn on the electrical con-
sumers. Do not turn on the lights under
any circumstances.
�
Remove the jumper cables first from
negative terminals3 and4 and then
from positive terminals2 and1.
You can now turn on the lights.
�
Have the battery checked at the near-
est authorized Mercedes-Benz Center.
Warning!
G
Keep flames or sparks away from battery.
Do not smoke.
Observe all safety instructions and precau-
tions when handling automotive batteries
(�page 314).
!Never invert the terminal connections.
iVehicles with automatic transmission*:
Do not tow-start vehicle.
Page 433 of 481
432 Practical hintsFusesFuse box in engine compartment
The fuse box is located in the engine com-
partment on the driver’s side.
1Fuse box
2Clamp
3Fuse box coverOpening
�
Open the hood (
�page 307).
�
With a dry cloth, remove any moisture
from the fuse box.
�
Release clamps2.
�
Remove fuse box cover3.Closing
�
Make sure the sealing rubber is proper-
ly positioned.
�
Press fuse box cover3 down and se-
cure with clamps2.