Page 383 of 481

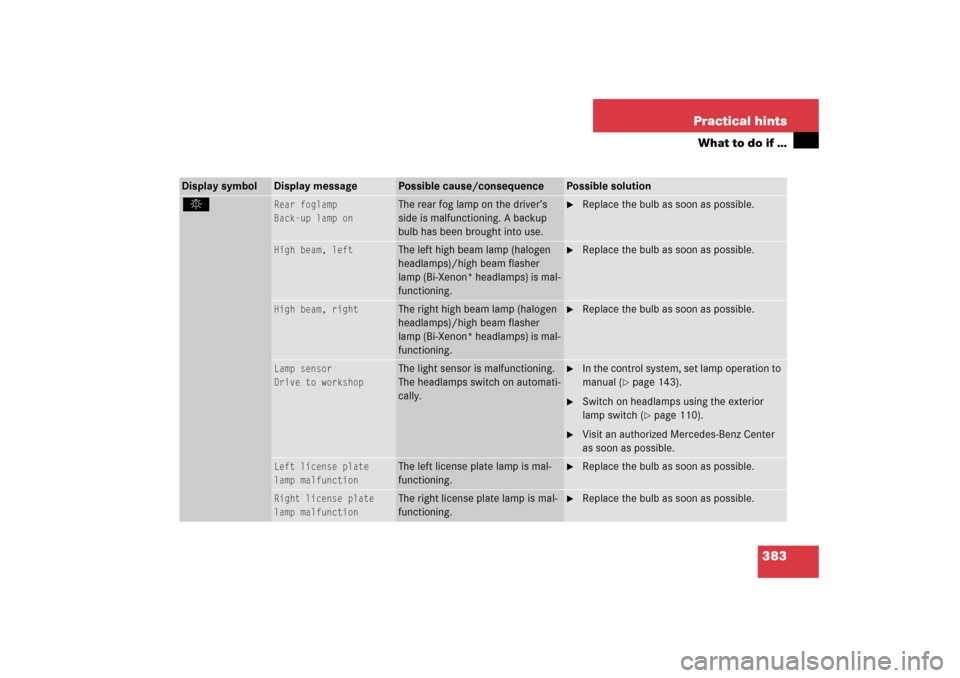
382 Practical hintsWhat to do if …Display symbol
Display message
Possible cause/consequence
Possible solution
.
3rd brake light
The high mounted brake lamp is
malfunctioning. This message will
only appear if a critical number of
LEDs have stopped working.
�
Visit an authorized Mercedes-Benz Center
as soon as possible.
Tail lamp / brake lamp
left
Back-up lamp on
The left tail lamp/brake lamp is
malfunctioning. This message will
only appear if a critical number of
LEDs have stopped working.
A backup bulb has been brought
into use.
�
Visit an authorized Mercedes-Benz Center
as soon as possible.
Tail lamp / brake lamp
right
Back-up lamp on
The right tail lamp/brake lamp is
malfunctioning. This message will
only appear if a critical number of
LEDs have stopped working.
A backup bulb has been brought
into use.
�
Visit an authorized Mercedes-Benz Center
as soon as possible.
Brake lamp
Visit workshop
Brake lamp illumination is delayed
or lamp is permanently on.
�
Visit an authorized Mercedes-Benz Center
as soon as possible.
Front foglamp, L
The left front fog lamp is malfunc-
tioning.
�
Visit an authorized Mercedes-Benz Center
as soon as possible.
Front foglamp, R
The right front foglamp is malfunc-
tioning.
�
Visit an authorized Mercedes-Benz Center
as soon as possible.
Page 384 of 481

383 Practical hints
What to do if …
.
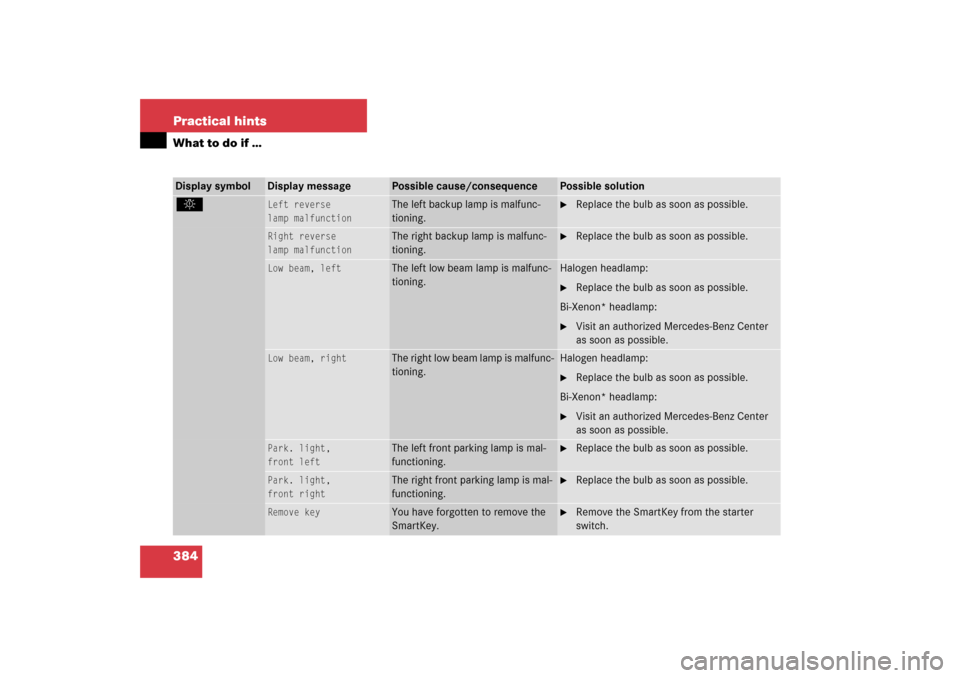
Rear foglamp
Back-up lamp on
The rear fog lamp on the driver’s
side is malfunctioning. A backup
bulb has been brought into use.
�
Replace the bulb as soon as possible.
High beam, left
The left high beam lamp (halogen
headlamps)/high beam flasher
lamp (Bi-Xenon* headlamps) is mal-
functioning.
�
Replace the bulb as soon as possible.
High beam, right
The right high beam lamp (halogen
headlamps)/high beam flasher
lamp (Bi-Xenon* headlamps) is mal-
functioning.
�
Replace the bulb as soon as possible.
Lamp sensor
Drive to workshop
The light sensor is malfunctioning.
The headlamps switch on automati-
cally.
�
In the control system, set lamp operation to
manual (
�page 143).
�
Switch on headlamps using the exterior
lamp switch (
�page 110).
�
Visit an authorized Mercedes-Benz Center
as soon as possible.
Left license plate
lamp malfunction
The left license plate lamp is mal-
functioning.
�
Replace the bulb as soon as possible.
Right license plate
lamp malfunction
The right license plate lamp is mal-
functioning.
�
Replace the bulb as soon as possible.
Display symbol
Display message
Possible cause/consequence
Possible solution
Page 385 of 481

384 Practical hintsWhat to do if ….
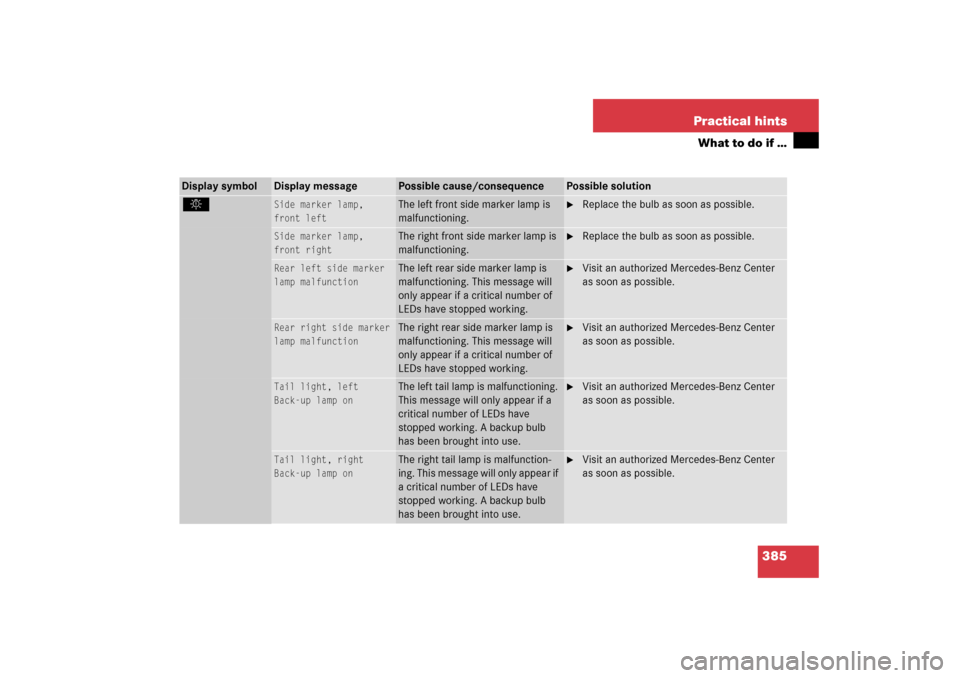
Left reverse
lamp malfunction
The left backup lamp is malfunc-
tioning.
�
Replace the bulb as soon as possible.
Right reverse
lamp malfunction
The right backup lamp is malfunc-
tioning.
�
Replace the bulb as soon as possible.
Low beam, left
The left low beam lamp is malfunc-
tioning.
Halogen headlamp:�
Replace the bulb as soon as possible.
Bi-Xenon* headlamp:
�
Visit an authorized Mercedes-Benz Center
as soon as possible.
Low beam, right
The right low beam lamp is malfunc-
tioning.
Halogen headlamp:�
Replace the bulb as soon as possible.
Bi-Xenon* headlamp:
�
Visit an authorized Mercedes-Benz Center
as soon as possible.
Park. light,
front left
The left front parking lamp is mal-
functioning.
�
Replace the bulb as soon as possible.
Park. light,
front right
The right front parking lamp is mal-
functioning.
�
Replace the bulb as soon as possible.
Remove key
You have forgotten to remove the
SmartKey.
�
Remove the SmartKey from the starter
switch.
Display symbol
Display message
Possible cause/consequence
Possible solution
Page 386 of 481

385 Practical hints
What to do if …
.
Side marker lamp,
front left
The left front side marker lamp is
malfunctioning.
�
Replace the bulb as soon as possible.
Side marker lamp,
front right
The right front side marker lamp is
malfunctioning.
�
Replace the bulb as soon as possible.
Rear left side marker
lamp malfunction
The left rear side marker lamp is
malfunctioning. This message will
only appear if a critical number of
LEDs have stopped working.
�
Visit an authorized Mercedes-Benz Center
as soon as possible.
Rear right side marker
lamp malfunction
The right rear side marker lamp is
malfunctioning. This message will
only appear if a critical number of
LEDs have stopped working.
�
Visit an authorized Mercedes-Benz Center
as soon as possible.
Tail light, left
Back-up lamp on
The left tail lamp is malfunctioning.
This message will only appear if a
critical number of LEDs have
stopped working. A backup bulb
has been brought into use.
�
Visit an authorized Mercedes-Benz Center
as soon as possible.
Tail light, right
Back-up lamp on
The right tail lamp is malfunction-
ing. This message will only appear if
a critical number of LEDs have
stopped working. A backup bulb
has been brought into use.
�
Visit an authorized Mercedes-Benz Center
as soon as possible.
Display symbol
Display message
Possible cause/consequence
Possible solution
Page 387 of 481

386 Practical hintsWhat to do if ….
Turn off
lights
You have forgotten to switch off the
headlamps when exiting the vehicle
and no SmartKey is in the starter
switch.
�
Switch off the headlamps.
Turn signal in
mirror, left
T h e l e f t t u r n s i g n a l i n t h e s i d e m i r r o r
is malfunctioning. This message will
only appear if a critical number of
LEDs have stopped working.
�
Visit an authorized Mercedes-Benz Center
as soon as possible.
Turn signal in
mirror, right
The right turn signal in the side mir-
ror is malfunctioning. This message
will only appear if a critical number
of LEDs have stopped working.
�
Visit an authorized Mercedes-Benz Center
as soon as possible.
Turn signal
,
front left
The left front turn signal is malfunc-
tioning.
�
Replace the bulb as soon as possible.
Turn signal
,
front right
The right front turn signal is mal-
functioning.
�
Replace the bulb as soon as possible.
Rear left turn signal
Back-up lamp on
The left rear turn signal is malfunc-
tioning. A backup bulb has been
brought into use.
�
Replace the bulb as soon as possible.
Rear right turn signal
Back-up lamp on
The right rear turn signal is malfunc-
tioning. A backup bulb has been
brought into use.
�
Replace the bulb as soon as possible.
Display symbol
Display message
Possible cause/consequence
Possible solution
Page 388 of 481
387 Practical hints
What to do if …
Display symbol
Display message
Possible cause/consequence
Possible solution
<
Seat belt system
Visit workshop
The seat belt system is malfunction-
ing.
�
Visit an authorized Mercedes-Benz Center
as soon as possible.
t
Function
Not available
This display appears if buttons
ort on the multifunction steer-
ing wheel is pressed and the vehicle
is not equipped with a telephone*.
Ê
Close trunk lid!
This message will appear whenever
the trunk lid is open.
�
Close the trunk lid.
W
Washer fluid
Top up
The fluid level in the windshield
washer fluid reservoir has dropped
below its minimum mark.
�
Add washer fluid (
�page 315).
Page 401 of 481
400 Practical hintsReplacing bulbsSafe vehicle operation depends on proper
exterior lighting and signaling. It is there-
fore essential that all bulbs and lamp as-
semblies are in good working order at all
times.
Correct headlamp adjustment is extremely
important. Have headlamps checked and
readjusted at regular intervals and when a
bulb has been replaced. See an authorized
Mercedes-Benz Center for headlamp ad-
justment.
iIf the headlamps are fogged up on the
inside as a result of high humidity,
driving the vehicle a short distance with
the lights on should clear up the
fogging.
iBackup bulbs will be brought into use
when lamps malfunction. Observe the
messages in the multifunction display
(�page 382).
Page 411 of 481

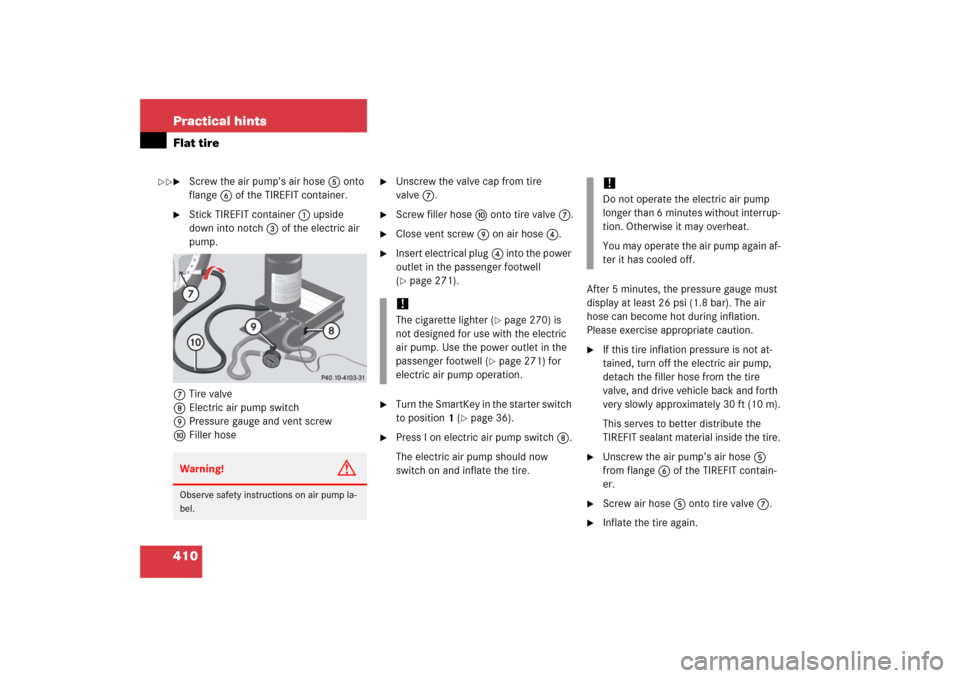
410 Practical hintsFlat tire�
Screw the air pump’s air hose5 onto
flange6 of the TIREFIT container.
�
Stick TIREFIT container1 upside
down into notch3 of the electric air
pump.
7Tire valve
8Electric air pump switch
9Pressure gauge and vent screw
aFiller hose
�
Unscrew the valve cap from tire
valve7.
�
Screw filler hosea onto tire valve7.
�
Close vent screw9 on air hose4.
�
Insert electrical plug4 into the power
outlet in the passenger footwell
(�page 271).
�
Turn the SmartKey in the starter switch
to position1 (
�page 36).
�
Press I on electric air pump switch8.
The electric air pump should now
switch on and inflate the tire.After 5 minutes, the pressure gauge must
display at least 26 psi (1.8 bar). The air
hose can become hot during inflation.
Please exercise appropriate caution.
�
If this tire inflation pressure is not at-
tained, turn off the electric air pump,
detach the filler hose from the tire
valve, and drive vehicle back and forth
very slowly approximately 30 ft (10 m).
This serves to better distribute the
TIREFIT sealant material inside the tire.
�
Unscrew the air pump’s air hose5
from flange6 of the TIREFIT contain-
er.
�
Screw air hose5onto tire valve7.
�
Inflate the tire again.
Warning!
G
Observe safety instructions on air pump la-
bel.
!The cigarette lighter (
�page 270) is
not designed for use with the electric
air pump. Use the power outlet in the
passenger footwell (
�page 271) for
electric air pump operation.
!Do not operate the electric air pump
longer than 6 minutes without interrup-
tion. Otherwise it may overheat.
You may operate the air pump again af-
ter it has cooled off.
��