Page 153 of 480

152 Controls in detailControl systemLighting submenu
Access the
Lighting
submenu via the
Settings
menu. Use the
Lighting
sub-
menu to change the lamp and lighting set-
tings on your vehicle. The following
functions are available:Setting daytime running lamp mode
(USA only)
�
Move the selection marker with button
æ or ç to the
Lighting
sub-
menu.
�
Press button j or k repeatedly
until you see
Light circuit Headlamp
mode
in the multifunction display.
The selection marker is on the current
setting.
�
Press button æ or ç to select
manual operation (
Manual
) or daytime
running lamp mode (
Constant
).
With daytime running lamp mode activated
and the exterior lamp switch at
positionM or U the low beam head-
lamps are switched on when the engine is
running.
In low ambient light conditions the follow-
ing lamps will switch on additionally:
�
Parking lamps
�
Tail lamps
�
License plate lamps
�
Side marker lamps
Function
Page
Setting daytime running lamp
mode (USA only)
152
Setting locator lighting
153
Setting night security illumina-
tion
154
Setting interior lighting delayed
switch-off
155
iThis function is not available in coun-
tries where the daytime running lamp
mode is mandatory and therefore in a
constant mode.
Page 155 of 480

Use this function to set whether you would
like the exterior lamps to illuminate during
d")
154 Controls in detailControl systemSetting night security illumination
(Exterior lamps delayed switch-off)
Use this function to set whether you would
like the exterior lamps to illuminate during
darkness after exiting the vehicle and clos-
ing the doors.
With the delayed switch-off feature activat-
ed and the exterior lamp switch in position
U before the engine is turned off, the
following lamps will switch on when the en-
gine is turned off and remain lit for approx-
imately 15 seconds: �
Parking lamps
�
Tail lamps
�
License plate lamps
�
Side marker lamps
�
Front fog lampsIf after turning off the engine you do not
open a door or do not close an opened
door, the lamps will switch off automatical-
ly after 60 seconds.
�
Move the selection marker with button
æ or ç to the
Lighting
sub-
menu.
�
Press button j or k repeatedly
until you see
Headlamps delayed
switch-off in the multifunction dis-
play.
The selection marker is on the current
setting.
�
Press button æ or ç to switch
the delayed switch-off feature
On or
Off
.
�
Turn the exterior lamp switch to posi-
tion U before turning off the engine
(�page 49).
You can temporarily deactivate the de-
layed switch-off feature:
�
Before exiting the vehicle turn the
SmartKey in the starter switch to
position0.
�
Then turn it to position2 and back
to0.
The delayed switch-off feature is deac-
tivated. It will reactivate as soon as you
reinsert the SmartKey in the starter
switch.
iYou can reactivate this function within
10 minutes by opening a door.
Page 165 of 480

164 Controls in detailAutomatic transmissionGear selector lever position
Effect
ì
Park position
Gear selector lever position
when the vehicle is parked. Place
gear selector lever in positionP
only when vehicle is stopped.
The park position is not intended
to serve as a brake when the
vehicle is parked. Rather, the
driver should always set the
parking brake in addition to
placing the gear selector lever in
positionP to secure the vehicle.
EffectThe SmartKey can only be
removed from the starter switch
with the gear selector lever in
positionP. With the SmartKey
removed, the gear selector lever
is locked in positionP.
í
Reverse gear
Place gear selector lever in
positionR only when vehicle is
stopped.
Effect
ë
Neutral
No power is transmitted from the
engine to the drive axle. When
the brakes are released, the
vehicle can be moved freely
(pushed or towed).
To avoid damage to the trans-
mission, never engageN while
driving.
If the ESP
® is deactivated or
malfunctioning:
Move gear selector lever toN
only if the vehicle is in danger of
skidding, e.g. on icy roads.
ê
Drive
The transmission shifts
automatically. All forward gears
are available.
Page 202 of 480

201 Controls in detail
Retractable hardtop
�
The hardtop drive system has shut it-
self down. For safety reasons, no more
than five consecutive attempts may be
made to raise or lower the hardtop.�
After about 10 minutes you may
again attempt to open or close the
retractable hardtop.
If the indicator lamp in the retractable
hardtop switch flashes when starting off or
while driving and you hear a warning sound
for a maximum of 10 seconds, the retract-
able hardtop is not locked.
�
Properly lock the retractable hardtop
(�page 198) before continuing to
drive.
If the indicator lamp continues to flash af-
ter you have carried out the above actions,
there is a malfunction.
�
Have the retractable hardtop system
checked at an authorized
Mercedes-Benz Center.Indicator lamp in the retractable hard-
top switch is on when vehicle is stopped
If the indicator lamp in the retractable
hardtop switch comes on while the vehicle
is standing still and the switch was not ac-
tivated, then the retractable hardtop is not
locked.
�
Properly lock the retractable hardtop
(�page 198) before continuing to
drive.
The retractable hardtop will not lock
There is a malfunction in the retractable
hardtop system.
�
Notify an authorized Mercedes-Benz
Center.Wind screen
The wind screen deflects drafts away from
the driver and passenger when the hardtop
is lowered. It is stored in a separate stor-
age bag.
Installing
�
Leave the wind screen folded and place
it on the roll bar.Warning!
G
The wind screen can restrict the driver’s vi-
sion to the rear of the vehicle. To prevent a
possible accident when visibility is limited
(e.g. in darkness), the upper part of the wind
screen should be folded back.
Page 229 of 480
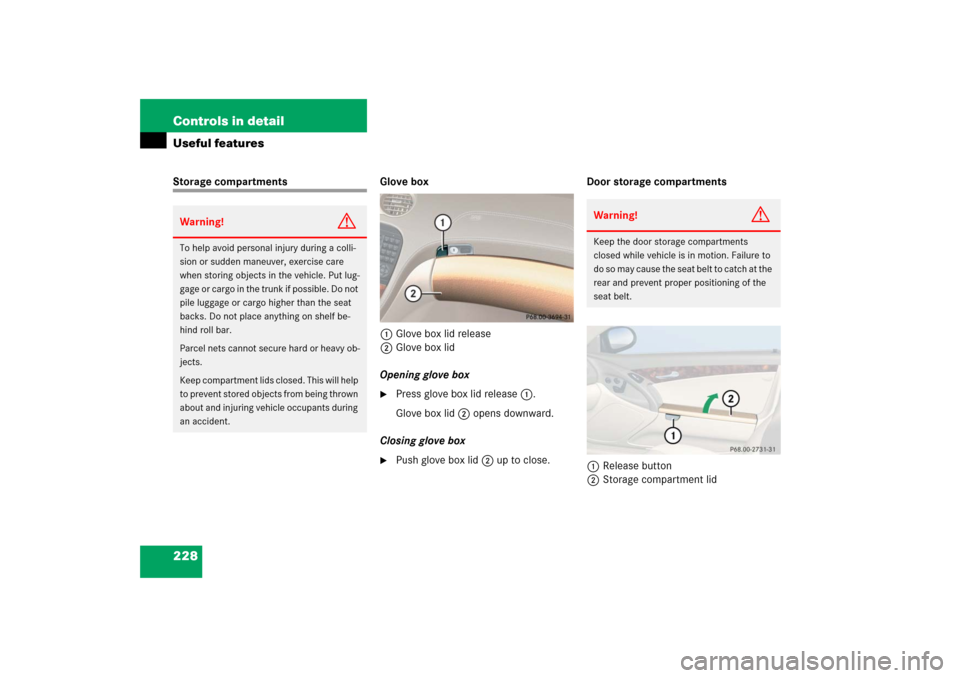
228 Controls in detailUseful featuresStorage compartments Glove box
1Glove box lid release
2Glove box lid
Opening glove box
�
Press glove box lid release1.
Glove box lid 2 opens downward.
Closing glove box
�
Push glove box lid 2 up to close.Door storage compartments
1Release button
2Storage compartment lid
Warning!
G
To help avoid personal injury during a colli-
sion or sudden maneuver, exercise care
when storing objects in the vehicle. Put lug-
gage or cargo in the trunk if possible. Do not
pile luggage or cargo higher than the seat
backs. Do not place anything on shelf be-
hind roll bar.
Parcel nets cannot secure hard or heavy ob-
jects.
Keep compartment lids closed. This will help
to prevent stored objects from being thrown
about and injuring vehicle occupants during
an accident.
Warning!
G
Keep the door storage compartments
closed while vehicle is in motion. Failure to
do so may cause the seat belt to catch at the
rear and prevent proper positioning of the
seat belt.
Page 232 of 480

231 Controls in detail
Useful features
Parcel net in passenger footwell
A small convenience parcel net is located
in the passenger footwell. It is for small
and light items, such as road maps, mail,
etc.Parcel net in trunk
There are three nets available in the trunk
to secure loads:
�
a pocket net on each side of the right
and left trunk side walls
�
a trunk floor net
�
Pull the trunk floor net from the trunk
back wall towards the front over the
luggage.
�
Hang the hooks of the net on the eyes
on the trunk floor.Luggage compartment in the rear
Warning!
G
The parcel net is intended for storing
light-weight items only.
Heavy objects, objects with sharp edges or
fragile objects may not be transported in the
parcel net. In an accident, during hard brak-
ing, or sudden maneuvers, they could be
thrown around inside the vehicle and cause
injury to vehicle occupants.
The parcel net cannot protect transported
goods in the event of an accident.
Warning!
G
Secure all pieces of luggage in the rear with
the luggage straps. Unsecured pieces of lug-
gage can otherwise cause injury during a
braking maneuver and can increase the risk
of injury in an accident.
Never allow anyone to ride in the rear.
The luggage straps can only secure light lug-
gage items. Carry heavy pieces of luggage in
the trunk.
The rear compartment area is not designed
or intended to accommodate occupants. Se-
vere personal injury or death may be the re-
sult in an accident.
Page 233 of 480

232 Controls in detailUseful features1Holder
2Strap
3Latch
4Release button
�
Pull strap2 out of holder1.
�
Secure the luggage with the strap so
that it cannot move.
�
Insert strap2 into latch3.
Releasing strap
�
Press release button4 and guide
strap2 back to holder1.
Cup holders
Warning!
G
The shelf below the rear window should not
be used to carry objects. This will avoid such
objects from being thrown about and injur-
ing vehicle occupants during an accident or
sudden maneuver.
The trunk is the preferred place to carry ob-
jects.
Warning!
G
In order to help prevent spilling liquids on
vehicle occupants and/or vehicle equip-
ment, only use containers that fit into the
cup holder. Use lids on open containers and
do not fill containers to a height where the
contents, especially hot liquids, could spill
during braking, vehicle maneuvers, or in an
accident. Liquids spilled on vehicle occu-
pants may cause serious personal injury.
Liquids spilled on vehicle equipment may
cause damage not covered by the
Mercedes-Benz Limited Warranty.
When not in use, keep the cup holder
closed. An open cup holder may cause injury
to or others when contacted during braking,
vehicle maneuvers, or in an accident.
Page 234 of 480

233 Controls in detail
Useful features
1Left cup holder
2Right cup holder
Opening�
Briefly press cup holder cover.
The cup holder opens automatically.
Ashtray
1Cover plate
2Sliding knob
Opening ashtray�
Briefly touch cover plate1.
The ashtray opens automatically.
Closing ashtray
�
Press cover plate1 down until it
latches.Removing the ashtray insert
�
Secure vehicle from movement by set-
ting the parking brake. Move the gear
selector lever to positionN.
Now you have more room to take out
the insert.
�
Press sliding knob2 to the right.
The insert will eject a short distance.
Replacing the ashtray insert
�
Press the insert into the frame until it
snaps into place.
Keep in mind that objects placed in the cup
holder may come lose during braking, vehi-
cle maneuvers, or in an accident and be
thrown around in the vehicle interior. Ob-
jects thrown around in the vehicle interior
may cause an accident and/or serious per-
sonal injury.
Warning!
G
Remove ashtray only with vehicle standing
still. Set the parking brake to secure vehicle
from movement. Move gear selector lever to
positionN. With gear selector lever in
positionN, turn off the engine.