Page 347 of 480
346 Practical hintsWhat to do if …On the pages that follow, you will find a
compilation of the most important warning
and malfunction messages that may ap-
pear in the multifunction display.
For your convenience the messages are di-
vided into two sections:�
Text messages (
�page 347)
�
Symbol messages (
�page 359)
iSwitching on the ignition causes all in-
strument cluster lamps (except high
beam headlamp indicator lamp and
turn signal indicator lamps unless acti-
vated) as well as the multifunction dis-
play to come on. Make sure the lamps
and the multifunction display are in
working order before starting your jour-
ney.
Page 376 of 480

375 Practical hints
What to do if …
Left display
Right display
Possible cause/consequence
Possible solution
.
Brake lamp
Right
Substitute
bulb on
The right brake lamp is malfunction-
ing. A substitute bulb has been
brought into use.
�
Visit an authorized Mercedes-Benz Center as
soon as possible.
Brake lamp
!
Drive to
workshop!
Brake lamp illumination is delayed
or lamp is permanently on.
�
Visit an authorized Mercedes-Benz Center as
soon as possible.
Front foglamp
Left
The left front fog lamp is malfunc-
tioning.
�
Replace the bulb as soon as possible.
Front foglamp
Right
The right front fog lamp is malfunc-
tioning.
�
Replace the bulb as soon as possible.
High beam
Left
The left high beam lamp is malfunc-
tioning.
�
Replace the bulb as soon as possible.
High beam
Right
The right high beam lamp is mal-
functioning.
�
Replace the bulb as soon as possible.
Left turn signal
Mirror
The left turn signal in the side mirror
is malfunctioning. This message will
only appear if all light emitting di-
odes have stopped working.
�
Have the LEDs replaced as soon as possible.
Page 393 of 480
392 Practical hintsReplacing bulbsFront lamps Rear lamps
Lamp
Type
1
Additional turn signal
LED
2
Turn signal lamp
1156 NA
3
Low beam
1
1Vehicles with Bi-Xenon* headlamps: Low beam
and high beam use the same D2S-35W lamp. Do
not replace the Xenon and Bi-Xenon* bulbs your-
self. Contact an authorized Mercedes-Benz Center.
D2S-35 W
4
Xenon headlamps:
High beam, high beam
flasher
H7 (55 W)
Bi-Xenon head-
lamps*:
High beam flasher
H7 (55 W)
Parking and standing
lamps
W 5 W
5
Fog lamp, Corner-illu-
minating front fog
lamp*
HB4 (51 W)
6
Side marker lamp
W 5 W
Lamp
Type
7
Rear fog lamp
(driver’s side only);
replacement
P 21 W
1156/32 cp
8
High mounted brake
lamp
LED
9
Backup lamp;
replacement
P 21 W
1156/32 cp
a
Tail, parking and
standing lamp, side
marker lamp
LED
b
Tail, parking and
standing lamp, brake
lamp
LED
c
License plate lamps
C 5 W
d
Turn signal lamp;
replacement
P 21 W
1156/32 cp
Page 394 of 480

393 Practical hints
Replacing bulbs
Notes on bulb replacement�
Only use 12-volt bulbs of the same type
and with the specified watt rating.
�
Switch the lights off before changing a
bulb to prevent short circuits.
�
Always use a clean lint-free cloth when
handling bulbs.
�
Your hands should be dry and free of oil
and grease.
�
If the newly installed bulb does not
come on, visit an authorized
Mercedes-Benz Center.Have the LEDs and bulbs for the following
lamps replaced by an authorized
Mercedes-Benz Center:
�
the additional turn signals in the exteri-
or rear view mirrors
�
the high mounted brake lamp
�
the brake lamps
�
the parking lamps and the side marker
lamps in the tail lamp unit
�
the rear fog lamps
�
the low beam (Xenon or Bi-Xenon*)
lamps
�
the front fog lamps
�
the front side marker lamps
Warning!
G
Bulbs and bulb sockets can be very hot. Al-
low the lamp to cool down before changing
a bulb.
Keep bulbs out of reach of children.
Halogen lamps contain pressurized gas. A
bulb can explode if you:�
touch or move it when hot
�
drop the bulb
�
scratch the bulb
Wear eye and hand protection.
Because of high voltage in Xenon lamps, it is
dangerous to replace the bulb or repair the
lamp and its components. We recommend
that you have such work done by a qualified
technician.
iHave the headlamp adjustment
checked regularly.
Page 395 of 480

394 Practical hintsReplacing bulbsReplacing bulbs for front lamps
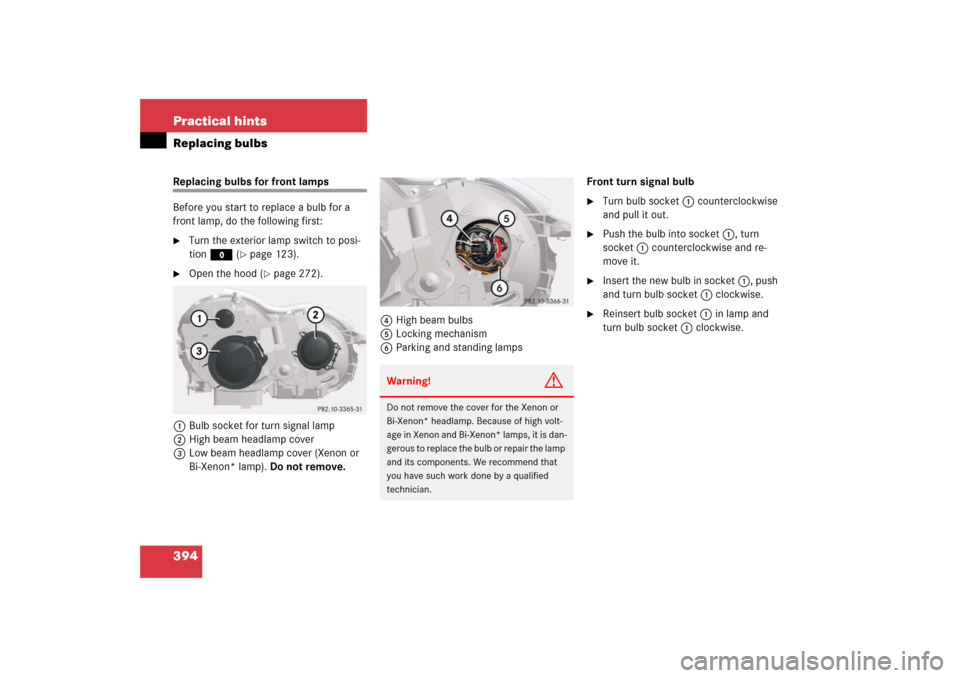
Before you start to replace a bulb for a
front lamp, do the following first:�
Turn the exterior lamp switch to posi-
tion M (
�page 123).
�
Open the hood (
�page 272).
1Bulb socket for turn signal lamp
2High beam headlamp cover
3Low beam headlamp cover (Xenon or
Bi-Xenon* lamp). Do not remove.4High beam bulbs
5Locking mechanism
6Parking and standing lampsFront turn signal bulb
�
Turn bulb socket 1 counterclockwise
and pull it out.
�
Push the bulb into socket 1, turn
socket 1 counterclockwise and re-
move it.
�
Insert the new bulb in socket 1, push
and turn bulb socket 1 clockwise.
�
Reinsert bulb socket 1 in lamp and
turn bulb socket 1 clockwise.
Warning!
G
Do not remove the cover for the Xenon or
Bi-Xenon* headlamp. Because of high volt-
age in Xenon and Bi-Xenon* lamps, it is dan-
gerous to replace the bulb or repair the lamp
and its components. We recommend that
you have such work done by a qualified
technician.
Page 396 of 480

395 Practical hints
Replacing bulbs
High beam/ high beam flasher bulbs�
Press ends of headlamp cover tab to-
gether and remove high beam head-
lamp cover 2.
�
Pull the electrical connector off.
�
Turn locking mechanism 5 counter-
clockwise and take out the bulb.
�
Insert the new bulb so that the base lo-
cates in the recess on the holder.
�
Turn locking mechanism 5 clockwise.
�
Plug the connector onto the bulb.
�
Align high beam headlamp cover 2
and click it into place.Parking and standing lamp bulbs
�
Press ends of cover tab together and
remove high beam headlamp cover 2.
�
Pull out bulb socket 6 with the bulb.
�
Pull the bulb out of bulb socket 6.
�
Insert a new bulb in bulb socket 6.
�
Reinstall bulb socket 6.
�
Align high beam headlamp cover 2
and click it into place.Additional turn signal lamp bulbs
The additional turn signal lamps in the
exterior rear view mirrors have LEDs.
If a malfunction occurs or LEDs fail to func-
tion, the entire turn signal unit must be re-
placed. Have the turn signal unit replaced
by an authorized Mercedes-Benz Center.
Front side marker lamp bulbs
Since replacing the side marker lamp bulbs
is a technically highly demanding process,
we recommend you have the side marker
lamp bulbs replaced by an authorized
Mercedes-Benz Center.
Page 454 of 480

453 Technical terms
ABS
(A
ntilock B
rake S
ystem)
Prevents the wheels from locking up
during braking so that the vehicle can
continue to be steered.
ABC
(A
ctive B
ody C
ontrol)
Active, computer-controlled system
that hydraulically adjusts the suspen-
sion at all four wheels in response to
various driving situations.
Accessory weight
(
�page 310)
Air pressure
(�page 310)
Alignment bolt
Metal pin with thread. The alignment
bolt, or centering bolt, is an aid used
when changing a tire to align the wheel
with the wheel hub.
Aspect ratio
(�page 310)BabySmart
TM airbag deactivation
system
This system detects if a special system
compatible child restraint seat is in-
stalled on the front passenger seat. The
system will automatically deactivate
the passenger front airbag when such a
seat is properly installed (indicator
lamp 7 on the glove box comes on
and remains illuminated).
BabySmartTM compatible child seats
Special restraint system for children.
The sensor system for the passenger
seat prevents deployment of the pas-
senger front airbag if a BabySmart
TM
compatible child seat is installed. See
your authorized Mercedes-Benz Center
for availability.
Bar
(
�page 310)BAS
(B
rake A
ssist S
ystem)
System for potentially reducing braking
distances in emergency braking situa-
tions. The system is activated when it
senses an emergency based on how
fast the brake is applied.
Bead
(
�page 310)
Bi-Xenon headlamps*
Headlamps which use an electric arc as
the light source and produce a more in-
tense light than filament headlamps.
Bi-Xenon headlamps produce low
beam and high beam.
CAC
(Customer A
ssistance C
enter)
Mercedes-Benz customer service cen-
ter, which can help you with any ques-
tions about your vehicle and provide
assistance in the event of a break-
down.
Page 464 of 480

463 Index
C
CAC 453
California retail buyers and lessees, impor-
tant notice for 11
Call priority, Tele Aid 244
CAN System 454
Capacities and recommended
fuel/lubricants 445
Cargo area see Trunk
Carpets, cleaning 330
Catalytic converter 267
CD changer 142
CD player 142
Operating 142
Center console
Lower part 30
Upper part 29
Central locking
Automatic 112, 155
Central locking/unlocking switch 29,
113
Locking/unlocking from inside 113
Certification label 430
Check engine see Lamps, indicator and
warningChildren in the vehicle
Airbags 66
Indicator lamp, front passenger front
airbag 78
Infant and child restraint systems 64,
76
Cigarette lighter 234
Clock 23, 150
Cockpit 22, 454
Cockpit Management and Data System
see COMAND system
Cold tire inflation pressure 310, 454
Collapsible tire 454
COMAND system 29, 454
Driving instructions 266
Combination switch
High beam 53, 129
Turn signals 53
Windshield wipers 54
Consumer battery 279
Control and operation of radio
transmitters 266
Control system 135, 138, 454Control system menus
AUDIO 141
NAV 143
Settings 146
Standard display 140
TEL* 159
Trip computer 157
Vehicle status message memory 144
Control system submenus 139
Convenience 156
Instrument cluster 149
Lighting 152
Time 150
Vehicle 155
Controller Area Network see CAN System
Convenience feature 200
Coolant 450
Anticorrosion/antifreeze mixing ratio
and quantity 451
Checking coolant level 278
Coolant warning lamp 336
Messages in the multifunction
display 365, 366, 367, 368
Temperature 268
Temperature gauge 133