Page 197 of 480
196 Controls in detailRetractable hardtopLuggage cover
The luggage cover is located in the trunk.
1Handle
2Holders
Closing luggage cover�
Pull out the luggage cover using
handle1.
�
Hook the luggage cover into left and
right side holders2.Opening luggage cover
�
Unhook luggage cover from side hold-
ers.
�
While holding on to handle1, guide
luggage cover back into its storage
compartment. Opening the retractable hardtop with
the switch
Hardtop switchBefore pulling on the hardtop switch, you
must make sure�
the parking brake is engaged
(�page 51)
�
the luggage cover is closed, see Lug-
gage cover
�
the trunk lid is closed
�
the ignition is switched on
!To prevent damage to the hardtop or
luggage/cargo when lowering the roof:�
Load trunk only to the height of the
luggage cover.
�
Do not permit luggage/cargo to
push up the closed luggage cover.
�
Do not load anything on top of or in
front of the luggage cover.
�
Do not place anything on the shelf
behind the roll bar.
Page 220 of 480

The ABC system automatically selects the
optimum suspension tuning and ride
height for your vehicle.
Suspension tuning
The suspension")
219 Controls in detail
Driving systems
Active Body Control (ABC)
The ABC system automatically selects the
optimum suspension tuning and ride
height for your vehicle.
Suspension tuning
The suspension tuning is set according to:�
Your driving style
�
Road surface conditions
�
The vehicle loading
�
Your choice of suspension style
You can set the following suspension
styles:
�
Regular (Comfort)
�
SportyThe ABC button with the indicator lamp is
located in the lower section of the center
console.
1ABC button
2Indicator lamp
�
Start the engine (
�page 49).Suspension for sporty driving style
The setting for sporty driving is selected
when indicator lamp2 is illuminated.
�
Press button1.
Indicator lamp2 comes on.
The message
ABC Active Body Con-
trol SPORT appears in the multifunc-
tion display for a short time.
Suspension for regular driving style
The setting for regular driving is selected
when the indicator lamp2 is off.
�
Press button1.
Indicator lamp2 goes out.
The message
ABC Active Body Con-
trol COMFORT appears in the multifunc-
tion display for a short time.
iThe selected setting is stored, even if
the engine is turned off.
Page 221 of 480
220 Controls in detailDriving systemsVehicle level controlYour vehicle automatically adjusts its ride
height to:
�
increase vehicle safety
�
reduce fuel consumption
The vehicle chassis ride height is raised or
lowered according to the selected level
setting and to the vehicle speed:
�
With increasing speed, ride height is re-
duced by up to approximately 1 inch
(25 mm).
�
With decreasing speed, the ride height
is again raised to the selected vehicle
level.Select the level 1 and level 2 settings only
when required by current driving condi-
tions. Otherwise:
�
Fuel consumption may increase.
�
Handling may be impaired.
Warning!
G
To help avoid personal injury, keep hands
and feet away from wheel housing area, and
stay away from under the vehicle when low-
ering the vehicle chassis.
iThese height adjustments are so small
that you may not notice any change.
Page 222 of 480
221 Controls in detail
Driving systems
The following vehicle level settings can be
selected when the vehicle is stationary:Vehicle level when
stationary
Use for
Height increase over
normal
Automatic lowering
Indicator lamps
(�page 222)
Normal
Normal operation
None
Max. approx. 0.5 in (12 mm)
Both lamps off
Level 1
Driving with snow chains
(�page 317)
Max. 0.6 in (15 mm)
1
Max. approx. 0.6 in (15 mm)
One lamp on
Level 2
Very rough road surface
conditions
Max. 1.0 in (25 mm)
1
Max. approx. 1.0 in (25 mm)
Both lamps on
1Dependent on loading
Page 225 of 480
224 Controls in detailDriving systemsRange of the sensors
To function properly, the sensors must be
free of dirt, ice snow and slush. Clean the
sensors regularly, being careful not to
scratch or damage the sensors, see
“Cleaning the Parktronic system* sensors”
(�page 326).
Front sensors
Rear sensors
Center
approx. 40 in (100 cm)
Corners
approx. 24 in (60 cm)
Center
approx. 48 in (120 cm)
Corners
approx. 32 in (80 cm)
!During parking maneuvers, pay special
attention to objects located above or
below the height of the sensors (e.g.
planters or trailer hitches).
The Parktronic system will not detect
such objects at close range and dam-
age to your vehicle or the object may
result.
Ultrasonic signals from outside sourc-
es (e.g. truck air brakes, car wash, or
jackhammers) may impair the opera-
tion of the Parktronic system.
Page 233 of 480

232 Controls in detailUseful features1Holder
2Strap
3Latch
4Release button
�
Pull strap2 out of holder1.
�
Secure the luggage with the strap so
that it cannot move.
�
Insert strap2 into latch3.
Releasing strap
�
Press release button4 and guide
strap2 back to holder1.
Cup holders
Warning!
G
The shelf below the rear window should not
be used to carry objects. This will avoid such
objects from being thrown about and injur-
ing vehicle occupants during an accident or
sudden maneuver.
The trunk is the preferred place to carry ob-
jects.
Warning!
G
In order to help prevent spilling liquids on
vehicle occupants and/or vehicle equip-
ment, only use containers that fit into the
cup holder. Use lids on open containers and
do not fill containers to a height where the
contents, especially hot liquids, could spill
during braking, vehicle maneuvers, or in an
accident. Liquids spilled on vehicle occu-
pants may cause serious personal injury.
Liquids spilled on vehicle equipment may
cause damage not covered by the
Mercedes-Benz Limited Warranty.
When not in use, keep the cup holder
closed. An open cup holder may cause injury
to or others when contacted during braking,
vehicle maneuvers, or in an accident.
Page 273 of 480
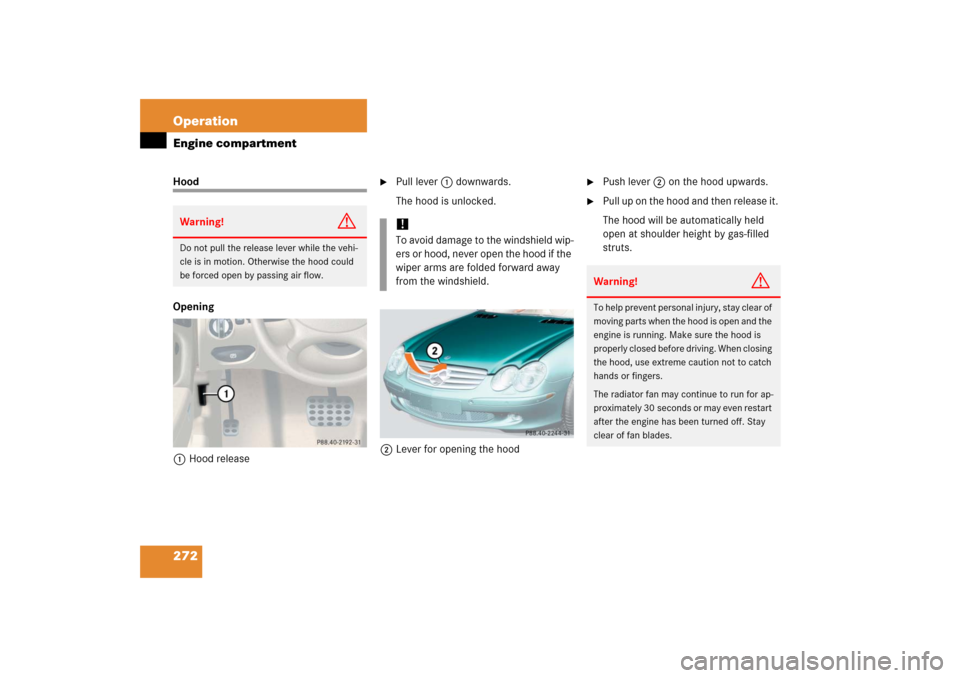
272 OperationEngine compartmentHood
Opening
1Hood release
�
Pull lever1 downwards.
The hood is unlocked.
2Lever for opening the hood
�
Push lever2 on the hood upwards.
�
Pull up on the hood and then release it.
The hood will be automatically held
open at shoulder height by gas-filled
struts.
Warning!
G
Do not pull the release lever while the vehi-
cle is in motion. Otherwise the hood could
be forced open by passing air flow.
!To avoid damage to the windshield wip-
ers or hood, never open the hood if the
wiper arms are folded forward away
from the windshield.
Warning!
G
To help prevent personal injury, stay clear of
moving parts when the hood is open and the
engine is running. Make sure the hood is
properly closed before driving. When closing
the hood, use extreme caution not to catch
hands or fingers.
The radiator fan may continue to run for ap-
proximately 30 seconds or may even restart
after the engine has been turned off. Stay
clear of fan blades.
Page 274 of 480
.
The hood will lock audibly.
�
Check to make sure the hood is fully
closed.
If you can r")
273 Operation
Engine compartment
Closing�
Let the hood drop from a height of ap-
proximately 1
1/2ft (50 cm).
The hood will lock audibly.
�
Check to make sure the hood is fully
closed.
If you can raise the hood at a point
above the headlamps, then it is not
properly closed. Open it again and let it
drop with somewhat greater force.
Warning!
G
If you see flames or smoke coming from the
engine compartment, or if the coolant tem-
perature gauge indicates that the engine is
overheated, do not open the hood. Move
away from the vehicle and do not open the
hood until the engine has cooled. If neces-
sary, call the fire department.
Warning!
G
The engine is equipped with a transistorized
ignition system. Because of the high voltage
it is dangerous to touch any components (ig-
nition coils, spark plug sockets, diagnostic
socket) of the ignition system�
with the engine running
�
while starting the engine
�
if ignition is “on” and the engine is
turned manually
Warning!
G
Be careful that you do not close the hood on
anyone.