Page 400 of 480

399 Practical hints
Flat tire
�Flat tire
Your SL 55 AMG with Performance
Package* and SL 65 AMG are equipped
with a TIREFIT kit.Preparing the vehicle�
Park the vehicle in a safe distance from
moving traffic on a hard, flat surface
when possible.
�
Turn on the hazard warning flashers.
�
Turn the steering wheel so that the
front wheels are in a straight ahead po-
sition.
�
Set the parking brake.
�
Move the gear selector lever to P.
Vehicles with SmartKey:
�
Turn off the engine (
�page 60).
�
Remove the SmartKey from the starter
switch.Vehicles with KEYLESS-GO*:
�
Turn off the engine by pressing the
KEYLESS-GO* button on the gear se-
lector lever once (
�page 60).
�
Open the driver’s door (this puts the
starter switch in position 0, same as
with the SmartKey removed from the
starter switch). The driver’s door then
can be closed again.
�
Have any passenger exit the vehicle at
a safe distance from the roadway.
Sealing tires with TIREFIT
Small tire punctures, particularly those in
the tread, can be sealed with TIREFIT.
TIREFIT can be used in ambient tempera-
tures down to -4°F (-20°C).
iOpen door only when conditions are
safe to do so.
iSL 55 AMG with Performance
Package* and SL 65 AMG only.Warning!
G
Keep TIREFIT away from sparks, open flame
or heat source.
Do not smoke.
Page 406 of 480

405 Practical hints
Flat tire
�
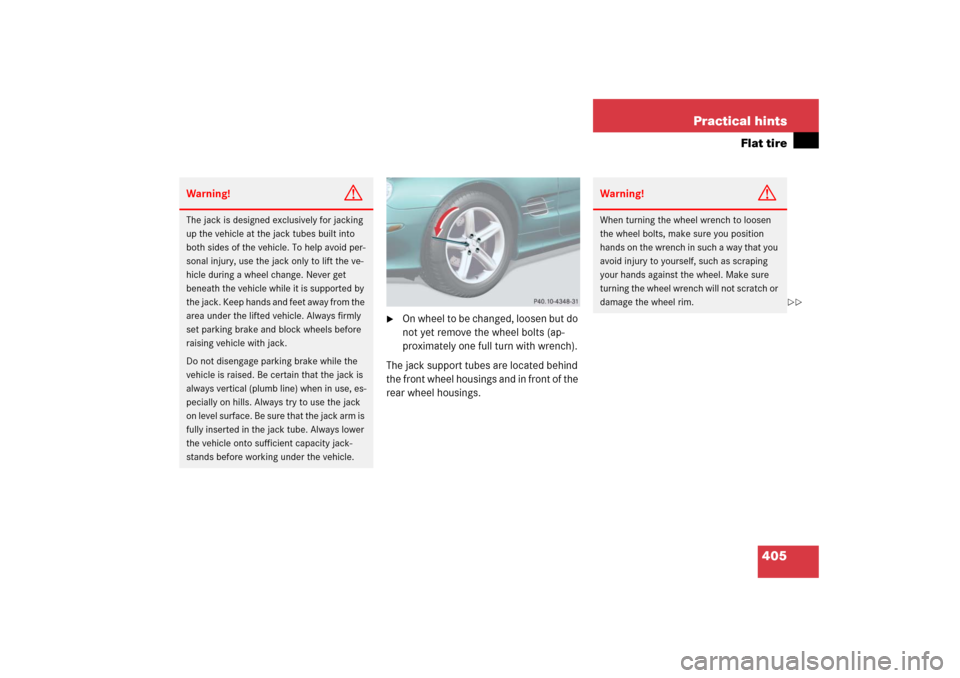
On wheel to be changed, loosen but do
not yet remove the wheel bolts (ap-
proximately one full turn with wrench).
The jack support tubes are located behind
the front wheel housings and in front of the
rear wheel housings.
Warning!
G
The jack is designed exclusively for jacking
up the vehicle at the jack tubes built into
both sides of the vehicle. To help avoid per-
sonal injury, use the jack only to lift the ve-
hicle during a wheel change. Never get
beneath the vehicle while it is supported by
the jack. Keep hands and feet away from the
area under the lifted vehicle. Always firmly
set parking brake and block wheels before
raising vehicle with jack.
Do not disengage parking brake while the
vehicle is raised. Be certain that the jack is
always vertical (plumb line) when in use, es-
pecially on hills. Always try to use the jack
on level surface. Be sure that the jack arm is
fully inserted in the jack tube. Always lower
the vehicle onto sufficient capacity jack-
stands before working under the vehicle.
Warning!
G
When turning the wheel wrench to loosen
the wheel bolts, make sure you position
hands on the wrench in such a way that you
avoid injury to yourself, such as scraping
your hands against the wheel. Make sure
turning the wheel wrench will not scratch or
damage the wheel rim.
��
Page 417 of 480

416 Practical hintsBatteries�
Depress the parking brake pedal.
�
Open the trunk.
�
Read and observe safety instructions
and precautions (
�page 279).
�
Unhook the luggage cover in the trunk.
�
Remove the trunk floor.
The battery for electrical consumers is
located in the right hand area of the
trunk (
�page 383).
�
Use the 10 mm open-end wrench from
the vehicle tool kit to disconnect the
negative lead from negative
terminal4 of the consumer battery
(�page 413).
�
Open the hood (
�page 272).
�
Use the 10 mm open-end wrench from
the vehicle tool kit to disconnect the
negative lead from negative
terminal2 of the starter battery
(�page 413).
�
Remove the covers from the positive
terminals 1 and 3 (
�page 413).
�
Disconnect the positive lead from pos-
itive terminal 3 of the consumer bat-
tery (
�page 413).
�
Disconnect the positive lead from pos-
itive terminal 1 of the starter battery
(�page 413).
Removing the batteries
Removing the consumer battery�
Remove the screws securing the bat-
tery in the trunk.
�
Remove the battery support and
bracket.
�
Pull out the battery ventilation tube
from the battery.
Depending on battery arrangement in
your vehicle model, the ventilation tube
is located either on the left or right side
of the battery.
�
Take out the battery.
��
Page 421 of 480

420 Practical hintsJump startingThe starter battery is located on the right
side of the engine compartment.�
Make sure the two vehicles do not
touch.
�
Turn off all electrical consumers.
�
Apply the parking brake (
�page 59).
�
Shift gear selector lever to positionP.
�
Open the hood (
�page 272).
�
Remove the red cover from positive ter-
minal on both vehicles (
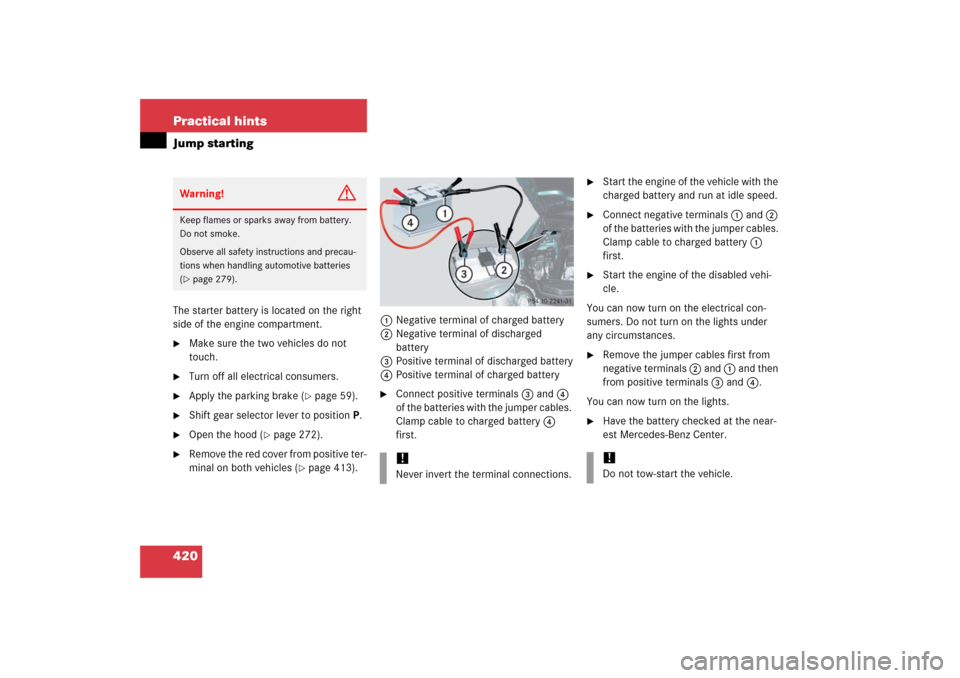
�page 413).1Negative terminal of charged battery
2Negative terminal of discharged
battery
3Positive terminal of discharged battery
4Positive terminal of charged battery
�
Connect positive terminals 3 and 4
of the batteries with the jumper cables.
Clamp cable to charged battery 4
first.
�
Start the engine of the vehicle with the
charged battery and run at idle speed.
�
Connect negative terminals 1 and 2
of the batteries with the jumper cables.
Clamp cable to charged battery 1
first.
�
Start the engine of the disabled vehi-
cle.
You can now turn on the electrical con-
sumers. Do not turn on the lights under
any circumstances.
�
Remove the jumper cables first from
negative terminals 2 and 1 and then
from positive terminals 3 and 4.
You can now turn on the lights.
�
Have the battery checked at the near-
est Mercedes-Benz Center.
Warning!
G
Keep flames or sparks away from battery.
Do not smoke.
Observe all safety instructions and precau-
tions when handling automotive batteries
(�page 279).
!Never invert the terminal connections.
!Do not tow-start the vehicle.
Page 472 of 480

471 Index
Oil see Engine oil
One-touch gearshifting 169
Canceling gear range limit 169
Downshifting 169
Upshifting 169
Opening
Doors from the inside 107
Fuel filler flap 269
Hood 272
Luggage cover 196
Retractable hardtop (SmartKey) 199
Retractable hardtop (switch) 196
Side windows 193
Storage compartment in the
armrest 229
Storage compartment in the center
console 229
Sunshade 203
Trunk from inside vehicle 108
Trunk lid 108
Windows 192
Operating
CD player 142
Navigation system 143
Radio 141
Telephone* 159Ornamental moldings 325
Overdue maintenance service 319
Overhead control panel 31
Overspeed range 133, 457
P
Paintwork code see Certification label
Panic alarm 81
Panic button on SmartKey 81
Panorama roof*
Sunshade 203
Sunshade closing 203
Sunshade opening 203
Parcel net
In front passenger footwell 231
Parcel net in trunk 231
Parking 261
Parking assistance (Parktronic*) 223
Parking brake
Engaging 59
Releasing 51
Parking brake pedal 23
Parking lamps 392
Switching on 123
Parktronic* 30, 223, 457
Activating 226
Cleaning system sensors 326Malfunctioning 227
Minimum distance 225
Range 224
Rear sensors 225
System sensors 326
Warning indicators 23, 225
Parktronic* deactivation switch 30
Parts service 428
Passenger side
Front airbag 70
Head-thorax airbag 71
Pedals 257
Phone book* 160
Loading 160
Quick search 160
Phone number*
Dialing 160
Redialing 161
Poly-V-belt drive 457
Layout 431
Potential problems associated with under-
inflated and overinflated tires 299
Pounds per square inch see PSI
Power assistance 258
Power outlet 237
Page 478 of 480

477 Index
Trunk lid
Opening 108
Turn 185
Turn signal lamps
Cleaning lenses 325
Replacing bulbs 392, 395
Turn signals 23, 53
Exterior rear view mirrors 392, 395
Front bulbs 392
Indicator lamps 25
Rear bulbs 392
Turning off the engine 60
U
Uniform Tire Quality Grading
Standards 313, 459
Units
Setting speedometer units 149
Unlocking 34
Centrally from inside 113
Driver’s door in an emergency 385
Storage compartments 230, 386
Trunk 99, 108
Trunk (KEYLESS-GO*) 106
Trunk in an emergency 386
With the SmartKey 34With the SmartKey with
KEYLESS-GO* 35, 100
Upholstery
Cleaning 330
Upshifting 169
V
Vehicle
Locking 29
Locking in an emergency 387
Minimum distance (Parktronic*) 225
Towing 421
Unlocking 29
Unlocking in an emergency 385
Vehicle capacity weight 313, 459
Vehicle care
Leather upholstery 330
Ornamental moldings 325
Upholstery 330
Wood trims 330
Vehicle Identification Number see VIN
Vehicle level 459
Changing 222
Setting 222
Vehicle level control 459
Vehicle level control (ABC) 220
Vehicle level control switch 30Vehicle lighting
Checking 271
Vehicle loading terminology 310
Vehicle maximum load on the tire 313,
459
Vehicle status messages 345
Vehicle tool kit 383
VIN 430
VIN (vehicle identification number) 459
Voice control system* 23, 459
Hands-free microphone 31
W
Warning sounds
Distance warning function* 215
Distronic* 209
Drivers seat belts 71
Parking brake 52
Warranty coverage 429
Washing the vehicle 323
Wear pattern (tires) 313
Wheel bolts
Tightening torque 410
Wheel change 404
Tightening torque 410
Wheel wrench 384