Page 122 of 480

121 Controls in detail
Memory function
�Memory function
Prior to operating the vehicle, the driver
should check and adjust the seat height,
seat position fore and aft, and seat back-
rest angle if necessary, to ensure adequate
control, reach and comfort. The head re-
straint should also be adjusted for proper
height. See also the section on airbags
(�page 65) for proper seat positioning.
In addition, adjust the steering wheel to
ensure adequate control, reach, operation
and comfort. Both the interior and exterior
rear view mirrors should be adjusted for
adequate rear vision.
Fasten seat belts. Infants and small chil-
dren should be seated in a properly se-
cured restraint system that complies with
U.S. Federal Motor Vehicle Safety Stan-
dard 213 and Canadian Motor Vehicle
Safety Standard 213.With the memory switch you can store up
to three different settings.
The following settings are stored when us-
ing the buttons on the driver’s door:
�
Driver’s seat and backrest position
�
Steering wheel position
�
Driver’s side exterior rear view mirror
position
�
Passenger side exterior rear view mir-
ror position
The following settings are stored when us-
ing the buttons on the passenger door:
�
Passenger seat and backrest positionThe memory switch is located on the door
control panel.
M Memory button
1, 2, 3 Stored positions
�
Switch on the ignition (
�page 36).
or
�
Open the respective door.
Warning!
G
Do not activate the memory function while
driving. Activating the memory function
while driving could cause the driver to lose
control of the vehicle.
Page 137 of 480
136 Controls in detailControl systemMultifunction steering wheel
The displays in the multifunction display
and the settings in the control system are
controlled by the buttons on the multifunc-
tion steering wheel.
Pressing any of the buttons, except for the
telephone buttons, on the multifunction
steering wheel will alter what appears in
the multifunction display.
The information available in the multifunc-
tion display is arranged in menus, each
containing a number of functions or sub-
menus.
1
Left multifunction display in the
speedometer
2
Right multifunction display in the
tachometerOperating the control system
3
Selecting the submenu or setting the
volume:
Press buttonçdown / to decreaseæup / to increase
4
Telephone*:
Press buttonsto take a calltto end a call
5
Menu systems:
Press buttonÿfor previous menuèfor next menu
6
Moving within a menu:
Press buttonjfor next displaykfor previous display
Page 171 of 480

170 Controls in detailAutomatic transmissionSteering wheel gearshift control one-touch gearshifting
Steering wheel gearshift control is avail-
able on vehicles with Sport Package*, on
SL 55 AMG, and on SL 65 AMG only.
The steering wheel gearshift control pro-
vides an alternative method for changing
the gears manually and limiting or extend-
ing the gear range for automatic shifting
with the gear selector lever in positionD
and driving in the automatic program
modeC orS.Steering wheel gearshift control
SL 500 with Sport Package* and
SL 600 with Sport Package*
The steering wheel gearshift buttons are
located to the left and right of the steering
wheel.
1Button, outside: upshift
2Button, inside: downshift
iFor information on using the steering
wheel gearshift control in program
mode MANUAL (SL 55 AMG and
SL 65 AMG only), see “Manual shift
program” (
�page 173).
iTo avoid overrevving the engine when
downshifting with steering wheel
gearshift buttons, the transmission will
not shift to a lower gear if the engine’s
max. speed would be exceeded.!Allow engine to warm up under low
load use. Do not place full load on the
engine until the operating temperature
has been reached.
Shift into reverse gearR or parking
positionP only when the vehicle is
stopped.
Avoid spinning of a drive wheel for an
extended period when driving off on
slippery road surfaces. This may cause
serious damage to the drivetrain which
is not covered by the Mercedes-Benz
Limited Warranty.
Page 172 of 480

171 Controls in detail
Automatic transmission
Downshifting
�
Briefly press the inside2 of one of the
buttons on the steering wheel.
The transmission will shift to the next
lower gear as permitted by the shift
program. This action simultaneously limits
the gear range of the transmission
(
�page 167).
Upshifting
�
Briefly press the outside1 of one of
the buttons on the steering wheel.
The transmission will shift to the next
higher gear as permitted by the shift
program. This action simultaneously
extends the gear range of the transmis-
sion.Canceling gear range limit
�
Press and hold the outside1 of one of
the buttons on the steering wheel
until
D reappears in the right multifunc-
tion display.
The transmission will shift from the current
gear range directly to gear rangeD.
Shifting into optimal gear range
�
Press and hold the inside2 of one of
the buttons on the steering wheel.
The transmission will automatically select
the gear range suited for optimal
acceleration and deceleration. This may
involve shifting down one or more gears.
iYou cannot shift with the steering
wheel gearshift buttons when the gear
selector lever is in positionP,N orR.
The last selected program
mode (CorS) is switched on when the
engine is restarted.Warning!
G
On slippery road surfaces, never downshift
in order to obtain braking action. This could
result in drive wheel slip and reduced
vehicle control. Your vehicle’s ABS will not
prevent this type of loss of control.
Page 173 of 480

172 Controls in detailAutomatic transmissionSteering wheel gearshift control
SL 55 AMG and SL 65 AMG
The steering wheel gearshift buttons are
located to the left and right of the steering
wheel.
1Left button: downshift
2Right button: upshiftThe following instructions describe opera-
tion of the steering wheel gearshift control
when driving in the automatic program
modeC orS.
For instructions on operating the steering
wheel gearshift control and gear selector
lever in the program mode MANUAL, see
“Manual shift program SL 55 AMG and
SL 65 AMG” (
�page 173).Downshifting
�
Briefly press button1 on the left side
of the steering wheel.
The transmission will shift to the next
lower gear as permitted by the shift
program. This action simultaneously limits
the gear range of the transmission
(
�page 167) when you are driving in the
automatic program mode (CorS).
iYou cannot shift with the steering
wheel gearshift buttons when the gear
selector lever is in positionP,N orR.
The last selected program
mode (CorS) is switched on when the
engine is restarted in the automatic
program mode.
Warning!
G
On slippery road surfaces, never downshift
in order to obtain braking action. This could
result in drive wheel slip and reduced
vehicle control. Your vehicle’s ABS will not
prevent this type of loss of control.
Page 188 of 480
.
The indicator lamp on the button
comes on.
The air conditioning switches to the fol-
lowing functions automa")
187 Controls in detail
Automatic climate control
Activating�
Press button P (
�page 181).
The indicator lamp on the button
comes on.
The air conditioning switches to the fol-
lowing functions automatically:
�
cooling on to dehumidify
�
maximum blower speed and
heating power
�
air flows onto the windshield
and the front side windows
�
the air recirculation mode is
switched off
Deactivating
�
Press button P (
�page 181).
The indicator lamp on the button goes
out. Defrosting is turned off.
The previous settings are in effect
again.Windshield fogged on the outside
�
Switch the windshield wipers on
(�page 54).
If the automatic air distribution and air vol-
ume are switched off:
�
Turn air distribution controls2 and 6
(�page 181) to position h ork.
or
�
Press control buttons 2, 6 and a
(�page 181).
The control buttons are engaged. The
U symbol on the control buttons
come on. Air distribution and air vol-
ume are adjusted automatically.
Air recirculation mode
Switch to air recirculation mode to prevent
unpleasant odors from entering the vehicle
from the outside. This setting cuts off the
intake of outside air and recirculates the
air in the passenger compartment.
iThe cooling remains switched on.iKeep this setting selected only until the
windshield is clear again.
Warning!
G
Fogged windows impair visibility, endanger-
ing you and others. If the windows begin to
fog on the inside, switching off the air
recirculation mode immediately should clear
interior window fogging. If interior window
fogging persists, make sure the air
conditioning (
�page 189) is activated, or
press buttonP.
Page 204 of 480
203 Controls in detail
Retractable hardtop
�
Lower the roll bar. Make sure the fas-
tening straps do not get caught.
�
Pull the wind screen out towards the
front of the vehicle. Be careful not to
damage interior trim with the guide
tabs.
�
Place the wind screen back into the
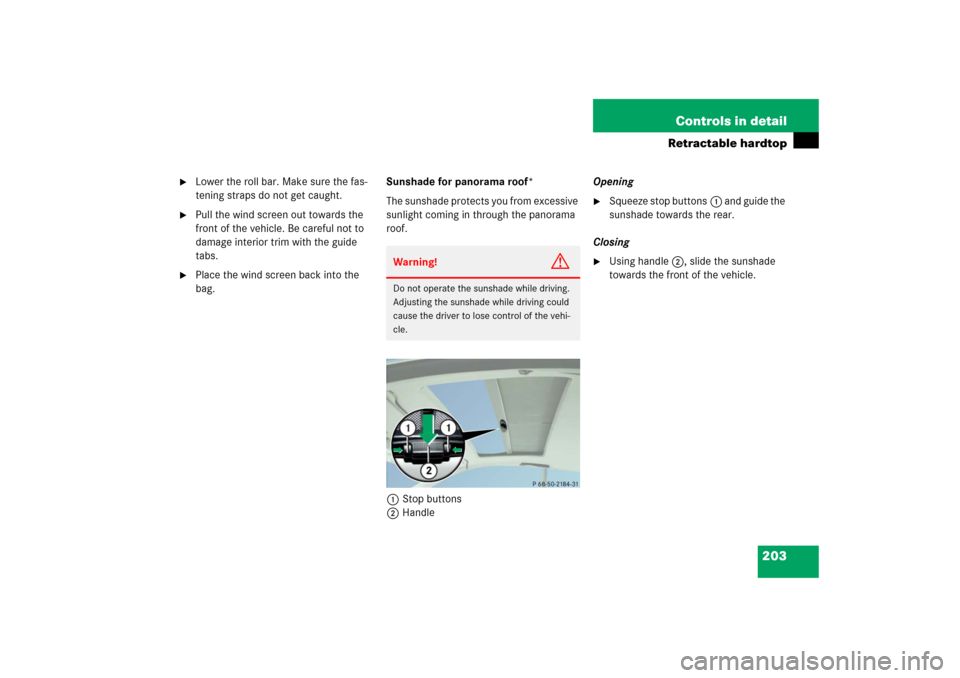
bag.Sunshade for panorama roof*
The sunshade protects you from excessive
sunlight coming in through the panorama
roof.
1Stop buttons
2HandleOpening
�
Squeeze stop buttons1 and guide the
sunshade towards the rear.
Closing
�
Using handle2, slide the sunshade
towards the front of the vehicle.
Warning!
G
Do not operate the sunshade while driving.
Adjusting the sunshade while driving could
cause the driver to lose control of the vehi-
cle.
Page 230 of 480
229 Controls in detail
Useful features
Opening�
Press release button 1.
Storage compartment lid 2 lid opens
upwards.
Armrest storage compartments
The buttons are located under the cushion
of the armrest.
1Button to open storage tray
2Button to open storage compartmentOpening storage tray
�
Press button1 and lift the armrest.
Opening storage compartment
�
Press button2 and lift the armrest.
Rear storage compartments
The CD changer is located in the left stor-
age compartment.
For instructions on the CD changer, see
separate COMAND Operator’s Manual.
1Release button
2Storage compartment lid
�
Press release button 1.
Storage compartment lid 2 lid opens
upwards.
Locking storage compartments
The storage compartments are centrally
locked when you lock the vehicle from the
outside.
You can also lock the storage compart-
ments separately, see “Locking the stor-
age compartments separately”
(
�page 230).