Page 24 of 480
23 At a glance
Cockpit
Item
Page
1
Parking brake pedal
51
2
Hood lock release
272
3
Parking brake release han-
dle
59
4
Door control panel
32
5
Exterior lamp switch
53, 123
6
Headlamp washer button
177
7
Combination switch�
Turn signals
�
Windshield wipers
�
High beam
53
54
129
Item
Page
8
Steering wheel gearshift
control
(SL 55 AMG, SL 65 AMG,
and vehicles with
Sport Package* only)
170
9
Cruise control lever�
Cruise control
�
Distronic*
204
207
a
Instrument cluster
24, 132
b
Multifunction steering
wheel
28, 136
c
Lever for voice control sys-
tem*, see separate
operating instructions
d
Front Parktronic* warning
indicator
225
Item
Page
e
Digital clock
150
f
Overhead control panel
31
g
Interior storage compart-
ments (locking/unlocking)
230
h
7 indicator lamp
78
j
Glove box
228
k
Center console
29, 30
l
Starter switch
38
m
Horn
n
Steering wheel adjustment
stalk
Heated steering wheel*
42
235
Page 71 of 480

70 Safety and SecurityOccupant safetyFront airbags
Driver and passenger airbags are de-
ployed:�
in the event of certain frontal impacts
�
if impact exceeds a preset deployment
threshold
�
independently of the head-thorax air-
bags
The airbags will not deploy in impacts
which do not exceed the system’s deploy-
ment thresholds. You will then be protect-
ed by the fastened seat belts.
The passenger airbag will only be deployed
if:
�
the passenger seat is occupied
�
the 7 indicator lamp on the glove
box is not lit (
�page 78)
�
the impact exceeds a preset deploy-
ment threshold1Driver airbag
2Passenger airbag
3Knee bagKnee bag
The knee bag is located on the driver-side
lower instrument panel. It is designed to
operate together with the driver airbag in
certain frontal impacts exceeding a preset
threshold. The knee bag operates best in
conjunction with a properly positioned and
fastened seat belt.
!Do not place objects heavier than
20 lbs (9 kg) on the front passenger
seat. This could cause the front airbag
or the head-thorax airbag on the front
passenger side to deploy in a crash
which exceeds the system’s deploy-
ment threshold.
Page 80 of 480

79 Safety and Security
Occupant safety
The 7indicator lamp located on the
glove box will be illuminated, except with
the SmartKey removed or in starter switch
position0.
Self-test BabySmart
TM without special
child seat installed
After turning the SmartKey in the starter
switch to position1 or2 or pressing the
KEYLESS-GO* start/stop button once or
twice, the 7 indicator lamp located on
the glove box comes on for approximately
6 seconds and then goes out.
If the indicator lamp should not come on or
is continuously lit, the system is not func-
tioning. You must see an authorized
Mercedes-Benz Center before seating any
child on the passenger seat.
iThe system does not deactivate the
head-thorax airbag and the emergency
tensioning device.
Warning!
G
The BabySmart
TM airbag deactivation sys-
tem will ONLY work with a special child seat
designed to operate with it. It will not work
with child seats which are not BabySmart
TM
compatible.
Never place anything between seat cushion
and child seat (e.g. pillow), since it reduces
the effectiveness of the deactivation sys-
tem. The bottom of the child seat must
make full contact with the passenger seat
cushion. An incorrectly mounted child seat
could cause injuries to the child in case of an
accident, instead of protecting the child.
Follow the manufacturer’s instructions for
installation of special child seats.
Warning!
G
When using a BabySmart
TM compatible child
seat on the front passenger seat, the pas-
senger front airbag will not deploy only if the
7 indicator lamp remains illuminated.
Please be sure to check the indicator every
time you use the special system child seat.
Should the light go out while the restraint is
installed, please check installation. If the
light remains out, do not use the
BabySmart
TM restraint to transport children
on the passenger seat until the system has
been repaired.
Page 92 of 480

91 Safety and Security
Anti-theft systems
�Anti-theft systems
Immobilizer
The immobilizer prevents unauthorized
persons from starting your vehicle.
Activating
With the SmartKey�
Remove the SmartKey from the starter
switch.
With KEYLESS-GO*
�
Press the start/stop button on the gear
selector lever once.
The engine is turned off.
�
Open the driver’s door.Deactivating
With the SmartKey
�
Turn the SmartKey in the starter switch
to position2 (
�page 36).
With KEYLESS-GO*
�
Switch on the ignition (
�page 38).
Anti-theft alarm system
Once the alarm system has been armed, a
visual and audible alarm is triggered when
someone opens �
a door
�
the trunk lid
�
the hood
�
a storage compartment in the rear
�
the glove box
�
the storage compartment under the
armrest
The alarm will stay on, even if the activat-
ing element (a door, for example) is imme-
diately closed.
iStarting the engine will also deactivate
the immobilizer.
In case the engine cannot be started
(yet the vehicle’s battery is charged),
the system is not operational. Contact
an authorized Mercedes-Benz Center
or call 1-800-FOR-MERCedes (in the
USA), or 1-800-387-0100 (in Canada).
Page 97 of 480

96 Controls in detailIn the “Controls in detail” section you will
find detailed information on how to oper-
ate the equipment installed on your vehi-
cle. If you are already familiar with the
basic functions of your vehicle, this section
will be of particular interest to you.
To quickly familiarize yourself with the ba-
sic functions of the vehicle, refer to the
“Getting started” section of this manual.
The corresponding page numbers are giv-
en at the beginning of each segment.
For more information on locking and un-
locking, see the “Getting started” section
(�page 34).
Locking and unlocking
SmartKey
Your vehicle comes supplied with two
SmartKeys, each with remote control and
a removable mechanical key.
The locking tabs for the mechanical key
portion of the two SmartKeys are a differ-
ent color to help distinguish each
SmartKey unit.
The SmartKey provides an extended oper-
ating range. To prevent theft, however, it is
advisable to only unlock the vehicle when
you are in close proximity to it.
The SmartKey centrally locks and unlocks:�
the doors
�
the trunk lid
�
the glove box
�
the storage compartment under the
armrest
�
the storage compartment in the rear
�
the fuel filler flap
SmartKey with remote control1‹Lock button
2Š Unlock button for the trunk lid
3Mechanical key locking tab
4ΠUnlock button
5Battery check lamp
6Â Panic button (
�page 81)
Page 101 of 480

100 Controls in detailLocking and unlockingLoss of SmartKey or mechanical key
If you lose a SmartKey or mechanical key,
you should do the following:�
Have the SmartKey deactivated by an
authorized Mercedes-Benz Center.
�
Report the loss of the SmartKey or the
mechanical key to your car insurance
company immediately.
�
If necessary, have the mechanical lock
replaced.
Your authorized Mercedes-Benz Center
will be glad to supply you with a replace-
ment.
SmartKey with KEYLESS-GO*
Vehicles equipped with KEYLESS-GO come
with two SmartKeys with KEYLESS-GO,
each with remote controls and a remov-
able mechanical key.
The locking tabs for the mechanical key
portion of the two SmartKeys with
KEYLESS-GO are a different color to help
distinguish each SmartKey with
KEYLESS-GO unit.
The function of the SmartKey overrules the
KEYLESS-GO function.
The KEYLESS-GO function is integrated
into the SmartKey. On these vehicles, the
validity of the SmartKey with KEYLESS-GO
is checked every time you grasp a door
handle. If the SmartKey with KEYLESS-GO is valid,
your vehicle unlocks
�
the doors
�
the trunk lid
�
the glove box
�
the storage compartment under the
armrest
�
the storage compartment in the rear
�
the fuel filler flap
Page 192 of 480
191 Controls in detail
Automatic climate control
Deactivating�
Press button T (
�page 181).
The indicator lamp on the button goes
out.
The residual heat is automatically turned
off:
�
when the ignition is switched on
�
after about 30 minutes
�
if the battery voltage drops
�
when the coolant temperature is too
low
Ventilated storage compartments
The glove box and the armrest storage
compartment have their own air vents that
allow for cooling ventilation when the auto-
matic climate control system is activated.Glove box1Thumbwheel
2Air ventOpening the air vent
�
Turn thumbwheel1 upwards.
Closing the air vent
�
Turn thumbwheel1 downwards.
Storage compartment under the armrest1Thumbwheel
2Air vent
Opening the air vent�
Turn thumbwheel1 to the right.
Closing the air vent
�
Turn thumbwheel1 to the left.
iYou should keep these air vents closed
when outside temperatures are low.
Page 229 of 480
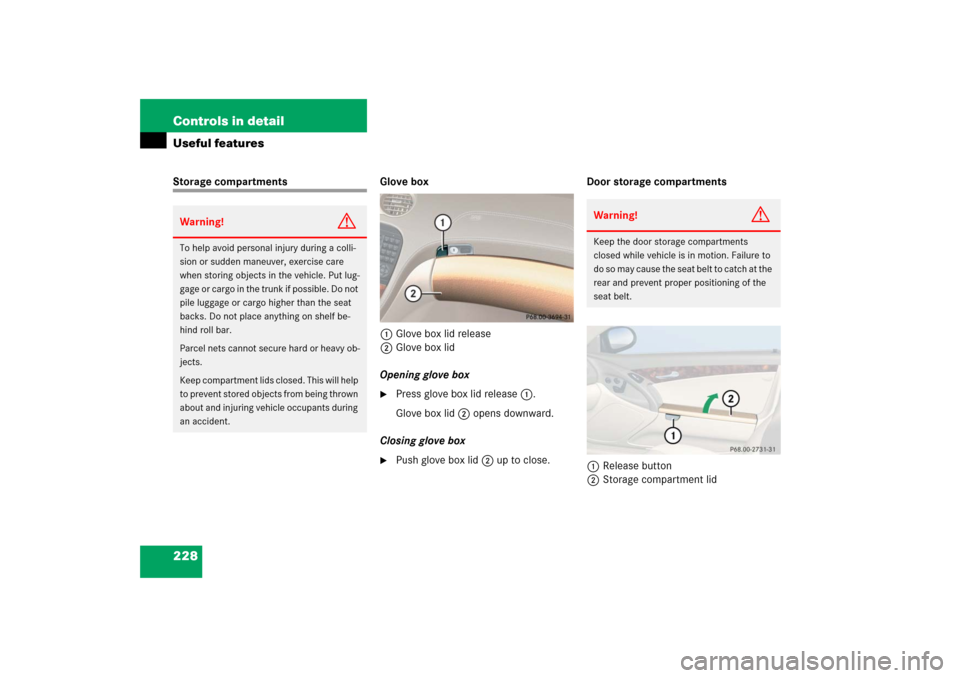
228 Controls in detailUseful featuresStorage compartments Glove box
1Glove box lid release
2Glove box lid
Opening glove box
�
Press glove box lid release1.
Glove box lid 2 opens downward.
Closing glove box
�
Push glove box lid 2 up to close.Door storage compartments
1Release button
2Storage compartment lid
Warning!
G
To help avoid personal injury during a colli-
sion or sudden maneuver, exercise care
when storing objects in the vehicle. Put lug-
gage or cargo in the trunk if possible. Do not
pile luggage or cargo higher than the seat
backs. Do not place anything on shelf be-
hind roll bar.
Parcel nets cannot secure hard or heavy ob-
jects.
Keep compartment lids closed. This will help
to prevent stored objects from being thrown
about and injuring vehicle occupants during
an accident.
Warning!
G
Keep the door storage compartments
closed while vehicle is in motion. Failure to
do so may cause the seat belt to catch at the
rear and prevent proper positioning of the
seat belt.