Page 8 of 480

Contents
Practical hints................................. 331
What to do if … .................................. 332
Lamps in the instrument cluster .. 332
AIRBAG OFF indicator lamp ......... 344
Vehicle status messages in the
multifunction display .................... 345
Where will I find ...? ........................... 383
First aid kit ................................... 383
Vehicle tool kit, jack, and
spare wheel.................................. 383
Locking/unlocking in an emergency . 385
Unlocking the vehicle ................... 385
Locking the vehicle ...................... 387
Lowering the load assist
manually ...................................... 388
Replacing SmartKey batteries ........... 389
SmartKey ..................................... 389
SmartKey with KEYLESS-GO* ...... 390
Replacing bulbs ................................. 391
Bulbs ............................................ 391
Replacing bulbs for front lamps ... 394
Replacing bulbs for rear lamps..... 396
Replacing wiper blades ...................... 397
Removing wiper blades ................ 397
Installing wiper blades................. 398Flat tire ............................................... 399
Preparing the vehicle .................... 399
Sealing tires with TIREFIT.............. 399
Mounting the spare wheel ............ 404
MOExtended system* ................... 411
Batteries ............................................. 413
Disconnecting the batteries .......... 415
Removing the batteries ................. 416
Charging and reinstalling
batteries ....................................... 417
Reconnecting the batteries ........... 418
Jump starting ...................................... 419
Towing the vehicle .............................. 421
Installing towing eye bolt .............. 423
Fuses .................................................. 425
Main fuse box ............................... 425
Emergency engine shut-down ....... 426
Technical data.................................. 427
Parts service ...................................... 428
Warranty coverage ............................. 429
Loss of Service and Warranty
Information Booklet ...................... 429
Identification labels ............................ 430
Layout of poly-V-belt drive.................. 431
SL 500 .......................................... 431
SL 55 AMG ................................... 431
SL 600, SL 65 AMG ...................... 431
Engine ................................................ 432
Rims and tires .................................... 434
Same size tires ............................. 436
Mixed size tires ............................. 438
MOExtended tires* ....................... 440
Spare wheel .................................. 441
Electrical system ................................ 442
Main dimensions ................................ 443
Weights .............................................. 444
Page 272 of 480

271 Operation
At the gas station
Check regularly and before a long trip
For information on quantities and require-
ments of operating agents, see “Fuels,
coolants, lubricants, etc.” (
�page 445).
�
Open the hood (
�page 272).
1Windshield washer and headlamp
cleaning system
2Brake fluid
3Coolant levelWindshield washer and headlamp
cleaning system
For information on refilling the reservoir,
see “Windshield washer system and
headlamp cleaning system” (
�page 280).
Brake fluid
For information on brake fluid, see “Fuels,
coolants, lubricants, etc.” (
�page 445).Coolant level
For information on checking the coolant
level, see “Coolant” (
�page 278).
Engine oil level
For more information on checking the en-
gine oil level, see “Checking engine oil lev-
el with the control system” (
�page 274).
Vehicle lighting
Check function and cleanliness. For more
information, see “Replacing bulbs”
(
�page 391).
Exterior lamp switch, see “Switching on
headlamps” (
�page 53).
Tire inflation pressure
For information on checking the tire infla-
tion pressure, see “Checking tire inflation
pressure” (
�page 293).
!If you find that the brake fluid in the
brake fluid reservoir has fallen to the
minimum mark or below, have the
brake system checked for brake pad
thickness and leaks immediately. Noti-
fy an authorized Mercedes-Benz Center
immediately. Do not add brake fluid as
this will not solve the problem. For
more information, see the “Practical
hints” section (
�page 363).
Page 332 of 480
331 Practical hints
What to do if …
Where will I find ...?
Locking/unlocking in an emergency
Replacing SmartKey batteries
Replacing bulbs
Replacing wiper blades
Flat tire
Batteries
Jump starting
Towing the vehicle
Fuses
Page 333 of 480

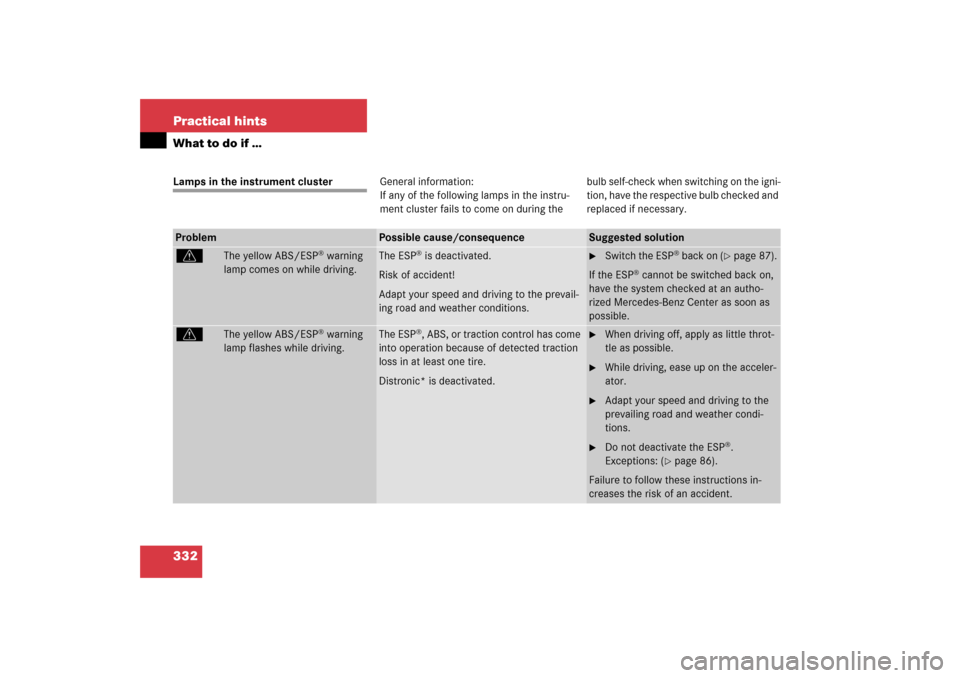
332 Practical hintsWhat to do if …Lamps in the instrument clusterGeneral information:
If any of the following lamps in the instru-
ment cluster fails to come on during thebulb self-check when switching on the igni-
tion, have the respective bulb checked and
replaced if necessary.Problem
Possible cause/consequence
Suggested solution
v
The yellow ABS/ESP
® warning
lamp comes on while driving.
The ESP
® is deactivated.
Risk of accident!
Adapt your speed and driving to the prevail-
ing road and weather conditions.
�
Switch the ESP
® back on (
�page 87).
If the ESP
® cannot be switched back on,
have the system checked at an autho-
rized Mercedes-Benz Center as soon as
possible.
v
The yellow ABS/ESP
® warning
lamp flashes while driving.
The ESP
®, ABS, or traction control has come
into operation because of detected traction
loss in at least one tire.
Distronic* is deactivated.
�
When driving off, apply as little throt-
tle as possible.
�
While driving, ease up on the acceler-
ator.
�
Adapt your speed and driving to the
prevailing road and weather condi-
tions.
�
Do not deactivate the ESP
®.
Exceptions: (
�page 86).
Failure to follow these instructions in-
creases the risk of an accident.
Page 375 of 480
374 Practical hintsWhat to do if …Left display
Right display
Possible cause/consequence
Possible solution
F
Key
still
in vehicle
A SmartKey with KEYLESS-GO* left
in the vehicle was recognized while
locking the vehicle from the out-
side.
�
Take the SmartKey with KEYLESS-GO* out of
the vehicle.
.
3rd brake lamp
The high mounted brake lamp is
malfunctioning.
�
Visit an authorized Mercedes-Benz Center as
soon as possible.
Brake lamp
Left
Substitute
bulb on
The left brake lamp is malfunction-
ing. A substitute bulb has been
brought into use.
�
Visit an authorized Mercedes-Benz Center as
soon as possible.
Page 376 of 480

375 Practical hints
What to do if …
Left display
Right display
Possible cause/consequence
Possible solution
.
Brake lamp
Right
Substitute
bulb on
The right brake lamp is malfunction-
ing. A substitute bulb has been
brought into use.
�
Visit an authorized Mercedes-Benz Center as
soon as possible.
Brake lamp
!
Drive to
workshop!
Brake lamp illumination is delayed
or lamp is permanently on.
�
Visit an authorized Mercedes-Benz Center as
soon as possible.
Front foglamp
Left
The left front fog lamp is malfunc-
tioning.
�
Replace the bulb as soon as possible.
Front foglamp
Right
The right front fog lamp is malfunc-
tioning.
�
Replace the bulb as soon as possible.
High beam
Left
The left high beam lamp is malfunc-
tioning.
�
Replace the bulb as soon as possible.
High beam
Right
The right high beam lamp is mal-
functioning.
�
Replace the bulb as soon as possible.
Left turn signal
Mirror
The left turn signal in the side mirror
is malfunctioning. This message will
only appear if all light emitting di-
odes have stopped working.
�
Have the LEDs replaced as soon as possible.
Page 377 of 480

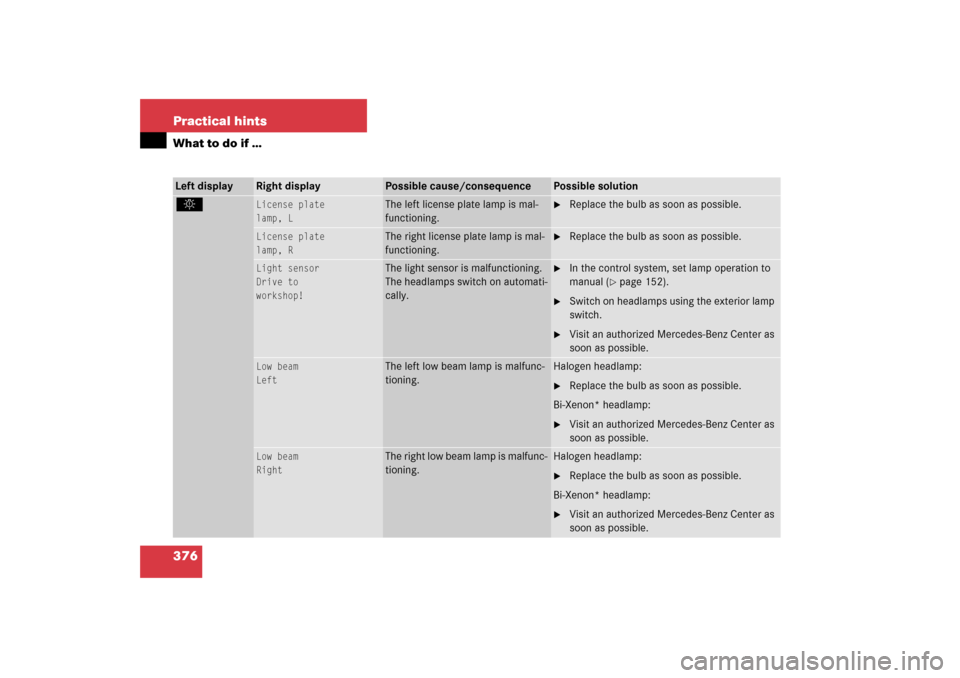
376 Practical hintsWhat to do if …Left display
Right display
Possible cause/consequence
Possible solution
.
License plate
lamp, L
The left license plate lamp is mal-
functioning.
�
Replace the bulb as soon as possible.
License plate
lamp, R
The right license plate lamp is mal-
functioning.
�
Replace the bulb as soon as possible.
Light sensor
Drive to
workshop!
The light sensor is malfunctioning.
The headlamps switch on automati-
cally.
�
In the control system, set lamp operation to
manual (
�page 152).
�
Switch on headlamps using the exterior lamp
switch.
�
Visit an authorized Mercedes-Benz Center as
soon as possible.
Low beam
Left
The left low beam lamp is malfunc-
tioning.
Halogen headlamp:�
Replace the bulb as soon as possible.
Bi-Xenon* headlamp:
�
Visit an authorized Mercedes-Benz Center as
soon as possible.
Low beam
Right
The right low beam lamp is malfunc-
tioning.
Halogen headlamp:�
Replace the bulb as soon as possible.
Bi-Xenon* headlamp:
�
Visit an authorized Mercedes-Benz Center as
soon as possible.
Page 378 of 480

377 Practical hints
What to do if …
Left display
Right display
Possible cause/consequence
Possible solution
.
Marker lamp
Front left
The front left side marker lamp is
malfunctioning.
�
Replace the bulb as soon as possible.
Marker lamp
Front right
The front right side marker lamp is
malfunctioning.
�
Replace the bulb as soon as possible.
Marker lamp
Rear left
The rear left side marker lamp is
malfunctioning.
�
Replace the bulb as soon as possible.
Marker lamp
Rear right
The rear right side marker lamp is
malfunctioning.
�
Replace the bulb as soon as possible.
Parking lamp
Front left
The front left parking or standing
lamp is malfunctioning.
�
Replace the bulb as soon as possible.
Parking lamp
Front right
The front right parking or standing
lamp is malfunctioning.
�
Replace the bulb as soon as possible.
Rear foglamp
Left
The left rear fog lamp is malfunc-
tioning.
�
Replace the bulb as soon as possible.
Reverse lamp
Left
The left backup lamp is malfunc-
tioning.
�
Replace the bulb as soon as possible.
Reverse lamp
Right
The right backup lamp is malfunc-
tioning.
�
Replace the bulb as soon as possible.