Page 132 of 480

131 Controls in detail
Lighting
Deactivating�
Slide switch4 to the right.
The interior lighting and the entry/exit
lamps remain switched off in darkness,
even when you�
unlock the vehicle
�
open a door
�
remove the SmartKey from the
starter switch
�
open the trunkManual control
Switching lamps on
�
Press switch3.
The interior lighting switches on.
Switching lamps off
�
Press switch3 again.
The interior lighting switches off.
Courtesy lighting
For better orientation in the dark, courtesy
lamps will illuminate the interior of your ve-
hicle as follows:
With parking lamps switched on:�
the door handles
�
the driver and passenger footwells
With SmartKey in starter switch position1:
�
the door handles
�
the center console
iThe setting selected for the interior
lighting is used for the trunk lighting as
well.
If you leave the trunk lid open for an ex-
tended period of time, the trunk light-
ing will switch off automatically after
approximately 10 minutes.
iIf you turn the SmartKey in the starter
switch to position0 and switch off the
exterior headlamps, the door handle
lamps will remain lit for approximately
5minutes.
Page 133 of 480
.
The instrument cluster is activated when
you
�
open a door
�")
132 Controls in detailInstrument clusterFor a full view illustration of the instrument
cluster, see “Instrument cluster”
(�page 24).
The instrument cluster is activated when
you
�
open a door
�
switch on the ignition
�
press the reset button (
�page 24)
�
switch on the exterior lamps
Opening a door will activate the instrument
cluster only for about 30 seconds.
You can change the instrument cluster set-
tings in the Instrument cluster submenu of
the control system (
�page 149).
Instrument cluster illumination
Use the reset button to adjust the illumina-
tion brightness for the instrument cluster
and the switches on the center console.
1Reset buttonTo brighten illumination
�
Turn reset button 1 in the instrument
cluster clockwise.
The instrument cluster illumination will
brighten.
To dim illumination
�
Turn reset button 1 in the instrument
cluster counterclockwise.
The instrument cluster illumination will
dim.
iThe instrument cluster illumination is
dimmed or brightened to suit ambient
light conditions.
Page 169 of 480

168 Controls in detailAutomatic transmissionAutomatic shift program
The program mode selector switch is
located on the lower part of the center
console.
1Program mode selector switch
C Comfort For comfort driving
S Sport For standard driving
The current gear selector lever position
and the selected program mode (
C/S) are
indicated in the right multifunction display
(
�page 163).
�
Press program mode selector
switch1 repeatedly until the letter of
the desired program mode appears in
the right multifunction display.
SelectCfor comfort driving:�
The vehicle starts out in second
gear (both forward and reverse) for
gentler starts. This does not apply if
full throttle is applied or gear
range1 is selected.
�
Traction and driving stability are
improved on icy roads.
�
Upshifts occur earlier even when
you give more gas. The engine then
operates at lower rpms and the
wheels are less likely to spin.
!Never change the program mode when
the gear selector lever is out of
positionP. This could result in a
change of driving characteristics for
which you may not be prepared.iThe last selected program
mode (CorS) is switched on when the
engine is restarted.
Page 175 of 480

174 Controls in detailAutomatic transmission
The program mode selector switch is
located on the lower part of the center
console.
1Program mode selector switch
MANUAL For manual gear shifting
C Comfort For comfort driving
S Sport For standard drivingThe current gear selector lever position
and the selected program mode (
M/C/S)
are indicated in the right multifunction
display (
�page 163).
!Allow engine to warm up under low
load use. Do not place full load on the
engine until the operating temperature
has been reached.
Shift into reverse gearR or parking
positionP only when the vehicle is
stopped.
Avoid spinning of a drive wheel for an
extended period when driving off on
slippery road surfaces. This may cause
serious damage to the drivetrain which
is not covered by the Mercedes-Benz
Limited Warranty.
iFor information on automatic program
modesC orS, see “Automatic shift
program” (
�page 168), “Gear selector
lever one-touch gearshifting”
(
�page 169), and “Steering wheel
gearshift control one-touch gearshift-
ing” (�page 170).
Page 216 of 480

215 Controls in detail
Driving systems
Setting the following distance in
Distronic
You can set the specified following dis-
tance for Distronic by varying the time set-
ting between 1.0 and 2.0 seconds. Using
this time setting and the current speed of
your vehicle, Distronic calculates and sets
the required following distance to the vehi-
cle ahead. The set distance will be shown
in the speedometer display field.
The thumbwheel for making the time set-
ting is located on the lower section of the
center console.1Distance warning function on/off
switch
2Thumbwheel for setting distance
Increasing distance
Increasing the distance setting tells Dis-
tronic to maintain a greater following dis-
tance to the vehicle ahead.
�
Turn thumbwheel2 towards ¯.Decreasing distance
Decreasing the distance setting tells Dis-
tronic to maintain a smaller following dis-
tance to the vehicle ahead.
�
Turn thumbwheel2 towards ®.
Distance warning function
When Distronic is deactivated, this func-
tion will continue to warn you when recog-
nizing a stationary obstacle or a slower
vehicle moving in your vehicle’s path and
the danger of a collision exists:
�
The DTR warning lamp E comes on
red.
�
An intermittent warning will sound if
necessary.
If these warnings are issued, you must
brake manually to maintain a safe distance
and avoid a collision with the vehicle
ahead.
Warning!
G
It is up to the driver to exercise discretion to
select the appropriate setting given road
conditions, traffic, driver’s preferred driving
style and applicable laws and driving recom-
mendations for safe following distance.
Page 220 of 480

The ABC system automatically selects the
optimum suspension tuning and ride
height for your vehicle.
Suspension tuning
The suspension")
219 Controls in detail
Driving systems
Active Body Control (ABC)
The ABC system automatically selects the
optimum suspension tuning and ride
height for your vehicle.
Suspension tuning
The suspension tuning is set according to:�
Your driving style
�
Road surface conditions
�
The vehicle loading
�
Your choice of suspension style
You can set the following suspension
styles:
�
Regular (Comfort)
�
SportyThe ABC button with the indicator lamp is
located in the lower section of the center
console.
1ABC button
2Indicator lamp
�
Start the engine (
�page 49).Suspension for sporty driving style
The setting for sporty driving is selected
when indicator lamp2 is illuminated.
�
Press button1.
Indicator lamp2 comes on.
The message
ABC Active Body Con-
trol SPORT appears in the multifunc-
tion display for a short time.
Suspension for regular driving style
The setting for regular driving is selected
when the indicator lamp2 is off.
�
Press button1.
Indicator lamp2 goes out.
The message
ABC Active Body Con-
trol COMFORT appears in the multifunc-
tion display for a short time.
iThe selected setting is stored, even if
the engine is turned off.
Page 223 of 480
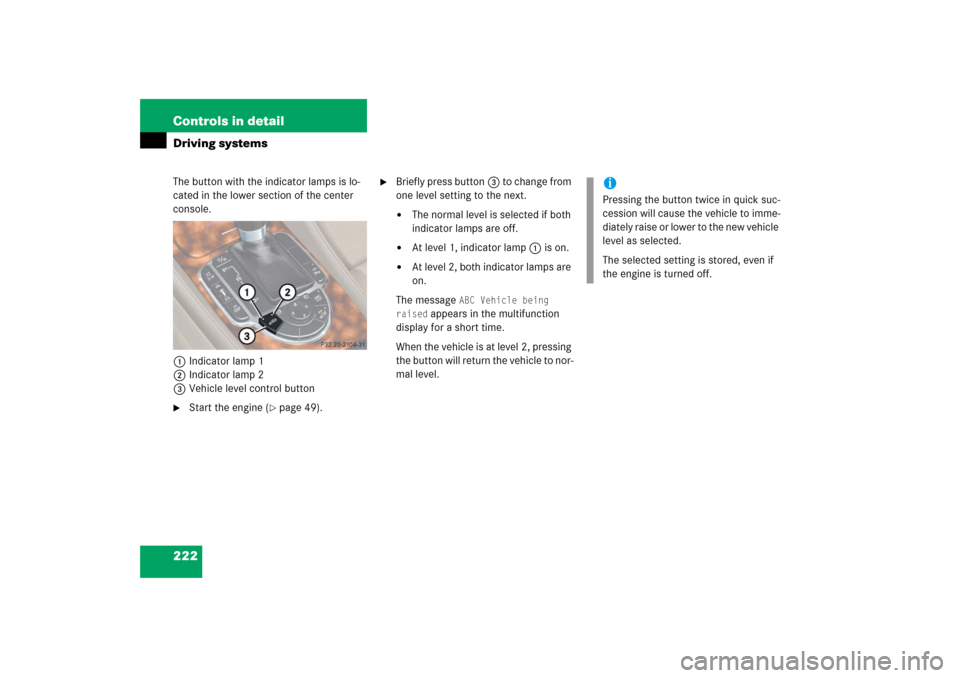
222 Controls in detailDriving systemsThe button with the indicator lamps is lo-
cated in the lower section of the center
console.
1Indicator lamp 1
2Indicator lamp 2
3Vehicle level control button�
Start the engine (
�page 49).
�
Briefly press button3 to change from
one level setting to the next.�
The normal level is selected if both
indicator lamps are off.
�
At level 1, indicator lamp1 is on.
�
At level 2, both indicator lamps are
on.
The message
ABC Vehicle being
raised
appears in the multifunction
display for a short time.
When the vehicle is at level 2, pressing
the button will return the vehicle to nor-
mal level.
iPressing the button twice in quick suc-
cession will cause the vehicle to imme-
diately raise or lower to the new vehicle
level as selected.
The selected setting is stored, even if
the engine is turned off.
Page 227 of 480

226 Controls in detailDriving systemsAs your vehicle approaches an object, one
or more distance segments will illuminate,
depending on the distance. When the
eighth distance segment illuminates, you
have reached the minimum distance.�
Front area: An intermittent acoustic
warning will sound as the first red dis-
tance segment illuminates and a con-
stant acoustic warning lasting a
maximum of two seconds will sound for
the second distance segment. The sig-
nal is canceled when the gear selector
lever is placed in position P or the park-
ing brake is set.
�
Rear area: An intermittent acoustic
warning will sound when the first dis-
tance segment illuminates. This signal
quickens with each additional distance
segment lit. When the eighth distance
segment illuminates, the acoustic
warning becomes a constant signal.
The signal is canceled when the gear
selector lever is placed in positionD
orP or the parking brake is set.Switching the Parktronic system
on/off
You can switch off the Parktronic system
manually.
The Parktronic switch is located in the low-
er part of the center console (
�page 30).
1Parktronic switch
2Indicator lampSwitching off the Parktronic system
�
Press Parktronic switch1.
Indicator lamp2 comes on.
Switching on the Parktronic system
�
Press Parktronic switch1 again.
Indicator lamp2 goes out.iThe Parktronic system switches on au-
tomatically when you switch on the ig-
nition (
�page 36).