Page 143 of 226

141
Navigation
Route guidance
Important map symbols:
�Current vehicle location and direction
of travel
y
If the map orientation
2D Heading Up
(�page 153) is chosen, the arrow will
always point upward.
�The remaining route section is
highlighted in blue color.
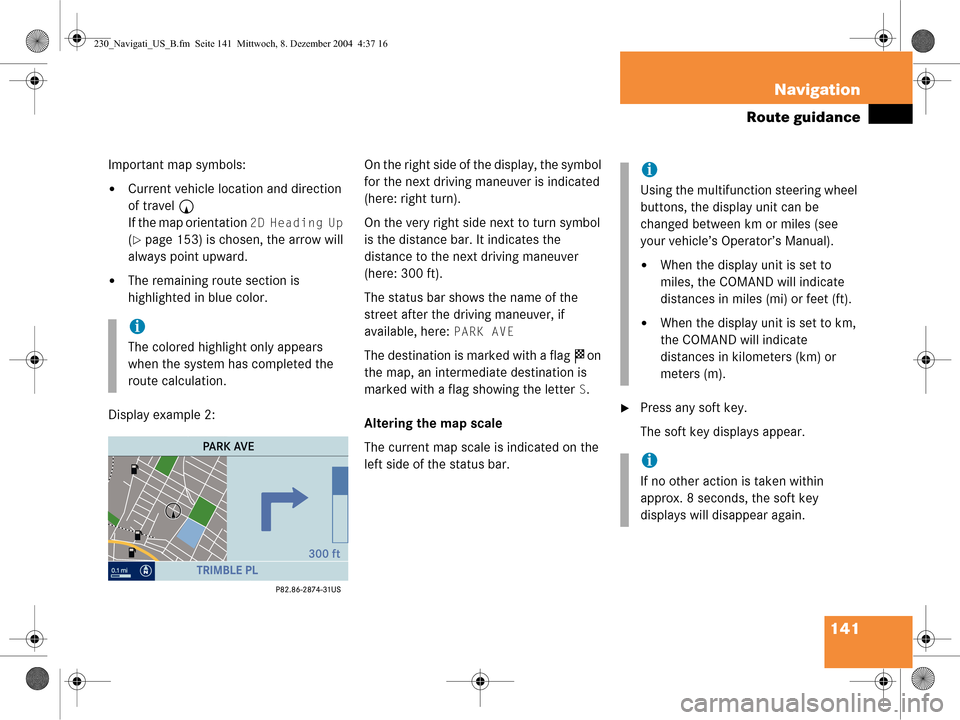
Display example 2: On the right side of the display, the symbol
for the next driving maneuver is indicated
(here: right turn).
On the very right side next to turn symbol
is the distance bar. It indicates the
distance to the next driving maneuver
(here: 300 ft).
The status bar shows the name of the
street after the driving maneuver, if
available, here:
PARK AVE
The destination is marked with a flag
$ on
the map, an intermediate destination is
marked with a flag showing the letter
S.
Altering the map scale
The current map scale is indicated on the
left side of the status bar.
�Press any soft key.
The soft key displays appear.
i
The colored highlight only appears
when the system has completed the
route calculation.
i
Using the multifunction steering wheel
buttons, the display unit can be
changed between km or miles (see
your vehicle’s Operator’s Manual).
�When the display unit is set to
miles, the COMAND will indicate
distances in miles (mi) or feet (ft).
�When the display unit is set to km,
the COMAND will indicate
distances in kilometers (km) or
meters (m).
i
If no other action is taken within
approx. 8 seconds, the soft key
displays will disappear again.
230_Navigati_US_B.fm Seite 141 Mittwoch, 8. Dezember 2004 4:37 16
Page 177 of 226

175
Service
SMS (Mail)
�Use
g or G to select Cell, Work or
Home.
�Press E.
If the address book entry does not con-
tain a phone number of the previously
selected number type, then the system
will add the number to the entry and
the message
Data Has Been Saved
is displayed and the Sender display will
appear.
If the address book entry already
contains a phone number of the
previously selected number type, the
inquiry
Do you want to Overwrite
Entry?
will appear. Overwriting an entry:
�Press
E.
The system overwrites the existing
number and the message
Data
Has Been Saved
is displayed and
the Sender display is displayed
again.
If you do not wish to overwrite the entry
�Use h to select No.
�Press E.
The Sender display is displayed
again.
�In the SMS Inbox Folder (�page 169),
use g or G to select a message.
�Press the Delete soft key.
The Delete dialog will appear.
�Press E to confirm with Yes.
The message is deleted.
If you do not wish to delete the message
�Press h to highlight No and then
press E.
or
�Press the Back soft key.
The SMS Inbox Folder will appear and
the sender is still marked.
Deleting a SMS message*
230_Service_US_B.fm Seite 175 Mittwoch, 8. Dezember 2004 4:40 16
Page 201 of 226

199
System settings
System settings
�In the System menu, press the Time
soft key.
The Date/Time menu for setting date
and time will appear.
Country soft key:
Can only be selected if you use the GPS.
You can select the country (
�page 200) .
�Press H or h to select day, month
or year.
�Press g or G .
Depending on the selection, you set
the day, the month or the year.
�Press the Back soft key.
or
�Press E.
The setting is saved.
Setting the time
�In the System settings menu, press the
Time soft key.
�Press H or h to select hours or
minutes.
�Press g or G .
Depending on the selection, you set
the hour or the minute. Setting the hour:
Each time the button is pressed, the
time is adjusted in increments of
1hour.
Setting the minute:
�With GPS reception:
Each time the button is pressed, the
time is adjusted in increments of
30 minutes.
�Without GPS reception:
Each time the button is pressed, the
time is adjusted in increments of
1 minute.
�Press the Back soft key.
or
�Press E.
The setting is saved.
i
Time settings are not automatically
changed to daylight saving time.
Change the clock manually.
230_System_US_B.fm Seite 199 Mi ttwoch, 8. Dezember 2004 4:41 16
Page 204 of 226
202 System settings
System settings
Adjusting the display brightness
�In the Display menu, press the
Bright. soft key.
�Press h or H to adjust the
brightness.
or
�Press the Bright. soft key longer than
2 seconds.
The display brightness changes
gradually.
�Release the Bright. soft key.
�Press the Back soft key.
or
�Press E.
The brightness setting is applied.
Setting the display dimming
characteristics
�In the Display menu, press the Mode
soft key.
�Press G or g to select an entry.
Day Mode
The display is continuously set to
daylight design.
Night Mode
The display is continuously set to night-
time design.
Automatic
The display changes depending on the
ambient light sensor in the vehicle.
�Press E.
The setting is applied. The System
settings menu will appear.
230_System_US_B.fm Seite 202 Mi ttwoch, 8. Dezember 2004 4:41 16
Page:
< prev 1-8 9-16 17-24