Page 267 of 481

266 Controls in detailUseful featuresStep 7:�
To program the remaining two buttons,
repeat the steps above starting with
step 3.Rolling code programming
To train a garage door opener (or other roll-
ing code devices) with the rolling code fea-
ture, follow these instructions after
completing the “Programming” portion
(steps 1 through 6) of this text. (A second
person may make the following training
procedures quicker and easier.)
Step 8:
�
Locate “training” button on the garage
door opener motor head unit.
Exact location and color of the button
may vary by garage door opener brand.
Depending on manufacturer, the “train-
ing” button may also be referred to as
“learn” or “smart” button. If there is dif-
ficulty locating the transmitting button,
refer to the garage door opener opera-
tor’s manual. Step 9:
�
Press “training” button on the garage
door opener motor head unit.
The “training light” is activated.
You have 30 seconds to initiate the follow-
ing step.
Step 10:
�
Firmly press, hold for two seconds and
release the programmed integrated
signal transmitter button (2, 3
or4).
Step 11:
�
Press, hold for two seconds and re-
lease same button a second time to
complete the training process.
Some garage door openers (or other rolling
code equipped devices) may require you to
perform this procedure a third time to
complete the training.
iIf the indicator lamp1 flashes rapidly
for about two seconds and then turns
to a constant light, continue with pro-
gramming steps 8 through 12 as your
garage door opener may be equipped
with the “rolling code feature”.
��
Page 268 of 481
.
Step 13:
�
To program the remaining t")
267 Controls in detail
Useful features
Step 12:�
Confirm the garage door operation by
pressing the programmed integrated
signal transmitter button (2, 3
or4).
Step 13:
�
To program the remaining two buttons,
repeat the steps above starting with
step 3.Gate operator/Canadian programming
Canadian radio-frequency laws require
transmitter signals to “time-out” (or quit)
after several seconds of transmission
which may not be long enough for the inte-
grated signal transmitter to pick up the sig-
nal during programming. Similar to this
Canadian law, some U.S. gate operators
are designed to “time-out” in the same
manner.
If you live in Canada or if you are having dif-
ficulties programming a gate operator (re-
gardless of where you live) by using the
programming procedures, replace step 4
with the following:Step 4:
�
Continue to press and hold the inte-
grated signal transmitter button (2,
3 or4) while you press and re-press
(“cycle”) your hand-held remote con-
trol transmitter6 every two seconds
until the frequency signal has been
learned. Upon successful training, the
indicator lamp1 will flash slowly and
then rapidly after several seconds.
�
Proceed with programming step 5 and
step 6 to complete.
Page 269 of 481
.
�
Select and press the appropriate inte-
grated signal transmitter button (2,
3 or4) t")
268 Controls in detailUseful featuresOperation of integrated remote control�
Switch on the ignition (
�page 34).
�
Select and press the appropriate inte-
grated signal transmitter button (2,
3 or4) to activate the remote con-
trolled device.
The integrated remote control trans-
mitter continues to send the signal as
long as the button is pressed – up to
20 seconds.Erasing the integrated remote control
memory
�
Switch on the ignition (
�page 34).
�
Simultaneously hold down the signal
transmitter buttons 2and 4, for ap-
proximately 20 seconds, until the indi-
cator lamp1 flashes rapidly. Do not
hold for longer than 30 seconds.
The codes of all three channels are
erased.Reprogramming a single integrated sig-
nal transmitter button
To program a device using a signal trans-
mitter button previously trained, follow
these steps:
�
Press and hold the desired signal trans-
mitter button (2, 3 or4). Do not re-
lease the button.
�
The indicator lamp1 will begin to
flash after 20 seconds. Without releas-
ing the integrated signal transmitter
button, proceed with programming
starting with step 3.
iIf you sell your vehicle, erase the codes
of all three channels.
Page 385 of 481
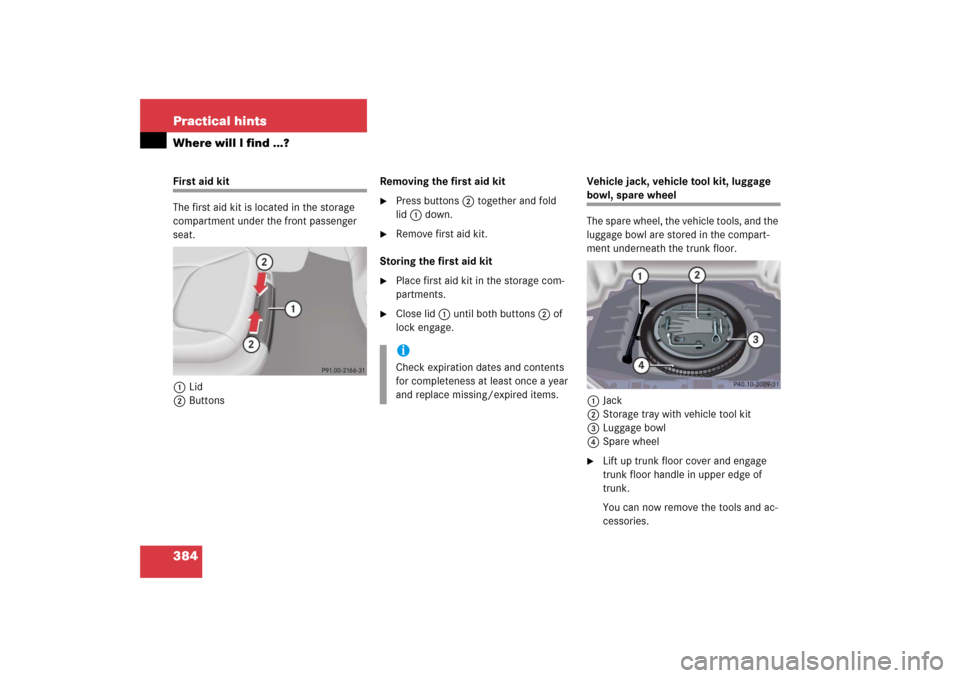
384 Practical hintsWhere will I find ...?First aid kit
The first aid kit is located in the storage
compartment under the front passenger
seat.
1Lid
2ButtonsRemoving the first aid kit
�
Press buttons2 together and fold
lid1 down.
�
Remove first aid kit.
Storing the first aid kit
�
Place first aid kit in the storage com-
partments.
�
Close lid1 until both buttons2 of
lock engage.Vehicle jack, vehicle tool kit, luggage
bowl, spare wheel
The spare wheel, the vehicle tools, and the
luggage bowl are stored in the compart-
ment underneath the trunk floor.
1Jack
2Storage tray with vehicle tool kit
3Luggage bowl
4Spare wheel�
Lift up trunk floor cover and engage
trunk floor handle in upper edge of
trunk.
You can now remove the tools and ac-
cessories.
iCheck expiration dates and contents
for completeness at least once a year
and replace missing/expired items.
Page 445 of 481

System for potentially reducing braking
distances in emergency braking situa-
tions. The system is activated when it
senses an emergency based on how")
444 Technical termsBAS
(B
rake A
ssist S
ystem)
System for potentially reducing braking
distances in emergency braking situa-
tions. The system is activated when it
senses an emergency based on how
fast the brake is applied.
Bead
(
�page 323)
Bi-xenon headlamps
Headlamps which use an electric arc as
the light source and produce a more in-
tense light than filament headlamps.
Bi-xenon headlamps produce low beam
and high beam.
CAC
(Customer A
ssistance C
enter)
Mercedes-Benz customer service cen-
ter, which can help you with any ques-
tions about your vehicle and provide
assistance in the event of a break-
down.CAN system
(C
ontroller A
rea N
etwork)
Data bus network serving to control ve-
hicle functions such as door locking or
windshield wiping.
Cockpit
All instruments, switches, buttons and
indicator/warning lamps in the passen-
ger compartment needed for vehicle
operation and monitoring.
Cold tire inflation pressure
(
�page 323)
COMAND
(Cockpit M
anagement and D
ata Sys-
tem)
Information and operating center for
vehicle sound and communications
systems, including the radio and navi-
gation system, as well as other optional
equipment (CD changer, telephone,
etc.).Control system
The control system is used to call up
vehicle information and to change
component settings. Information and
messages appear in the multifunction
display. The driver uses the buttons on
the multifunction steering wheel to
navigate through the system and to ad-
just settings.
Cruise control
Driving convenience system that auto-
matically maintains the vehicle speed
set by the driver.
Curb weight
(
�page 323)
Page 448 of 481

The Motor Octane Number for gasoline
as determined by a standardized meth-
od. It is an indication of a gasoline’s
ability to resist undesired deto")
447 Technical terms
MON
(M
otor O
ctane N
umber)
The Motor Octane Number for gasoline
as determined by a standardized meth-
od. It is an indication of a gasoline’s
ability to resist undesired detonation
(knocking). The average of both the
MON (Motor Octane Number) and
->RON (Research Octane Number) is
posted at the pump, also known as
ANTI-KNOCK INDEX.
Multifunction display
Display field in the speedometer used
to present information provided by the
control system.
Multifunction steering wheel
Steering wheel with buttons for operat-
ing the control system.
Normal occupant weight
(
�page 324)Overspeed range
Engine speeds within the red marking
of the tachometer dial. Avoid this en-
gi ne s pe ed r ange , as it m a y re su lt i n se -
rious engine damage that is not
covered by the Mercedes-Benz Limited
Warranty.
Parktronic system (Parking assist)*
System which uses visual and acoustic
signals to assist the driver during park-
ing maneuvers.
Poly-V-belt drive
Drives engine components (alternator,
AC compressor, etc.) from the engine.Power train
Collective term designating all compo-
nents used to generate and transmit
motive power to the drive axles, includ-
ing:
�
Engine
�
Clutch/torque converter
�
Transmission
�
Transfer case
�
Drive shaft
�
Differential
�
Axle shafts/axles
PRE-SAFE
®
(Pre
ventive occupant Safe
ty system)
Vehicles equipped with PRE-SAFE take
preventive measures when the system
senses certain driving dynamics sug-
gesting a possible accident.
Production options weight
(
�page 324)
Page 466 of 481

465 Index
Mph or km/h in speedometer 163
Multicontour backrest* 122
Multifunction display 143, 447
Selecting language 164
Standard display 147
Multifunction display messages
ABC 351
ABS 353
Airmatic 358
Brake fluid 361
Brake pads 361
Check engine 342, 343
Coolant 363
Coolant level 362
Distronic* 354
Doors 365
Engine 342, 343
Engine oil level 366
Entry position 368
Hood 368Lamps 371
Parking brake 360
Selector lever 357
SmartKey 368
SmartKey with KEYLESS-GO* 368
TeleAid 374
Telephone* 374
Tires 376–383
Trunk 375
Washer fluid 375
Multifunction steering wheel 26, 144,
447
Buttons 144
N
Navigation system
Operating 155
See separate COMAND* operating in-
structions
Night security illumination 133
Normal occupant weight 324O
Occupant distribution 324
Occupant safety 60
Air bags 61
Children and air bags 62
Children in the vehicle 71
Fastening the seat belt 43
Infant and child restraint systems 71
LATCH child seat anchors 75
Seat belts 43, 64
Oil
Adding 292
Consumption 288
Dipstick 288
Filler neck 291, 292, 293
Viscosity 445
Oil level
Checking 286
Oil level via control system
Checking 289