Page 184 of 481

183 Controls in detail
Automatic transmission
Manual shift program S 55 AMG and S65AMG
In addition to the automatic shift
programC orS, your vehicle is equipped
with the manual shift programM.
In the manual program modeM,
system-controlled automatic gearshifting
is switched off and you need to change the
gears by manually upshifting or downshift-
ing using the steering wheel gearshift but-
tons to the left and right of the steering
wheel (
�page 181) or the gear selector
lever.The program mode selector switch is
located on the lower part of the center
console.
1Program mode selector switch
M Manual For manual gear shifting
C Comfort For comfort driving
S Sport For standard driving
The current gear selector lever position
and the selected program mode (
M/C/S)
are indicated in the tachometer display
(
�page 174).
!Allow engine to warm up under low
load use. Do not place full load on the
engine until the operating temperature
has been reached.
Shift into reverse gearR or parking
positionP only when the vehicle is
stopped.
Avoid spinning of a drive wheel for an
extended period when driving off on
slippery road surfaces. This may cause
serious damage to the drivetrain which
is not covered by the Mercedes-Benz
Limited Warranty.
Page 192 of 481
.
�
Pr")
191 Controls in detail
Good visibility
Rear window sunshade
The switch is located on the upper part of
the front center console.
1Rear window sunshade switch�
Switch on the ignition (
�page 34).
�
Press switch 1 briefly to raise the sun-
shade.
�
Press switch 1 briefly to lower the
sunshade.
Always raise the sunshade fully for its sup-
port against the window frame.
Rear side window sunshade*�
To raise sunshade pull on the tab and
engage in holder.
�
To lower sunshade disengage tab and
guide retraction.
Warning!
G
When operating the rear window sunshade,
be sure that there is no danger of anyone be-
ing harmed by the raising or lowering proce-
dure.
The raising or lowering procedure can be im-
mediately reversed by pressing switch1.Warning!
G
When leaving the vehicle, always remove the
SmartKey or SmartKey with KEYLESS-GO*
from the starter switch, take it with you, and
lock the vehicle. Do not leave children unat-
tended in the vehicle, or with access to an
unlocked vehicle. Unsupervised use of vehi-
cle equipment can cause an accident
and/or serious personal injury.
!Always guide the sunshade. Do not let
it snap back abruptly, as the retractor
could be damaged.
Page 205 of 481
204 Controls in detailAutomatic climate controlRear passenger compartment adjust-able air vents
Rear center console air vents
1Left center air vent, adjustable
2Right center air vent, adjustable
3Thumbwheel for center air vents with
adjustable booster blowerTo open center air vents and to adjust the
booster blower:
�
Turn thumbwheel3.Rear side air vents
4Rear side air vent, right and left
5Air volume control for rear side air vent
To open rear side air vents:
�
Turn thumbwheel5 towards the win-
dow.
iThe booster blower allows air volume
speed to the rear passenger compart-
ment to be increased at four different
levels.
The temperature at the air vents for
rear passenger compartment1
and2 is the same as at the dashboard
center air vents.
Page 206 of 481

205 Controls in detail
Automatic climate control
Rear passenger compartment climate control*
The automatic climate control is operation-
al whenever the engine is running. You can
operate the climate control system in ei-
ther the automatic or manual mode. The
system cools or heats the interior depend-
ing on the selected interior temperature
and the current outside temperature.
The automatic climate control system is
adjustable individually for the rear passen-
ger compartment.
Nearly all dust particles, pollutants and
odors are filtered out before outside air en-
ters the passenger compartment through
the air distribution system.The control panel is located in the rear cen-
ter console.
Rear automatic climate control panel
iWhen the rear seats are not occupied
(rear seat belts unbuckled) the rear cli-
mate control system adopts the set-
tings of the front climate control
system.
Item
1
Left center air vent, adjustable
2
Display
3
Right center air vent, adjustable
4
Thumbwheel for air distribution
5
Temperature control, right
6
Air volume (automatic, manual)
7
Temperature control, left
8
Rear climate control system on/off
Residual engine heat utilization
(REST)
Warning!
G
Follow the recommended settings for heat-
ing and cooling as given in the instructions
for the front automatic climate control
(�page 192). Otherwise the windows could
fog up, impairing visibility for the driver and
endangering you and others.
Page 227 of 481

226 Controls in detailDriving systemsThe distance warning function on/off but-
ton and thumbwheel for setting distance
are located on the lower part of the front
center console.
1Distance warning function on/off but-
ton
2Thumbwheel for setting distance
Increasing distance
Increasing the distance setting causes Dis-
tronic to maintain a greater following dis-
tance to the vehicle ahead.�
Turn thumbwheel2 towards¯.Decreasing distance
Decreasing the distance setting causes
Distronic to maintain a shorter following
distance to the vehicle ahead.
�
Turn thumbwheel2 towards®.
Distance warning function
When Distronic is deactivated, this func-
tion will continue to warn you when recog-
nizing a slower vehicle moving in the
vehicle’s path and the danger of a collision
exists:
�
The distance warning lampl in the
instrument cluster comes on.
�
An intermittent warning sounds.
If these warnings are issued, you must
brake manually to maintain a safe distance
and avoid a collision with the vehicle
ahead.
When pressing the brake pedal, the warn-
ing sound stops. The warning sound also
stops when the distance to the vehicle ahead is sufficient again without applying
the brake pedal. In this case the distance
warning lampl also extinguishes.
Warning!
G
If the Distronic warning lampl in the in-
strument cluster comes on while driving
and/or an intermittent warning sounds, im-
mediate attention on the part of the driver is
required. As required by the traffic situation,
apply the brakes and navigate around a pos-
sible obstacle. However, do not drive by re-
lying on the distance warning function, as
this will result in an emergency braking ap-
plication. Especially depending on road sur-
face conditions and driver reaction, this will
not always enable you to avoid a collision.iComplex driving situations are not al-
ways fully recognized by Distronic. This
could result in wrong or missing dis-
tance warnings.
Page 232 of 481

231 Controls in detail
Driving systems
The following vehicle level settings can be
selected when the vehicle is stationary:
Select the “Raised” level setting only when
required by current driving conditions.
Otherwise:�
Fuel consumption may increase.
�
Handling may be impaired.The switch with the indicator lamps is lo-
cated on the upper part of the front center
console.
1Indicator lamp
2Vehicle level control switch
�
Start the engine.
�
Briefly press switch2 to change from
one level setting to the other.
The message:AIRMATIC
VEHICLE RISING appears in the multifunction display
when changing from normal level to
raised level.The indicator lamp is then lit. The dis-
play switches off when the vehicle is
raised.
�
Press switch2 again to lower the ve-
hicle. The indicator lamp is off.
The selected vehicle level setting remains
stored in memory even if the engine is
turned off and restarted except when you
�
exceed a speed of 75 mph (120 km/h)
or
�
maintain a speed of between 50 mph
(80 km/h) and 75 mph (120 km/h) for
more than 5 minutes
The vehicle then lowers to regular level.
The message:
AIRMATIC
LEVELING CANCELLEDappears in the multifunction display and
the indicator lamp is off. The display
switches off when the vehicle is raised.
LevelNormal
For driving on normal roads.
The indicator lamp is off.
Raised
For driving on rough roads or
with snow chains.The indica-
tor lamp is on.
Warning!
G
To help avoid personal injury, keep hands
and feet away from wheel housing area, and
stay away from under the vehicle when low-
ering the vehicle chassis.
Page 235 of 481
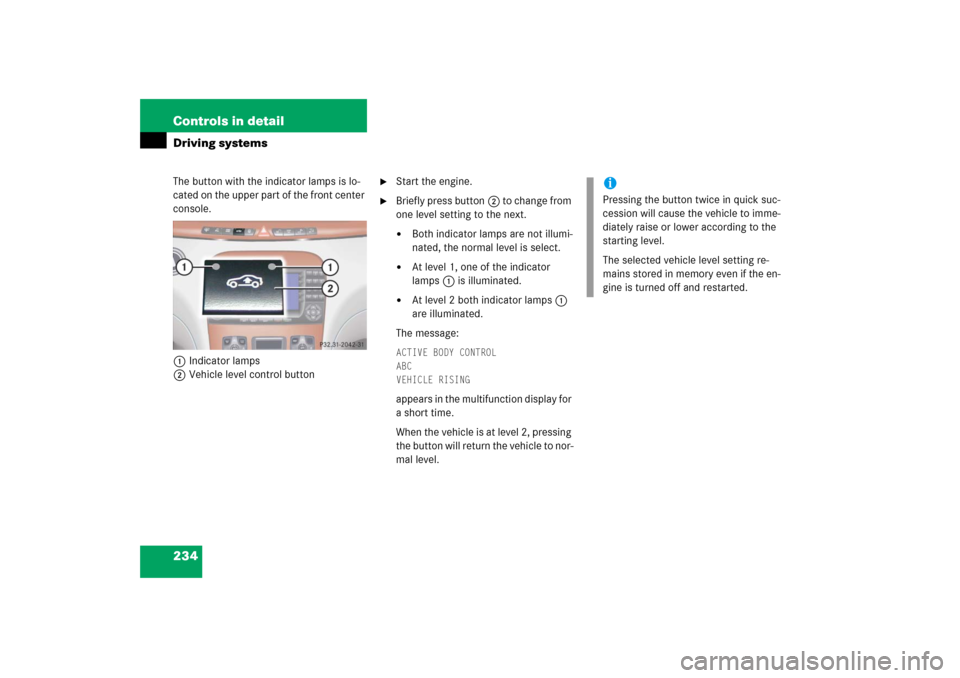
234 Controls in detailDriving systemsThe button with the indicator lamps is lo-
cated on the upper part of the front center
console.
1Indicator lamps
2Vehicle level control button
�
Start the engine.
�
Briefly press button2 to change from
one level setting to the next. �
Both indicator lamps are not illumi-
nated, the normal level is select.
�
At level 1, one of the indicator
lamps1 is illuminated.
�
At level 2 both indicator lamps1
are illuminated.
The message:
ACTIVE BODY CONTROL
ABC
VEHICLE RISINGappears in the multifunction display for
a short time.
When the vehicle is at level 2, pressing
the button will return the vehicle to nor-
mal level.
iPressing the button twice in quick suc-
cession will cause the vehicle to imme-
diately raise or lower according to the
starting level.
The selected vehicle level setting re-
mains stored in memory even if the en-
gine is turned off and restarted.
Page 239 of 481

238 Controls in detailDriving systemsSwitching the Parktronic system
on/off
The Parktronic system can be switched off
manually.
The Parktronic button is located in the up-
per part of the front center console.
1Indicator lamp
2Parktronic buttonSwitching off the Parktronic system
�
Press button 2.
Indicator lamp 1 comes on.
Switching on the Parktronic system
�
Press button 2 again.
Indicator lamp 1 goes out.
Parktronic system malfunction
If only the red distance segments illumi-
nate and an acoustic warning sounds,
there is a malfunction in the Parktronic
system. The Parktronic system will auto-
matically switch off after 20 seconds and
the indicator lamp in the Parktronic switch
comes on.
�
Have the Parktronic system checked
by an authorized Mercedes-Benz Cen-
ter as soon as possible.
If only the red distance segments illumi-
nate and no acoustic warning sounds, the
Parktronic system sensors are dirty or
there is an interference from other radio or
ultrasonic signals. The Parktronic system
will automatically switch off after 20 sec-
onds and the indicator lamp in the Park-
tronic switch comes on.
�
Switch off the ignition (
�page 34).
�
Clean Parktronic system sensors
(�page 335).
�
Switch on the ignition.
or
�
Check Parktronic system operation at
another location to rule out interfer-
ence from outside radio or ultrasonic
signals.
iThe Parktronic system is automatically
switched on when the ignition is
switched on (
�page 34).