Page 395 of 481
394 Practical hintsReplacing bulbsSafe vehicle operation depends on proper
exterior lighting and signaling. It is there-
fore essential that all bulbs and lamp as-
semblies are in good working order at all
times.
Correct headlamp adjustment is extremely
important. Have headlamps checked and
readjusted at regular intervals and when a
bulb has been replaced. See an authorized
Mercedes-Benz Center for headlamp ad-
justment.
iIf the headlamps or front fog lamps are
fogged up on the inside as a result of
high humidity, driving the vehicle a dis-
tance with the lights on should clear up
the fogging.
iSubstitute bulbs will be brought into
use when the following lamps malfunc-
tion:�
Brake lamps
�
Rear parking lamps
�
Rear turn signal lamps
�
Tail lamps
Observe the messages in the multi-
function display (
�page 369).
Page 396 of 481
395 Practical hints
Replacing bulbs
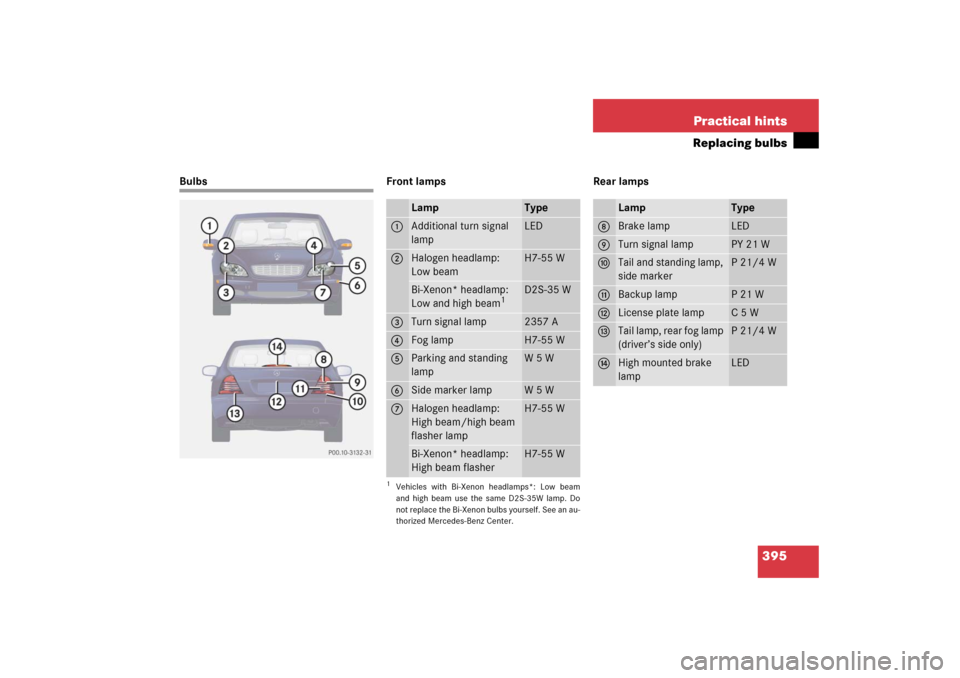
Bulbs Front lamps Rear lamps
Lamp
Type
1
Additional turn signal
lamp
LED
2
Halogen headlamp:
Low beam
H7-55 W
Bi-Xenon* headlamp:
Low and high beam
1
1Vehicles with Bi-Xenon headlamps*: Low beam
and high beam use the same D2S-35W lamp. Do
not replace the Bi-Xenon bulbs yourself. See an au-
thorized Mercedes-Benz Center.
D2S-35 W
3
Turn signal lamp
2357 A
4
Fog lamp
H7-55 W
5
Parking and standing
lamp
W5W
6
Side marker lamp
W5W
7
Halogen headlamp:
High beam/high beam
flasher lamp
H7-55 W
Bi-Xenon* headlamp:
High beam flasher
H7-55 W
Lamp
Type
8
Brake lamp
LED
9
Turn signal lamp
PY 21 W
a
Tail and standing lamp,
side marker
P 21/4 W
b
Backup lamp
P21W
c
License plate lamp
C5W
d
Tail lamp, rear fog lamp
(driver’s side only)
P 21/4 W
e
High mounted brake
lamp
LED
Page 397 of 481
396 Practical hintsReplacing bulbsNotes on bulb replacement
�
Only use 12-volt-bulbs of the same
type and with the specified watt rating.
�
Switch lights off before changing a bulb
to prevent short circuits.
�
Always use a clean lint-free cloth when
handling bulbs.
�
Your hands should be dry and free of oil
and grease.
�
If the newly installed bulb does not
come on, visit an authorized
Mercedes-Benz Center.Have the LEDs and bulbs for the following
lamps replaced by an authorized
Mercedes-Benz Center.
�
Additional turn signal lamps in the exte-
rior rear view mirrors
�
Bi-Xenon lamps*
�
High mounted brake lamp
�
Brake lamps
�
Rear side marker lamps
�
Rear parking lamps
Warning!
G
Keep bulbs out of reach of children.
Bulbs and bulb sockets can be very hot. Al-
low the lamp to cool down before changing
a bulb.
Halogen lamps contain pressurized gas. A
bulb can explode if you:�
touch or move it when hot
�
drop the bulb
�
scratch the bulb
Wear eye and hand protection.
Because of high voltage in Xenon lamps, it is
dangerous to replace the bulb or repair the
lamp and its components. We recommend
that you have such work done by a qualified
technician.
iHave the headlamp adjustment
checked regularly.
Page 398 of 481
397 Practical hints
Replacing bulbs
Replacing bulbs for front lamps
Before you start to replace a bulb for a
front lamp, do the following first:�
Turn the exterior lamp switch to M
(�page 50).
�
Open the hood (
�page 287) (except
for side marker lamps).
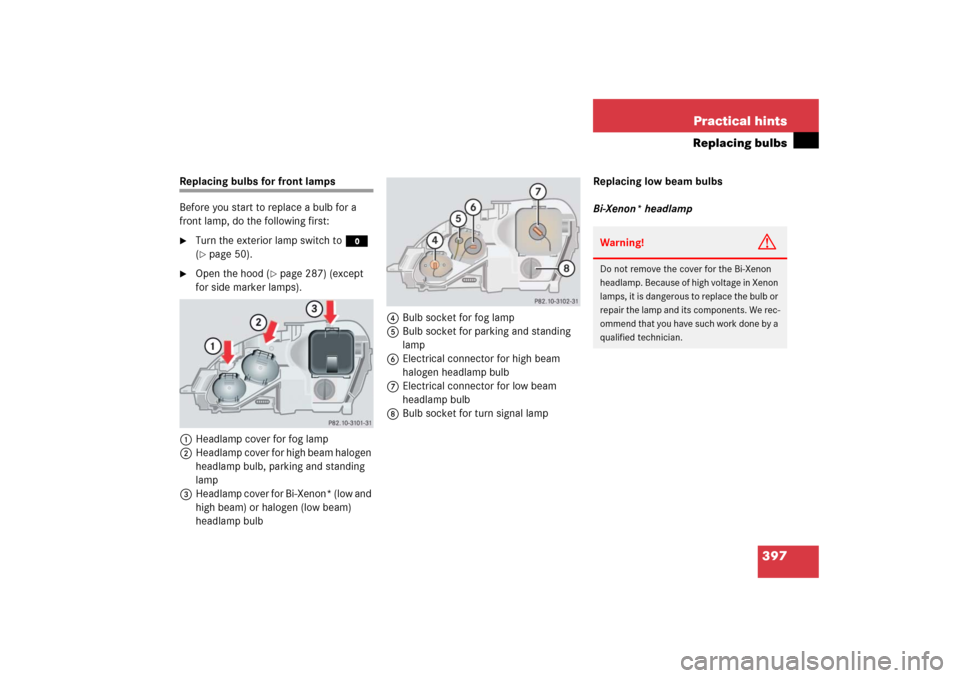
1Headlamp cover for fog lamp
2Headlamp cover for high beam halogen
headlamp bulb, parking and standing
lamp
3Headlamp cover for Bi-Xenon* (low and
high beam) or halogen (low beam)
headlamp bulb4Bulb socket for fog lamp
5Bulb socket for parking and standing
lamp
6Electrical connector for high beam
halogen headlamp bulb
7Electrical connector for low beam
headlamp bulb
8Bulb socket for turn signal lampReplacing low beam bulbs
Bi-Xenon* headlamp
Warning!
G
Do not remove the cover for the Bi-Xenon
headlamp. Because of high voltage in Xenon
lamps, it is dangerous to replace the bulb or
repair the lamp and its components. We rec-
ommend that you have such work done by a
qualified technician.
Page 400 of 481
399 Practical hints
Replacing bulbs
Parking and standing lamp bulb�
Press the tab on cover2 and remove
cover.
�
Pull out the bulb socket5 with the
bulb.
�
Pull the bulb out of the bulb socket5.
�
Insert a new bulb in the bulb socket5.
�
Reinstall the bulb socket5.
�
Press cover2 onto the housing until
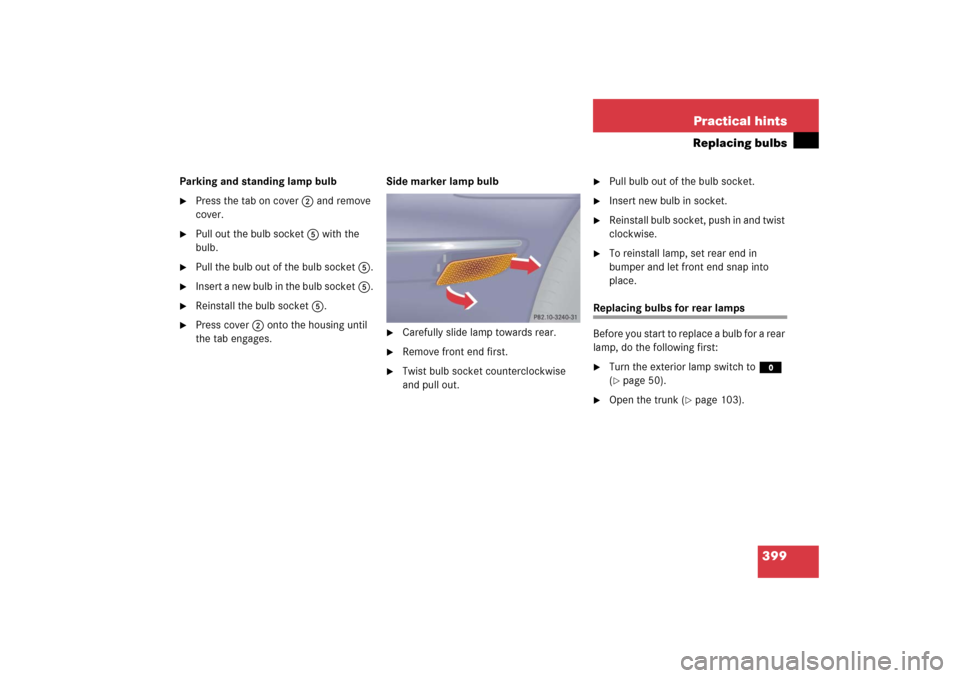
the tab engages.Side marker lamp bulb
�
Carefully slide lamp towards rear.
�
Remove front end first.
�
Twist bulb socket counterclockwise
and pull out.
�
Pull bulb out of the bulb socket.
�
Insert new bulb in socket.
�
Reinstall bulb socket, push in and twist
clockwise.
�
To reinstall lamp, set rear end in
bumper and let front end snap into
place.
Replacing bulbs for rear lamps
Before you start to replace a bulb for a rear
lamp, do the following first:�
Turn the exterior lamp switch to M
(�page 50).
�
Open the trunk (
�page 103).
Page 401 of 481
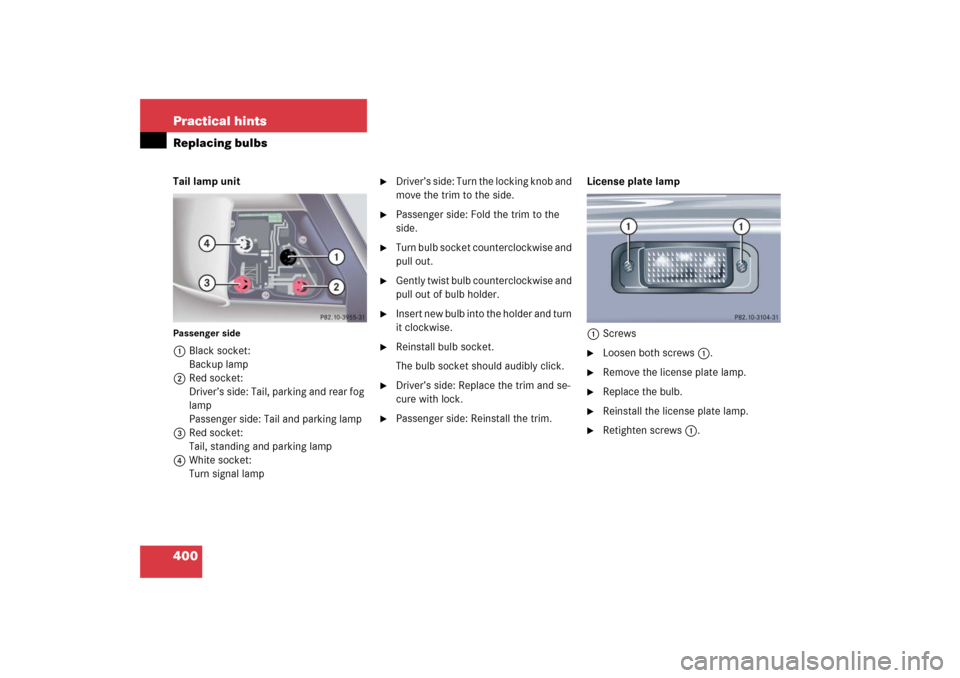
400 Practical hintsReplacing bulbsTail lamp unitPassenger side1Black socket:
Backup lamp
2Red socket:
Driver’s side: Tail, parking and rear fog
lamp
Passenger side: Tail and parking lamp
3Red socket:
Tail, standing and parking lamp
4White socket:
Turn signal lamp
�
Driver’s side: Turn the locking knob and
move the trim to the side.
�
Passenger side: Fold the trim to the
side.
�
Turn bulb socket counterclockwise and
pull out.
�
Gently twist bulb counterclockwise and
pull out of bulb holder.
�
Insert new bulb into the holder and turn
it clockwise.
�
Reinstall bulb socket.
The bulb socket should audibly click.
�
Driver’s side: Replace the trim and se-
cure with lock.
�
Passenger side: Reinstall the trim. License plate lamp
1Screws
�
Loosen both screws1.
�
Remove the license plate lamp.
�
Replace the bulb.
�
Reinstall the license plate lamp.
�
Retighten screws1.
Page 413 of 481

412 Practical hintsJump startingThe battery is located on the right side of
the trunk under the battery cover
(�page 408).
�
Make sure the two vehicles do not
touch.
�
Turn off all electrical consumers.
�
Apply parking brake.
�
Shift gear selector lever to positionP.
�
Open the trunk lid.
�
Remove battery cover (
�page 408).
�
Remove red cover from positive
terminal 1. 1Positive terminal of discharged battery
2Negative terminal of discharged
battery
3Positive terminal of charged battery
4Negative terminal of charged battery
�
Connect positive terminals 1 and3
of the batteries with the jumper cable.
Clamp cable to charged battery3
first.
�
Start engine of the vehicle with the
charged battery and run at idle speed.
�
Connect negative terminals2 and4
of the batteries with the jumper cable.
Clamp cable to charged battery4
first.
�
Start the engine of the disabled vehi-
cle.
Now you can again turn on the electrical
consumers. Do not turn on the lights under
any circumstances.
�
Remove the jumper cables first from
negative terminals2 and4 and then
from positive terminals1 and3.
You can now turn on the lights.
�
Have the battery checked at the near-
est authorized Mercedes-Benz Center.
Warning!
G
Keep flames or sparks away from battery.
Do not smoke.
Observe all safety instructions and precau-
tions when handling automotive batteries
(�page 408).
!Never invert the terminal connections.
Page 452 of 481
451 Index
A
ABC 232, 443
Messages in display 351
Setting vehicle level 230, 233
ABS 25, 79, 443
Malfunction indicator lamp 340
Messages in display 353
Warning lamp 340
Accelerator position, automatic
transmission 177
Accessory weight 323
Accident
In case of 54
Activating
Air conditioner (cooling) 202
Air conditioning 202
Air recirculation mode 198
Anti-theft alarm system 86
Central locking (control system) 168
Charcoal filter 200
Distance warning function* 227
Distronic* 223
Easy-entry/exit feature 170
ESP
®
83
Exterior lamps 132
Exterior rear view mirror parking position 187
Front and rear fog lamp 132, 134
Hazard warning flasher 136
Headlamps 50
High beams 135
Ignition 34
Ignition with KEYLESS-GO* start/stop
button 36
Immobilizer 57, 85
Limiting opening height of trunk
lid* 169
Manual shift program S 55 AMG and
S 65 AMG 184
Rear window defroster 201
Residual heat 202, 207
Seat heater 125, 126
Seat ventilation* 127
Tow-away alarm 88
Windshield wipers 52
Adaptive Damping System (ADS) 229,
443
Adding
Coolant 294
Engine oil 292
Additional turn signals 395
Adjustable air vents, rear passenger compartment 204
Adjusting 37
Air distribution 196, 206
Air volume 197
Backrest tilt 38
Drive-dynamic seat* 171
Exterior rear view mirrors 41
Head restraint height 39
Head restraint tilt 39
Instrument cluster illumination 140
Interior rear view mirror 41
Lumbar support 122
Mirrors 41
Multicontour backrest* 122
Power seat bench* 117
Seat cushion depth 38, 123
Seat cushion tilt 38
Seat fore and aft adjustment 38
Seat height 38
Seat in the lumbar region 123
Seat in the shoulder region 123
Seats 37
Steering column height 40
Steering column in or out 40
Steering column up or down 40
Steering wheel 40