Page 135 of 481
.
�
Pull out exterior lamp switch to first
stop.
The front fog lamps ar")
134 Controls in detailLightingSwitching on fog lamps
Switching on front fog lamps
�
Switch on the low beam headlamps
(�page 50).
�
Pull out exterior lamp switch to first
stop.
The front fog lamps are switched on.
The green indicator lamp‡ in the
lamp switch comes on (
�page 131).
�
Push in the exterior lamp switch.
The front fog lamps are switched off.
The green indicator lamp‡ in the
lamp switch goes out (
�page 131).Switching on rear fog lamp (driver’s side
only)
�
Switch on the front fog lamps
(�page 134).
�
Pull out exterior lamp switch to second
stop.
The rear fog lamp is switched on.
The yellow indicator lamp† in the
lamp switch comes on (
�page 131).
�
Push in the exterior lamp switch to first
stop.
The rear fog lamp is switched off.
The green indicator lamp‡ in the
lamp switch goes out (
�page 131).
The front fog lamps remain lit.
Warning!
G
In low ambient lighting or foggy conditions,
only switch from position U to B with
the vehicle at a standstill in a safe location.
Switching from U to B will briefly
switch off the headlamps. Doing so while
driving in low ambient lighting conditions
may result in an accident.iFog lamps will operate with the parking
lamps and/or the low beam headlamps
on. Fog lamps should only be used in
conjunction with low beam headlamps.
Consult your State or Province Motor
Vehicle Regulations regarding permis-
sible lamp operation.
iFog lamps cannot be switched on with
exterior lamp switch in position
U
.
For switching on the fog lamps, turn ex-
terior lamp switch to position
B
.
Page 136 of 481
135 Controls in detail
Lighting
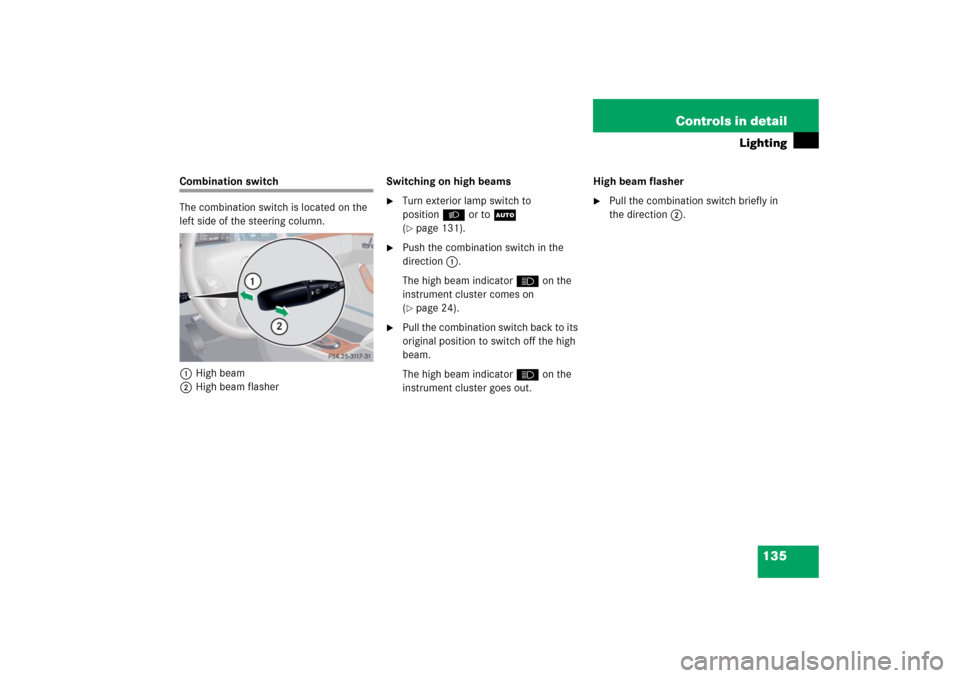
Combination switch
The combination switch is located on the
left side of the steering column.
1High beam
2High beam flasherSwitching on high beams
�
Turn exterior lamp switch to
positionB or toU
(�page 131).
�
Push the combination switch in the
direction1.
The high beam indicatorA on the
instrument cluster comes on
(�page 24).
�
Pull the combination switch back to its
original position to switch off the high
beam.
The high beam indicatorA on the
instrument cluster goes out.High beam flasher
�
Pull the combination switch briefly in
the direction2.
Page 137 of 481
136 Controls in detailLightingHazard warning flasher
The hazard warning flasher can be
switched on at all times, even with the
SmartKey removed from the starter switch
or with the SmartKey with KEYLESS-GO*
removed from the vehicle.
The hazard warning flasher switches on au-
tomatically when an airbag deploys.
1Hazard warning flasher switchSwitching on the hazard warning
flasher
�
Press hazard warning flasher switch.
All turn signals will flash.Switching off the hazard warning
flasher
�
Press hazard warning flasher switch
again.
iWith the hazard warning flasher acti-
vated and the combination switch set
for either left or right turn, only the re-
spective left or right turn signals will
operate when the SmartKey in the
starter switch is in position1 or2 or
the KEYLESS-GO* start/stop button
(�page 35) is pressed once or twice.
iIf the hazard warning flasher was acti-
vated automatically, also press hazard
warning flasher switch 1 to switch off
the hazard warning flasher.
Page 138 of 481

137 Controls in detail
Lighting
Interior lighting
The controls are located in the overhead
control panel.
1Left reading lamp on/off
2Rear interior lamps on/off
3Right reading lamp on/off
4Rocker switch for automatic
control on/offAutomatic control
Activating
�
Press rocker switch 4 to the center
position.
The interior lighting switches on in
darkness when you:�
unlock the vehicle
�
remove the SmartKey from the
starter switch
�
open a door
�
open the trunk
The interior lighting switches off automati-
cally following an adjustable time delay.
For more information, see “Interior lighting
delayed switch-off” (
�page 167).Deactivating
�
Press the ñ symbol on rocker
switch 4.
The interior lighting remains switched
off in darkness, even when you:�
unlock the vehicle
�
remove the SmartKey from the
starter switch
�
open a door
�
open the trunk
Manual control
Front interior lighting
�
Press the ð symbol on rocker
switch 4.
The front interior lighting switches on.
�
Press the ñ symbol on rocker
switch 4 again.
The front interior lighting switches off.
The automatic control function is acti-
vated.
iLeaving an interior light switch in the
ON position for extended periods of
time with the engine turned off could
result in a discharged battery.
iIf the door remains open, the interior
lighting switches off automatically after
approximately five minutes.
Page 139 of 481
138 Controls in detailLightingRear interior lighting�
Press switch2 on theò symbol.
The rear compartment lighting switch-
es on.
�
Press switch2 on theò symbol
again.
The rear compartment lighting switch-
es off.Reading lamps in the front
The reading lamps are integrated into the
interior rear view mirror.
�
Press reading lamp switch1or3 to
switch on the desired reading lamp.
�
Press reading lamp switch1or3
again to switch off the respective read-
ing lamp.Reading lamps in the rear
The reading lamps are located in the roof
lining for the rear seat passengers.
1Reading lamps on/off
2Reading lamps
�
Press reading lamp switch1 to switch
on reading lamps2.
�
Press reading lamp switch1 to switch
off reading lamps2.
iThe setting selected for the interior
lighting is used for the trunk lighting as
well.
If the trunk lid remains open, the trunk
lighting switches off automatically after
approximately ten minutes.
Page 140 of 481

139 Controls in detail
Lighting
Courtesy lighting
For better orientation in the dark, courtesy
lamps will illuminate the interior of your ve-
hicle as follows:
With parking lamps switched on:�
the door handles
�
the driver and passenger footwells
With the SmartKey in the starter switch
position1:
�
the door handles
�
the center console
Door entry lamps
For better orientation in the dark, the cor-
responding door entry lamps will switch on
in darkness when you open a door and the
automatic control is activated.
The door entry lamps switch off when the
corresponding door is closed.
Trunk lighting
The trunk lighting switches on if the trunk
lid is opened.
If you leave the trunk open for an extended
period of time, the trunk lighting will switch
off automatically after approximately
ten minutes.
iIf you turn the SmartKey in the starter
switch to position0 and switch off the
exterior headlamps, the door handle
lamps will remain lit for approximately
five minutes.
iIf you turn the SmartKey in the starter
switch to position0 and switch off the
exterior headlamps, the door entry
lamps will remain lit for approximately
five minutes.
Page 148 of 481

147 Controls in detail
Control system
Menus, submenus and functions
Menu1
Standard dis-
play
Menu2
AUDIO
Menu3
Telephone*
Menu4
NAVI
Menu5
Distronic*
Menu6
Trip computer
Menu7
Vehicle status
message memory
Menu8
Settings
(�page 148)
(�page 148)
(�page 153)
(�page 155)
(�page 156)
(�page 157)
(�page 159)
(�page 160)
Commands/submenusCall up mainte-
nance service
display
Select radio
station
Load phone
book
Show route
guidance in-
structions,
current direc-
tion traveled
Call up set-
tings
Fuel consump-
tion statistics
after start
Call up vehicle mal-
function, warning
and system status
messages stored in
memory
Reset to fac-
tory settings
Check tire in-
flation pres-
sure*
Select satel-
lite radio
station*
(USA only)
Search for
name in
phone book
Fuel consump-
tion statistics
since the last
reset
Instrument
cluster
submenu
Check engine
oil level
Select CD
track
Select
number last
dialed
Call up range
Lighting
submenu
Digital speed-
ometer
Select
MP3-CD track
Vehicle
submenuConvenience
submenu
Page 161 of 481

160 Controls in detailControl systemSettings menu
In the
SETTINGS
menu there are two func-
tions:
�
The function
TO RESET PRESS R BUTTON
FOR 3 SEC., with which you can reset
all settings to the original factory set-
tings.
�
A collection of submenus with which
you can make individual settings for
your vehicle.
�
Press buttonè orÿ repeatedly
until the
SETTINGS
menu appears in
the multifunction display.The following settings and submenus are
available:Resetting all settings
You can reset all the functions of all sub-
menus to the factory settings.
�
Press the reset buttonJ(
�page 140)
for approximately three seconds.
In the multifunction display you will see
the request to press the reset
buttonJagain to confirm.
�
Press the reset buttonJagain.
The functions of all the submenus will
reset to factory settings.
Function
Page
Resetting all settings
160
Submenus in the Settings menu
161
Resetting the functions of a sub-
menu
161
Instrument cluster submenu
163
Lighting submenu
164
Vehicle submenu
168
Convenience submenu
169
iThe settings you have changed will not
be reset unless you confirm the action
by pressing the reset buttonJa sec-
ond time.
Due to safety reasons, resetting all of
the settings while driving will not reset
all of the values in the
LIGHTING
or the
VEHICLE
menu.