Page 424 of 561

423 Practical hints
What to do if …
Display message
Possible
cause/consequence
Possible solution
Front passenger airbag
enabled
see Operator’s Manual
Front passenger front
air bag is activated
while driving even
though a child, small
individual, or object
below the system’s
weight threshold is on
the front passenger
seat, or the front pas-
senger seat is empty.
Objects on the seat or
forces acting on the
seat may make the
system sense supple-
mental weight.
Stop the vehicle in a safe location as soon as possible and check the front passen-
ger seat for the following:�
Turn off the ignition (
�page 38).
�
Remove child and child restraint from front passenger seat and properly secure
the child in rear seat employing the child restraint if necessary.
�
Remove any other items from on and around the front passenger seat and
make sure the storage bag on the back of the front passenger seat is empty.
�
Make sure that no objects which apply forces to the seat are present (e.g. ob-
jects such as books, briefcases etc. lodged behind or around the seat, head re-
straints pushing against roof etc.). The system may recognize such forces as
supplemental weight and sense that an occupant on the front passenger seat
is of a heavier weight than actually present.
�
Keep the seat unoccupied, close the front passenger door and turn on the igni-
tion (
�page 38).
(Continued on next page)
Page 456 of 561
455 Practical hints
Where will I find ...?
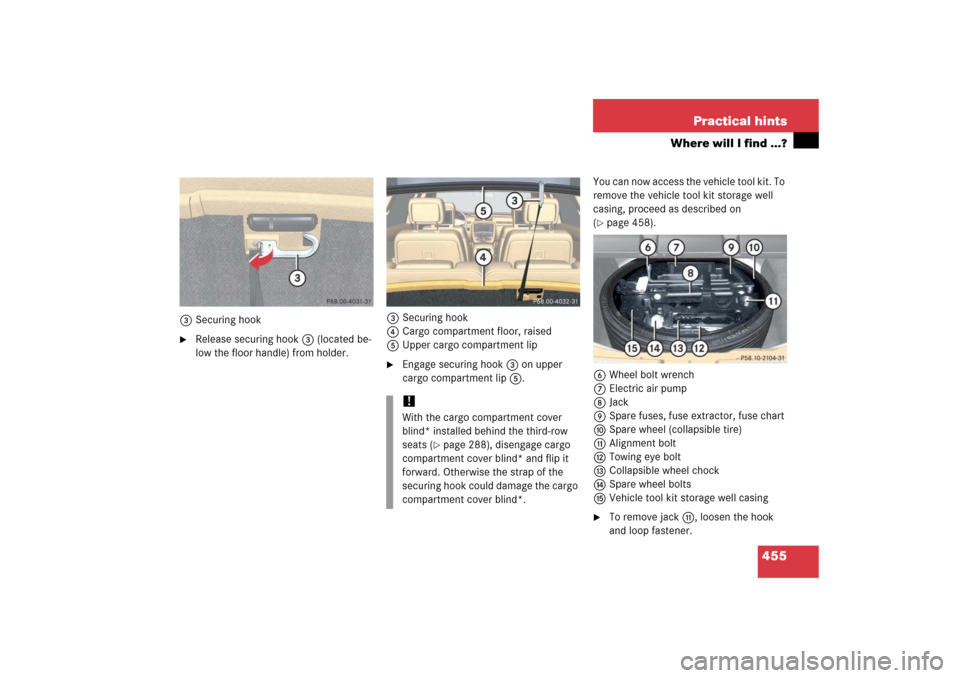
3Securing hook�
Release securing hook 3 (located be-
low the floor handle) from holder.3Securing hook
4Cargo compartment floor, raised
5Upper cargo compartment lip
�
Engage securing hook 3 on upper
cargo compartment lip 5.You can now access the vehicle tool kit. To
remove the vehicle tool kit storage well
casing, proceed as described on
(
�page 458).
6Wheel bolt wrench
7Electric air pump
8Jack
9Spare fuses, fuse extractor, fuse chart
aSpare wheel (collapsible tire)
bAlignment bolt
cTowing eye bolt
dCollapsible wheel chock
eSpare wheel bolts
fVehicle tool kit storage well casing
�
To remove jackb, loosen the hook
and loop fastener.
!With the cargo compartment cover
blind* installed behind the third-row
seats (
�page 288), disengage cargo
compartment cover blind* and flip it
forward. Otherwise the strap of the
securing hook could damage the cargo
compartment cover blind*.
Page 458 of 561
457 Practical hints
Where will I find ...?
Setting up the collapsible wheel chock
The collapsible wheel chock serves to ad-
ditionally secure the vehicle, e.g. while
changing the wheel.
1Tilt the plate upward
2Fold the lower plate outward
3Insert the plate
�
Tilt both plates upward1.
�
Fold the lower plate outward2.
�
Guide the tabs of the lower plate all the
way into the openings of base plate3.
Spare wheel
Your vehicle is equipped with a spare
wheel with collapsible tire. The spare
wheel is located underneath the cargo
compartment floor.Warning!
G
The dimensions of the spare wheel are dif-
ferent from those of the road wheels. As a
result, the vehicle handling characteristics
change when driving with a spare wheel
mounted.
The spare wheel should only be used tempo-
rarily, and should be replaced with a regular
road wheel as quickly as possible.
Page 477 of 561

476 Practical hintsReplacing wiper bladesInstalling
1Wiper blade
2Attachment
3Guide tab
4Opening�
With guide tab 3 sliding into opening
4, place wiper blade 1 onto wiper
arm in direction of arrow.
�
Fold wiper blade 1 towards wiper
arm.
Tabs 2 must engage into both recess-
es of attachment 2.
�
Check whether the wiper blade is
securely fastened.
�
Fold the wiper arm backward to rest on
the windshield.
Make sure to hold on to the wiper when
folding the wiper arm back.
Rear wiper bladeWarning!
G
For safety reasons, switch off wipers and
remove SmartKey from starter switch
(vehicles with KEYLESS-GO*: Make sure the
vehicle’s on-board electronics have
status0) before replacing a wiper blade.
Otherwise the motor could suddenly turn on
and cause injury.!Hold on to the wiper when folding the
wiper arm back. If released, the force
of the impact from the tensioning
spring could crack the rear window.
Do not allow the wiper arms to contact
the rear window glass without a wiper
blade inserted.
Page 478 of 561

477 Practical hints
Replacing wiper blades
Removing�
Remove the SmartKey from the starter
switch.
or
�
Vehicles with KEYLESS-GO*:
Make sure the vehicle’s on-board
electronics have status0 (
�page 39).
�
Fold wiper arm 1 away from the rear
window until it engages.
1Wiper arm
2Wiper blade
�
Turn wiper blade2 to form a right an-
gle with wiper arm 1 as shown.
�
Hold wiper arm 1 and disengage wip-
er blade 2 by carefully sliding it in
direction of arrow.
�
Remove wiper blade 2.Installing
1Wiper arm
2Wiper blade
�
Insert wiper blade 2 into wiper
arm1.
�
Hold wiper arm 1 and engage wiper
blade 2 by pushing it in direction of ar-
row until it locks into place.
�
Check whether the wiper blade is
securely fastened.
�
Fold the wiper arm to rest on the rear
window.
Make sure to hold on to the wiper when
folding the wiper arm back. Make sure the wiper blades are proper-
ly installed. Improperly installed wiper
blades may cause rear window dam-
age.
For your convenience, we recommend
that you have this work carried out by
an authorized Mercedes-Benz Light
Truck Center.
Page 489 of 561
 battery, also referred to as
“fleece” battery. Such batteries do not
require topping-up of the electrolyte
level.")
488 Practical hintsBattery
!
The battery is a valve-regulated lead
acid (VRLA) battery, also referred to as
“fleece” battery. Such batteries do not
require topping-up of the electrolyte
level. VRLA batteries therefore do not
have cell caps and the battery cover is
non-removable. Do not attempt to
open the battery as otherwise the bat-
tery will be damaged.
Even though VRLA batteries do not
require topping-up of the electrolyte
level and cannot be opened to check
the electrolyte level, the battery condi-
tion must be checked periodically by
performing a battery conductance test.
Refer to Maintenance Booklet for bat-
tery condition testing intervals.
As with any other battery, the battery
may discharge if the vehicle is not
operated for an extended period of
time. You can connect a battery
maintenance charge unit tested and
approved for use on your vehicle model
or disconnected the battery to prevent
battery discharge. Contact an
authorized Mercedes-Benz Light Truck
Center for more information.
!The factory-equipped VRLA battery is
leak-proofed. Only use a battery as re-
placement that has the same security
features and is of identical size,
voltage, and capacity as the
factory-equipped battery.
The battery, the battery ventilation and
the lateral plug must always be
securely installed when the vehicle is in
operation.Warning!
G
Jump starting must only be done using the
jump-start contacts located in the engine
compartment (
�page 496).
Page 494 of 561
493 Practical hints
Battery
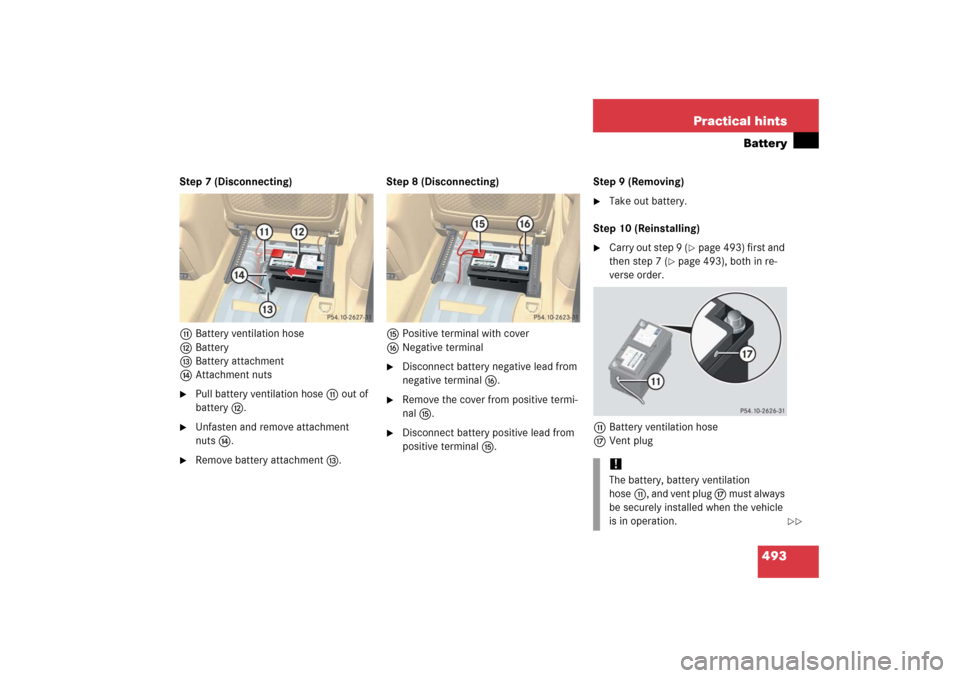
Step 7 (Disconnecting)
bBattery ventilation hose
cBattery
dBattery attachment
eAttachment nuts�
Pull battery ventilation hose b out of
battery c.
�
Unfasten and remove attachment
nutse.
�
Remove battery attachment d.Step 8 (Disconnecting)
fPositive terminal with cover
gNegative terminal
�
Disconnect battery negative lead from
negative terminal g.
�
Remove the cover from positive termi-
nal f.
�
Disconnect battery positive lead from
positive terminal f.Step 9 (Removing)
�
Take out battery.
Step 10 (Reinstalling)
�
Carry out step 9 (
�page 493) first and
then step 7 (
�page 493), both in re-
verse order.
bBattery ventilation hose
hVent plug
!The battery, battery ventilation
hoseb, and vent plug h must always
be securely installed when the vehicle
is in operation.
��
Page 504 of 561

503 Practical hintsFuses
�Fuses
The electrical fuses in your vehicle serve to
stop the supply of electricity to a device
that is malfunctioning. This helps to
prevent damage to the other vehicle
electronics. If a fuse is blown, the compo-
nents and systems secured by that fuse
will stop operating.
The following aids are available to help you
change fuses. They are included with the
vehicle tool kit (
�page 455):
�
Fuse chart
The fuse chart explains the fuse alloca-
tion and fuse amperages.
�
Spare fuses
�
Fuse extractor
Warning!
G
Only use fuses approved for Mercedes-Benz
with the specified amperage for the system
in question. Otherwise, a short circuit could
result and cause a fire.
!Only install fuses that have been tested
and approved by Mercedes-Benz and
that have the specified amperage
rating. Otherwise, electrical parts or
systems could be damaged.
Never attempt to repair or bridge a
blown fuse. Have the cause determined
and remedied by an authorized
Mercedes-Benz Light Truck Center.