Page 178 of 561
177 Controls in detail
Control system
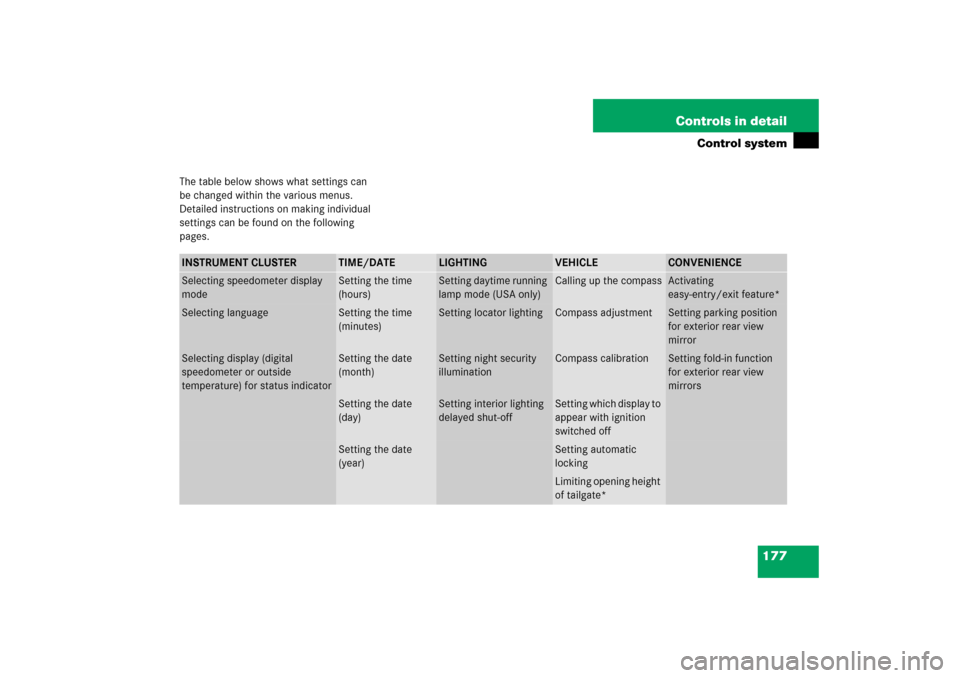
The table below shows what settings can
be changed within the various menus.
Detailed instructions on making individual
settings can be found on the following
pages.INSTRUMENT CLUSTER
TIME/DATE
LIGHTING
VEHICLE
CONVENIENCE
Selecting speedometer display
mode
Setting the time
(hours)
Setting daytime running
lamp mode (USA only)
Calling up the compass
Activating
easy-entry/exit feature*
Selecting language
Setting the time
(minutes)
Setting locator lighting
Compass adjustment
Setting parking position
for exterior rear view
mirror
Selecting display (digital
speedometer or outside
temperature) for status indicator
Setting the date
(month)
Setting night security
illumination
Compass calibration
Setting fold-in function
for exterior rear view
mirrors
Setting the date
(day)
Setting interior lighting
delayed shut-off
Setting which display to
appear with ignition
switched off
Setting the date
(year)
Setting automatic
lockingLimiting opening height
of tailgate*
Page 187 of 561
186 Controls in detailControl systemVehicle submenu
Access the
Vehicle
submenu via the
Settings
menu. Use the
Vehicle
submenu
to make general vehicle settings.
The following functions are available:Compass adjustment
This function is not available if your vehicle
is equipped with the Modular COMAND
system with navigation module*.
Determine your location on the basis of the
following zone maps.
Zone map North AmericaZone map South America
�
Press buttonæ orç to move
the selection marker to the
Vehicle
submenu.
Function
Page
Compass adjustment
186
Compass calibration
187
Setting which display to appear
with ignition switched off
188
Setting automatic locking
188
Limiting opening height of
tailgate*
189
Page 188 of 561

187 Controls in detail
Control system
�
Press buttonj ork repeatedly
until the message
Compass Adjustment
appears in the multifunction display.
The selection marker is on the current
setting.
�
Press buttonæ orç to set the
respective compass zone.
For information on how to select the prop-
er geographic zone, see “Compass”
(
�page 327).Compass calibration
This function is not available if your vehicle
is equipped with the Modular COMAND
system with navigation module*.
In order to calibrate the compass properly,
mind the following:
�
Calibrate the compass in open terrain.
Nearby buildings, bridges, power lines
and large antenna masts, for example,
could impair compass calibration.
�
Switch off electrical consumers (e.g.
climate control, windshield wipers, or
rear window defroster).
�
Close all doors and the tailgate.
�
Start the engine (
�page 53).
�
Press buttonæ orç to move
the selection marker to the
Vehicle
submenu.
�
Press buttonj ork repeatedly
until the message
Compass Calibra-
tion
appears in the multifunction
display.
The selection marker is on setting
off
.
�
Press buttonæ orç to set the
selection marker to
Start
.
The following message appears in the
multifunction display:
Compass Calibration Active
Please drive in a full circle
��
Page 190 of 561
189 Controls in detail
Control system
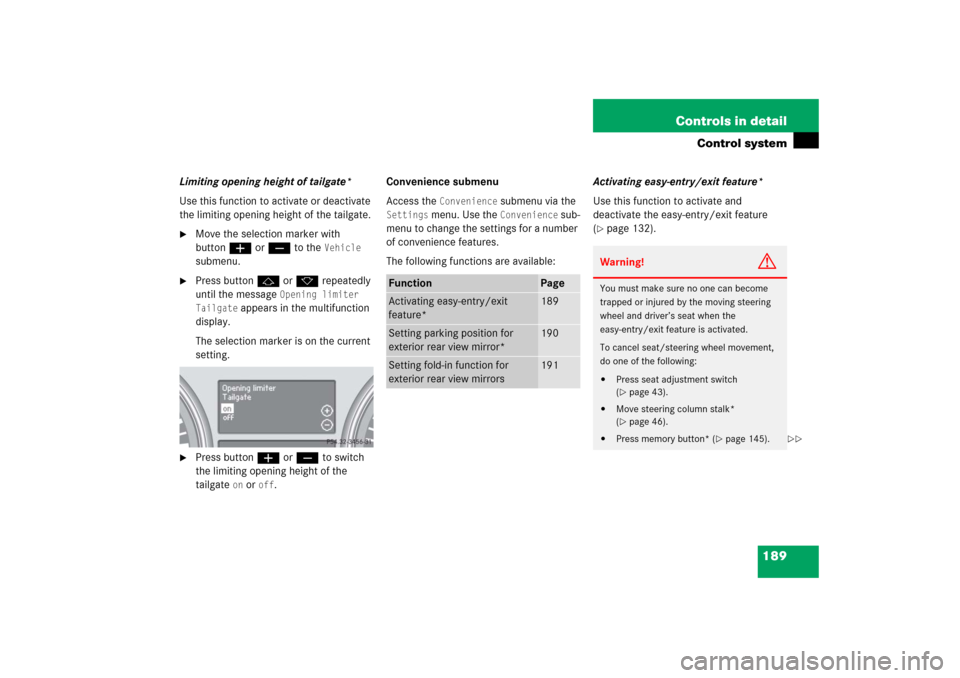
Limiting opening height of tailgate*
Use this function to activate or deactivate
the limiting opening height of the tailgate.�
Move the selection marker with
buttonæ orç to the
Vehicle
submenu.
�
Press buttonj ork repeatedly
until the message
Opening limiter
Tailgate
appears in the multifunction
display.
The selection marker is on the current
setting.
�
Press buttonæ orç to switch
the limiting opening height of the
tailgate
on or
off
.Convenience submenu
Access the
Convenience
submenu via the
Settings
menu. Use the
Convenience
sub-
menu to change the settings for a number
of convenience features.
The following functions are available:Activating easy-entry/exit feature*
Use this function to activate and
deactivate the easy-entry/exit feature
(
�page 132).
Function
Page
Activating easy-entry/exit
feature*
189
Setting parking position for
exterior rear view mirror*
190
Setting fold-in function for
exterior rear view mirrors
191
Warning!
G
You must make sure no one can become
trapped or injured by the moving steering
wheel and driver’s seat when the
easy-entry/exit feature is activated.
To cancel seat/steering wheel movement,
do one of the following:�
Press seat adjustment switch
(�page 43).
�
Move steering column stalk*
(�page 46).
�
Press memory button* (
�page 145).
��
Page 271 of 561
270 Controls in detailDriving systemsThe following settings are available:�
AUTO (for normal driving situations)
Indicator lamps2 and3 are off.
�
SPORT (for sporty driving)
Indicator lamp2 comes on.
�
COMF (for comfort driving)
Indicator lamp3 comes on.
�
Start the engine (
�page 53).
�
Press ADS switch1 repeatedly until
the desired suspension tuning is
reached.Vehicle level control*
The vehicle level control automatically
regulates the ride height to
�
reduce fuel consumption
�
improve driving safety
The vehicle begins adjusting to the set
vehicle level as soon as the doors or tail-
gate are
�
unlocked
or
�
opened or closed with the vehicle
unlocked
For major changes in vehicle level, the
engine must be running.
iThe setting is stored when you turn off
the engine.
iChanges to the vehicle level should be
made while the vehicle is moving. The
vehicle will then reach the set level as
fast as possible.
Warning!
G
Make sure that no one is near the wheel
housing or under the vehicle when you lower
the vehicle while it is standing still. Limbs
could become wedged into or under the
vehicle.
For safety reasons, the vehicle can only be
lowered with all doors and the tailgate
closed. Lowering is interrupted if a door or
the tailgate is opened and will continue after
the door is closed again.Warning!
G
Adapt your speed and driving to possible
changed driving behavior of the vehicle after
changing the vehicle level. The ESP
® cannot
prevent accidents, including those resulting
from excessive speed. The ESP
® cannot pre-
vent the natural laws of physics from acting
on the vehicle.
Page 274 of 561
273 Controls in detail
Driving systems
Highway level�
Close all doors and the tailgate.
�
Start the engine (
�page 53).
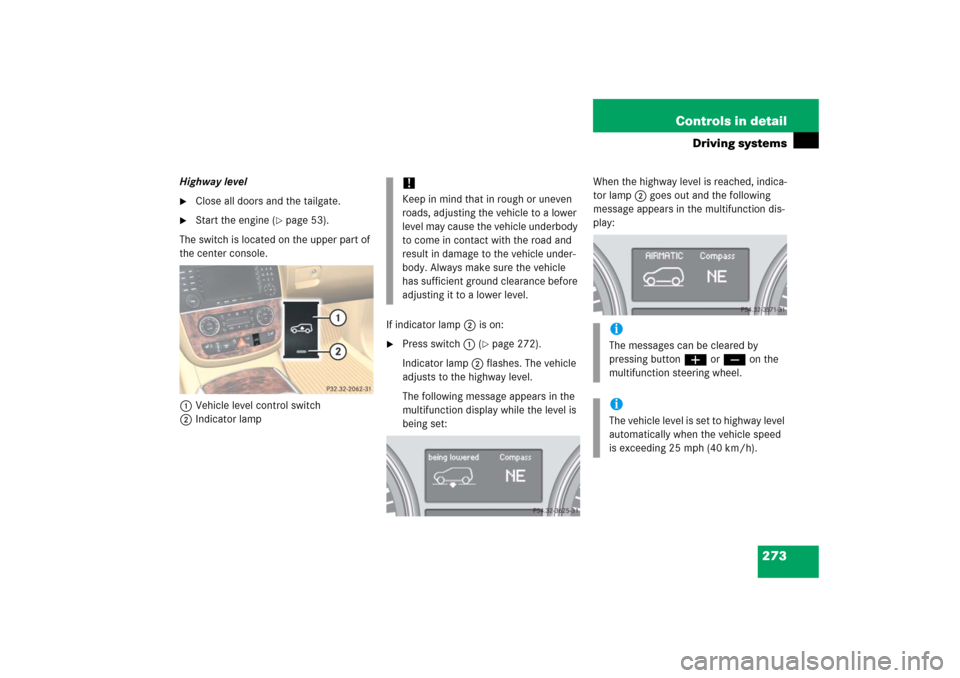
The switch is located on the upper part of
the center console.
1Vehicle level control switch
2Indicator lampIf indicator lamp2 is on:
�
Press switch1 (
�page 272).
Indicator lamp2 flashes. The vehicle
adjusts to the highway level.
The following message appears in the
multifunction display while the level is
being set:When the highway level is reached, indica-
tor lamp2 goes out and the following
message appears in the multifunction dis-
play:
!Keep in mind that in rough or uneven
roads, adjusting the vehicle to a lower
level may cause the vehicle underbody
to come in contact with the road and
result in damage to the vehicle under-
body. Always make sure the vehicle
has sufficient ground clearance before
adjusting it to a lower level.
iThe messages can be cleared by
pressing buttonæ orç on the
multifunction steering wheel.iThe vehicle level is set to highway level
automatically when the vehicle speed
is exceeding 25 mph (40 km/h).
Page 281 of 561
280 Controls in detailLoadingLoading instructionsThe gross vehicle weight which is the
weight of the vehicle including fuel, tools,
spare wheel, installed accessories, pas-
sengers, and luggage/cargo must never
exceed the load limit and the Gross Vehicle
Weight Rating (GVWR) for your vehicle as
specified on the placard(s) located on the
driver’s door B-pillar (
�page 510). In addi-
tion, the load must be distributed in such a
way so that the weight on each axle never
exceeds the Gross Axle Weight Rating
(GAWR) for the front and rear axle. The
GVWR and GAWR for your vehicle are indi-
cated on the certification label which can
be found on the driver’s door B-pillar
(
�page 510).
For more information, see “Tire and Load-
ing Information” (
�page 357).
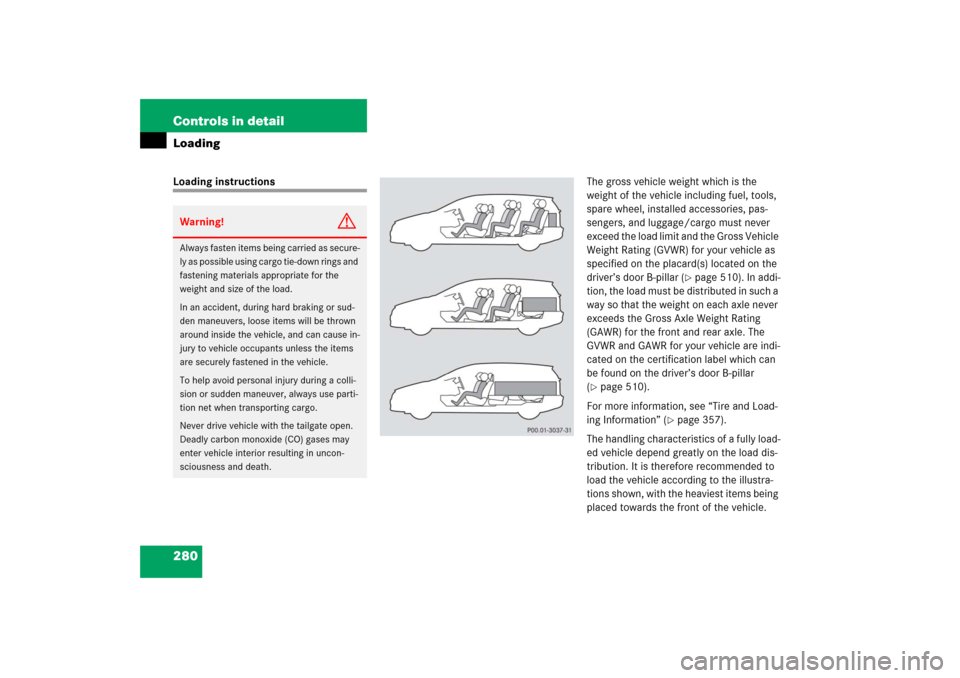
The handling characteristics of a fully load-
ed vehicle depend greatly on the load dis-
tribution. It is therefore recommended to
load the vehicle according to the illustra-
tions shown, with the heaviest items being
placed towards the front of the vehicle.
Warning!
G
Always fasten items being carried as secure-
ly as possible using cargo tie-down rings and
fastening materials appropriate for the
weight and size of the load.
In an accident, during hard braking or sud-
den maneuvers, loose items will be thrown
around inside the vehicle, and can cause in-
jury to vehicle occupants unless the items
are securely fastened in the vehicle.
To help avoid personal injury during a colli-
sion or sudden maneuver, always use parti-
tion net when transporting cargo.
Never drive vehicle with the tailgate open.
Deadly carbon monoxide (CO) gases may
enter vehicle interior resulting in uncon-
sciousness and death.
Page 284 of 561
283 Controls in detail
Loading
Expanding cargo compartment
You can separately fold each seat of the
rear passenger compartment to expand
the cargo compartment.Expanding cargo compartment in part
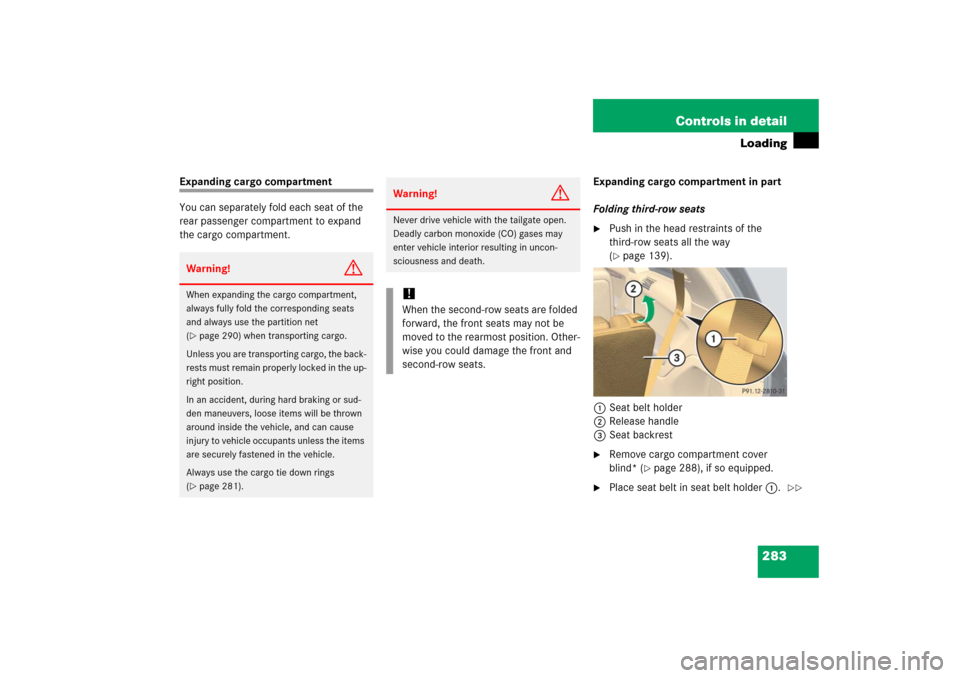
Folding third-row seats
�
Push in the head restraints of the
third-row seats all the way
(�page 139).
1Seat belt holder
2Release handle
3Seat backrest
�
Remove cargo compartment cover
blind* (
�page 288), if so equipped.
�
Place seat belt in seat belt holder 1.
Warning!
G
When expanding the cargo compartment,
always fully fold the corresponding seats
and always use the partition net
(�page 290) when transporting cargo.
Unless you are transporting cargo, the back-
rests must remain properly locked in the up-
right position.
In an accident, during hard braking or sud-
den maneuvers, loose items will be thrown
around inside the vehicle, and can cause
injury to vehicle occupants unless the items
are securely fastened in the vehicle.
Always use the cargo tie down rings
(�page 281).
Warning!
G
Never drive vehicle with the tailgate open.
Deadly carbon monoxide (CO) gases may
enter vehicle interior resulting in uncon-
sciousness and death.!When the second-row seats are folded
forward, the front seats may not be
moved to the rearmost position. Other-
wise you could damage the front and
second-row seats.
��