Page 203 of 561

202 Controls in detailAutomatic transmission
Gear ranges
With the automatic transmission in drive
positionD, you can select a gear range for
the automatic transmission to operate
within.
You can limit the gear range by pressing
the respective downshift button on the
steering wheel gearshift control, and
reverse the gear range limit by pressing
the respective upshift button on the
steering wheel gearshift control.
1Current gear range
The selected gear range appears in the
multifunction display (
�page 199). If you
press on the accelerator when the engine
has reached its rpm limit, the transmission
will upshift beyond any gear range limit
selected.
Warning!
G
When leaving the vehicle, always remove the
SmartKey or SmartKey with KEYLESS-GO*
from the starter switch, take it with you, and
lock the vehicle. Do not leave children unat-
tended in the vehicle, or with access to an
unlocked vehicle. Children could shift the
automatic transmission out of park
positionP, which could result in an accident
and/or serious personal injury.
Effect
ï
The transmission shifts through
sixth gear only.
î
The transmission shifts through
fifth gear only.
é
The transmission shifts through
fourth gear only.
è
The transmission shifts through
third gear only.
With this selection you can use
the braking effect of the engine.
Page 206 of 561
 and the selected
program mode (
C/S) are indicated in the
multifunction display.
1Current pro")
205 Controls in detail
Automatic transmission
The current gear range/transmission
position (
�page 199) and the selected
program mode (
C/S) are indicated in the
multifunction display.
1Current program mode
�
Press program mode selector switch
repeatedly until the letter of the de-
sired program mode appears in the
multifunction display.
SelectCfor comfort driving:�
The vehicle starts out in second
gear (both forward and reverse) for
gentler starts. This does not apply if
full throttle is applied or gear
range1 is selected.
�
Traction and driving stability are
improved on icy roads.
�
Upshifts occur earlier even when
you give more gas. The engine then
operates at lower rpms and the
wheels are less likely to spin.
Steering wheel gearshift control
With drive positionD selected, you can use
the steering wheel gearshift control but-
tons to manually shift the gears. When
doing so, you are also limiting or extending
the gear range.
!Never change the program mode when
the automatic transmission is out of
park positionP. This could result in a
change of driving characteristics for
which you may not be prepared.iThe last selected program
mode (CorS) is switched on when the
engine is restarted.
iTo avoid overrevving the engine when
downshifting with steering wheel
gearshift buttons, the transmission will
not shift to a lower gear if the engine’s
max. speed would be exceeded.
Page 207 of 561

206 Controls in detailAutomatic transmission
The steering wheel gearshift buttons are
located to the left and right of the steering
wheel.
1Button, inside: downshift
2Button, outside: upshiftDownshifting
�
Briefly press the inside1 of one of the
buttons on the steering wheel.
The transmission will shift to the next
lower gear as permitted by the shift
program. This action simultaneously limits
the gear range of the transmission
(
�page 202).
Upshifting
�
Briefly press the outside2 of one of
the buttons on the steering wheel.
!Allow engine to warm up under low
load use. Do not place full load on the
engine until the operating temperature
has been reached.
Shift into reverse gearR or park
positionP only when the vehicle is
stopped.
Avoid spinning of a drive wheel for an
extended period when driving off on
slippery road surfaces. This may cause
serious damage to the drivetrain which
is not covered by the Mercedes-Benz
Limited Warranty.
iYou cannot shift with the steering
wheel gearshift buttons when the
transmission in positionP,N orR.
Warning!
G
On slippery road surfaces, never downshift
in order to obtain braking action. This could
result in drive wheel slip and reduced
vehicle control. Your vehicle’s ABS will not
prevent this type of loss of control.
Page 208 of 561

207 Controls in detail
Automatic transmission
The transmission will shift to the next
higher gear as permitted by the shift
program. This action simultaneously
extends the gear range of the
transmission.
Canceling gear range limit�
Press and hold the outside2 of one of
the buttons on the steering wheel
until
Dreappears in the multifunction
display.
The transmission will shift from the current
gear range directly to gear rangeD.
Shifting into optimal gear range
�
Press and hold the inside1 of one of
the buttons on the steering wheel.
The transmission will automatically select
the gear range suited for optimal
acceleration and deceleration. This will
involve shifting down one or more gears.Emergency operation (Limp Home
Mode)
If vehicle acceleration becomes less re-
sponsive or sluggish or the transmission
no longer shifts, the transmission is most
likely operating in limp home (emergency
operation) mode. In this mode only second
gear and reverse gear can be selected.�
Stop the vehicle in a safe location.
�
Shift to park positionP.
�
Turn off the engine.
�
Wait at least 10 seconds before
restarting.
�
Restart the engine.
�
Shift to drive positionD (for second
gear) or reverse gearR.
�
Have the transmission checked at an
authorized Mercedes-Benz Light Truck
Center as soon as possible.
Page 265 of 561

264 Controls in detailDriving systemsThe driving systems of your vehicle are de-
scribed on the following pages:�
Cruise control, with which the vehicle
can maintain a preset speed.
�
Airmatic* adjusts the vehicle suspen-
sion characteristics automatically and
controls the vehicle level.
�
Parktronic*, which serves as a parking
assistant.
For information on the BAS, ABS, EBP,
4-ETS and ESP
® driving systems, see “Driv-
ing safety systems” (
�page 97).
Cruise control
The cruise control automatically maintains
the speed you set for your vehicle.
The use of cruise control is recommended
for driving at a constant speed for extend-
ed periods of time. You can set or resume
cruise control at any speed above 20 mph
(30 km/h).
The cruise control function is operated by
means of the cruise control lever.
The cruise control lever is the uppermost
lever on the left-hand side of the steering
column (
�page 22).
Warning!
G
The cruise control is a convenience system
designed to assist the driver during vehicle
operation. The driver is and must always
remain responsible for the vehicle’s speed
and for safe brake operation.
Only use the cruise control if the road, traffic
and weather conditions make it advisable to
travel at a steady speed.�
The use of cruise control can be danger-
ous on winding roads or in heavy traffic
because conditions do not allow safe
driving at a steady speed.
�
The use of cruise control can be danger-
ous on slippery roads. Rapid changes in
tire traction can result in wheel spin and
loss of control.
�
Deactivate the cruise control when driv-
ing in fog.
The “Resume” function should only be oper-
ated if the driver is fully aware of the previ-
ously set speed and wishes to resume this
particular preset speed.
Page 273 of 561
272 Controls in detailDriving systemsRaised level
Only choose the raised level when the road
conditions permit. Otherwise:�
Fuel consumption may increase.
�
Handling characteristics of the vehicle
may be unfavorable.
�
Start the engine (
�page 53).The switch is located on the upper part of
the center console.
1Vehicle level control switch
2Indicator lamp
If indicator lamp2 is off:
�
Press switch1.
Indicator lamp2 flashes. The vehicle
adjusts to the raised level.
The following message appears in the
multifunction display while the level is
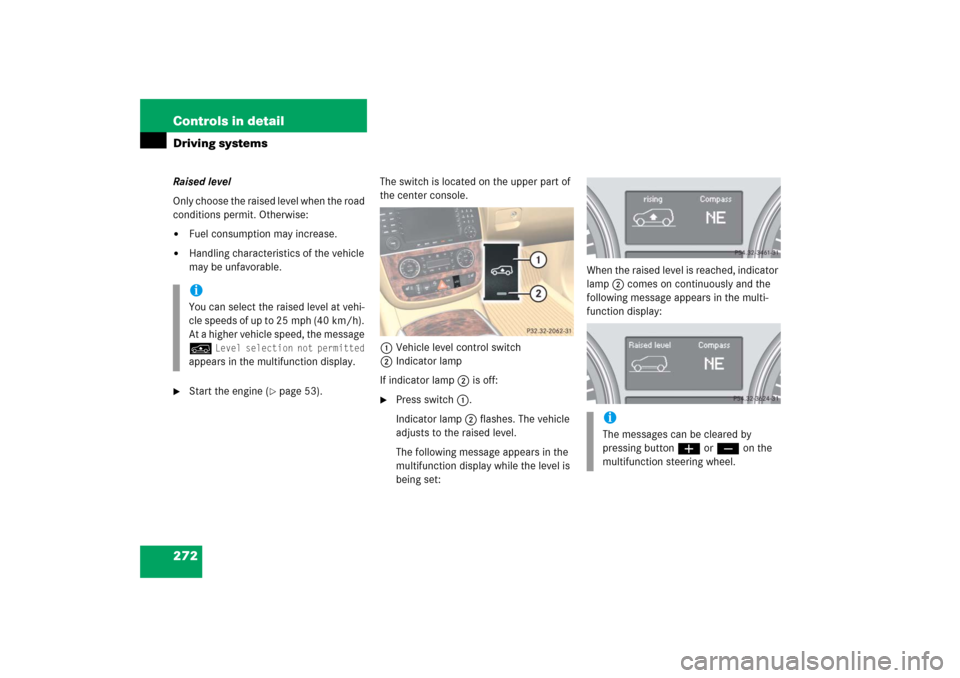
being set:When the raised level is reached, indicator
lamp2 comes on continuously and the
following message appears in the multi-
function display:
iYou can select the raised level at vehi-
cle speeds of up to 25 mph (40 km/h).
At a higher vehicle speed, the message
n
Level selection not permitted
appears in the multifunction display.
iThe messages can be cleared by
pressing buttonæ orç on the
multifunction steering wheel.
Page 274 of 561
.
The switch is located on the upper part of
the center console.
1Vehicle level c")
273 Controls in detail
Driving systems
Highway level�
Close all doors and the tailgate.
�
Start the engine (
�page 53).
The switch is located on the upper part of
the center console.
1Vehicle level control switch
2Indicator lampIf indicator lamp2 is on:
�
Press switch1 (
�page 272).
Indicator lamp2 flashes. The vehicle
adjusts to the highway level.
The following message appears in the
multifunction display while the level is
being set:When the highway level is reached, indica-
tor lamp2 goes out and the following
message appears in the multifunction dis-
play:
!Keep in mind that in rough or uneven
roads, adjusting the vehicle to a lower
level may cause the vehicle underbody
to come in contact with the road and
result in damage to the vehicle under-
body. Always make sure the vehicle
has sufficient ground clearance before
adjusting it to a lower level.
iThe messages can be cleared by
pressing buttonæ orç on the
multifunction steering wheel.iThe vehicle level is set to highway level
automatically when the vehicle speed
is exceeding 25 mph (40 km/h).
Page 312 of 561

311 Controls in detail
Useful features
You can take and place telephone calls us-
ing thes andt buttons on the
steering wheel. To carry out other tele-
phone functions, use the control system
(�page 194).
See separate instruction manual for infor-
mation on how to operate the telephone.
Tele Aid*
Shortly after the completion of your Tele
Aid acquaintance call, you will receive a
user ID and password. By visiting
www.mbusa.com and selecting “Tele Aid”
(USA only), you will have access to account
information, remote door unlock and
more.The Tele Aid system
(Tele
matic A
larm I
dentification on
D
emand)
The Tele Aid system consists of three
types of response:�
automatic and manual emergency
�
roadside assistance
�
information
The Tele Aid system is operational provid-
ing that the vehicle’s battery is charged,
properly connected, not damaged and cel-
lular and GPS coverage is available.
The speaker volume of a Tele Aid call can
be adjusted when using the volume control
on the Modular COMAND System or on the
multifunction steering wheel. To raise, turn
the rotary volume control on Modular
COMAND System clockwise or press
buttonæ on the multifunction steering
wheel. To lower, turn the rotary volume
control on Modular COMAND System con-
!The initial activation of the Tele Aid
system may only be performed by
completing the subscriber agreement
and placing an acquaintance call using
the ¡button. Failure to complete
either of these steps will result in a
system that is not activated.
If you have any questions regarding
activation, please call the Response
Center at 1-800-756-9018 (in the USA)
or 1-888-923-8367 (in Canada).