Page 399 of 561

398 OperationVehicle careHand-wash
Do not use hot water or wash your vehicle
in direct sunlight. �
Only use a mild car wash detergent,
such as Mercedes-Benz approved Car
Shampoo.
�
Thoroughly spray the vehicle with a dif-
fused jet of water.
Direct only a very weak spray towards
the ventilation intake.
�
Use plenty of water and rinse the
sponge and chamois frequently.
�
Rinse with clean water and thoroughly
dry with a chamois.
Do not allow cleaning agents to dry on
the finish.Automatic car wash
You can have your car washed in an auto-
matic car wash from the start. Automatic
car washes without brushes are prefera-
ble.
If the vehicle is very dirty, prewash it be-
fore running it through the automatic car
wash.
!If you want the gear position to remain
inN (for example when the vehicle is
pulled through a car wash)
�
do not remove the SmartKey from
the starter switch
or, when using KEYLESS-GO*
�
do not turn off the engine using the
KEYLESS-GO start/stop button*
and open the driver’s door
Otherwise, the transmission will shift
toP and lock the wheels, preventing
the vehicle from being pulled through a
car wash.
!Due to the width of the vehicle, fold in
exterior rear view mirrors prior to run-
ning the vehicle through an automatic
car wash to prevent damage to the
mirrors.
Make sure that the windshield wiper
switch is set to0 (
�page 59). Other-
wise, the rain sensor could activate and
cause the wipers to move unintention-
ally. This may lead to vehicle damage.
iAfter running the vehicle through an au-
tomatic car wash, wipe any wax off of
the windshield (
�page 400). This will
prevent smears and reduce wiping
noise which can be caused by residual
wax on the windshield.
When leaving the car wash, make sure
that the mirrors are folded out. Other-
wise they may vibrate.
Page 401 of 561

400 OperationVehicle care
Cleaning the windows and the wiper
blades�
Fold wiper arms forward until they snap
into place.
�
Clean the wiper blade inserts with a
clean cloth and detergent solution.
�
Use a soft, clean cloth and a mild win-
dow cleaning solution on all outside
and inside glass surfaces.
An automotive glass cleaner is recom-
mended.
!Do not apply strong pressure to the
sensor covers. Applying strong pres-
sure may damage the sensor covers.
Follow the instructions provided by the
power washer manufacturer on main-
taining a distance between the vehicle
and the nozzle of the power washer.!To prevent scratches, never apply
strong force and only use a soft,
non-scratching cloth when cleaning the
sensors. Do not attempt to wipe dirty
sensors with a dry cloth or sponge.
Warning!
G
For safety reasons, switch off wipers and re-
move SmartKey from starter switch
(vehicles with KEYLESS-GO*: Make sure the
vehicle’s on-board electronics have
status
0) before cleaning the windshield
and/or the wiper blades. Otherwise, the
wiper motor could suddenly turn on and
cause injury.
!Fold the windshield wiper arms back
onto the windshield before turning the
SmartKey in the starter switch or
pressing the KEYLESS-GO start/stop
button (vehicles with KEYLESS-GO*).
Hold on to the wiper when folding the
wiper arm back. If released, the force
of the impact from the tensioning
spring could crack the windshield.!To clean the window interior, do not
use a dry cloth, abrasives, solvents or
cleaners containing solvents. Do not
touch the inside of the front, rear or
side windows with hard objects such as
an ice scraper or ring. Doing so may
damage the windows.
Page 422 of 561

421 Practical hints
What to do if …
Display message
Possible cause/consequence
Possible solution
P
Gear selector lever
in Park
You have started the engine or
switched on the ignition with
KEYLESS-GO* and opened the
driver’s door with the automatic
transmission not set to positionP.
�
Set the automatic transmission to
positionP.
or
�
Close the driver’s door
Gear selector lever
in Neutral or Park
You have attempted to start the
engine with the KEYLESS-GO*
start/stop button while the auto-
matic transmission was set to
positionR orD.
�
Set the automatic transmission to
positionP orN.
Make sure the brake pedal is depressed
when attempting to start the engine with
the KEYLESS-GO* start/stop button.
PRE-SAFE
unavailable
See Operator’s Manual
If ESP
® and PRE-SAFE
®* malfunc-
tion messages are displayed simul-
taneously, PRE-SAFE®* has been
deactivated as a result of these mal-
functions. All other occupant safety
systems, such as the air bags are
still available.
�
Visit an authorizes Mercedes-Benz Light
Truck Center as soon as possible.
PRE-SAFE
®* itself has failed. All oth-
er occupant safety systems, such as
the air bags are still available.
�
Visit an authorizes Mercedes-Benz Light
Truck Center as soon as possible.
Page 460 of 561
459 Practical hints
Unlocking / locking in an emergency
�Unlocking / locking in an emergency
Unlocking the vehicle
If you cannot unlock the vehicle with the
SmartKey or KEYLESS-GO*, open the driv-
er’s door using the mechanical key.
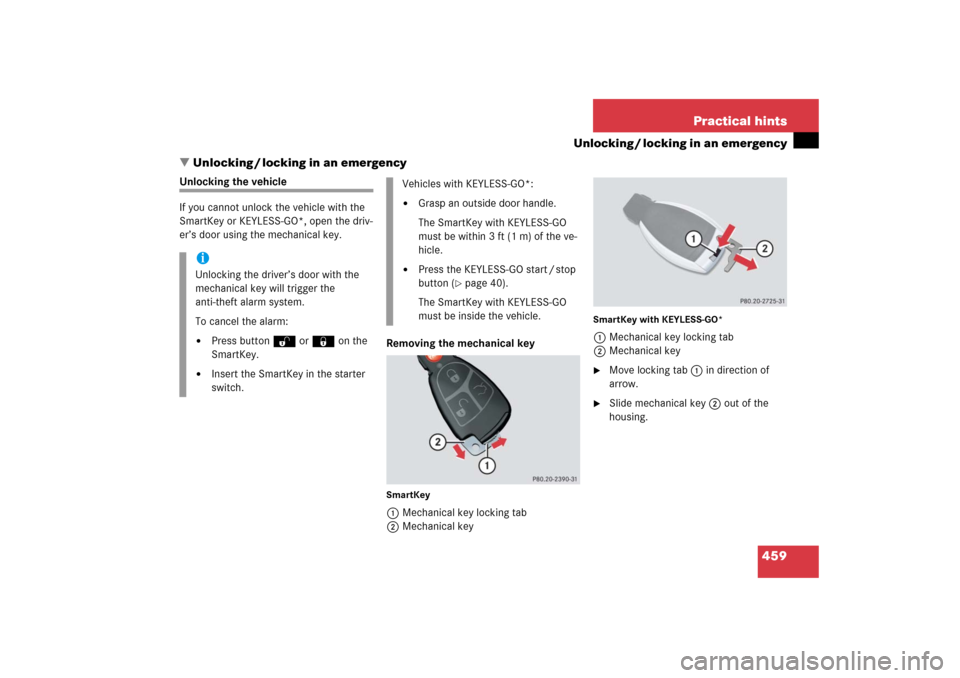
Removing the mechanical key
SmartKey1Mechanical key locking tab
2Mechanical key
SmartKey with KEYLESS-GO*1Mechanical key locking tab
2Mechanical key�
Move locking tab1 in direction of
arrow.
�
Slide mechanical key2 out of the
housing.
iUnlocking the driver’s door with the
mechanical key will trigger the
anti-theft alarm system.
To cancel the alarm:�
Press buttonŒ or‹on the
SmartKey.
�
Insert the SmartKey in the starter
switch.
Vehicles with KEYLESS-GO*:�
Grasp an outside door handle.
The SmartKey with KEYLESS-GO
must be within 3 ft (1 m) of the ve-
hicle.
�
Press the KEYLESS-GO start / stop
button (
�page 40).
The SmartKey with KEYLESS-GO
must be inside the vehicle.
Page 463 of 561

462 Practical hintsOpening / closing in an emergencyPower tilt/sliding sunroof*
You can open or close the tilt/sliding
sunroof manually should an electrical
malfunction occur.
The tilt/sliding sunroof drive is located
behind a cover on the overhead control
panel.
1Cover�
Remove the SmartKey from the starter
switch.Vehicles with KEYLESS-GO*:
�
Turn off the engine by pressing the
KEYLESS-GO start/stop button
(�page 66).
�
Open the driver’s door (this puts
the starter switch to position0,
same as with the SmartKey re-
moved from starter switch). The
driver’s door can then be closed
again.
�
Press on cover1 at the position indi-
cated by the arrow.
�
Take off cover 1.
2Crank
�
Take crank 2 out of the Operator’s
Manual pouch.
�
Insert crank2 into hole.
�
Turn crank2 clockwise to�
slide sunroof closed
�
raise sunroof at the rear
�
Turn crank2 counterclockwise to�
slide sunroof open
�
lower sunroof at the rear
iTurn crank2 slowly and smoothly.
The tilt/sliding sunroof must be syn-
chronized if it has been operated man-
ually (
�page 258).
iThe panorama roof with power
tilt/sliding panel* cannot be operated
as described. Contact an authorized
Mercedes-Benz Light Truck Center.
Page 484 of 561
.1Flap
2On/off switch
3Electrical plug
4Air hose with pre")
483 Practical hints
Flat tire
Inflating the collapsible tire�
Take the electric air pump out of the
vehicle tool kit storage well
(�page 454).1Flap
2On/off switch
3Electrical plug
4Air hose with pressure gauge and vent
screw
5Union nut
�
Open flap 1 on electric air pump.
�
Pull out electrical plug 3 and air hose
with pressure gauge 4.
�
Remove the valve cap from the collaps-
ible tire valve.
�
Screw union nut 5 onto the collaps-
ible tire valve.
�
Insert electrical plug 3 into a power
outlet (
�page 306).
�
Turn the SmartKey in the starter switch
to position1.
or
�
Vehicles with KEYLESS-GO*:
Press the KEYLESS-GO start/stop
button once without depressing the
brake pedal.
�
Press I on electric air pump switch 2.
The electric air pump should now
switch on and inflate the collapsible
tire.
Warning!
G
Inflate collapsible tire only after the wheel is
properly mounted.
Inflate the collapsible tire using the electric
air pump (
�page 454) before
lowering the
vehicle.
Warning!
G
Observe instructions on air pump label.!Do not lower the vehicle before inflat-
ing the collapsible tire. Otherwise the
rim may be damaged.
!The cigarette lighter* (
�page 303) is
not designed for use with the electric
air pump. Use a power outlet
(
�page 306) for electric air pump
operation.
��
Page 485 of 561
.
This takes about 5 minutes for the col-")
484 Practical hintsFlat tire�
Inflate the spare wheel tire to the rec-
ommended tire inflation pressure given
in the “Technical data” section
(�page 514).
This takes about 5 minutes for the col-
lapsible tire.
�
Press 0 on electric air pump switch 2.
�
Turn the SmartKey in the starter switch
to position0.
or
�
Vehicles with KEYLESS-GO*:
Press the KEYLESS-GO start/stop
button twice without depressing the
brake pedal.
�
If the tire inflation pressure is above
the recommended tire inflation pres-
sure given in this Operator’s Manual,
release excess tire inflation pressure
using the vent screw.
Warning!
G
Air hose
4
and union nut
5
can become
hot during inflation. Exercise proper caution
to avoid burning yourself when using the
equipment.
!Please compare the recommended tire
inflation pressure for your vehicle with
the tire inflation pressure on the yellow
label located on the spare wheel rim.
If the tire inflation pressure on the yel-
low label on the spare wheel rim differs
from the values given in this Operator’s
Manual, inflate the tire to the recom-
mended tire inflation pressure given on
the yellow label on the spare wheel rim.!Do not operate the electric air pump
longer than 8 minutes without interrup-
tion. Otherwise it may overheat.
You may operate the electric air pump
again after it has cooled off.
��
Page 491 of 561

�
Set the automatic position to P
(�page 199).
�
Firmly depress the parking brake
(�page 65).
�
Turn off the engine (
�page 66).
�
Leave the ignition")
490 Practical hintsBatteryStep 1 (Disconnecting)
�
Set the automatic position to P
(�page 199).
�
Firmly depress the parking brake
(�page 65).
�
Turn off the engine (
�page 66).
�
Leave the ignition switched on
(�page 38).
�
Switch off all electrical consumers.
�
Read and observe safety instructions
and precautions (
�page 487).
�
Open the front passenger door.
�
Move the front passenger seat to the
most rearward position (
�page 43).Step 2 (Disconnecting)
1Seat rail covers, front right
2Seat rail covers, front left
�
Pull off right seat rail cover 1 in direc-
tion of arrow.
�
Pull left seat rail cover 2 in direction
of arrow as far as it will go.
Left seat rail cover 2 cannot be re-
moved.
iWith a disconnected battery you will no
longer be able to turn the SmartKey in
the starter switch and pressing the
KEYLESS-GO* start/stop button will
have no effect.iIf your battery is discharged, the vehi-
cle must be jump started (
�page 496)
using the jump start contacts in the
engine compartment, or an accessory
battery charge unit* approved by
Mercedes-Benz must be connected
using the jump start contacts in the
engine compartment (see separate
instructions for the accessory battery
charge unit*) before any of the follow-
ing steps can be performed. If the bat-
tery cannot be jumped or charged,
please contact an authorized
Mercedes-Benz Light Truck Center.
iOpen doors only when conditions are
safe to do so.