Page 350 of 561
349 Operation
Engine compartment
To check the engine oil level with the oil
dipstick, do the following:�
Open the hood (
�page 345).
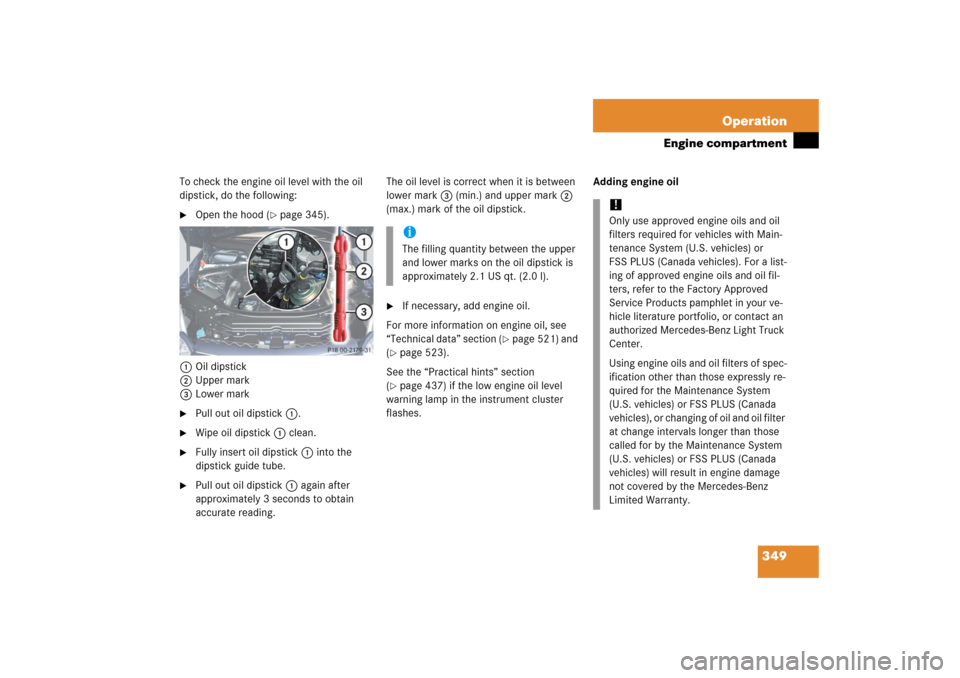
1Oil dipstick
2Upper mark
3Lower mark
�
Pull out oil dipstick1.
�
Wipe oil dipstick 1 clean.
�
Fully insert oil dipstick1 into the
dipstick guide tube.
�
Pull out oil dipstick1 again after
approximately 3 seconds to obtain
accurate reading.The oil level is correct when it is between
lower mark 3 (min.) and upper mark 2
(max.) mark of the oil dipstick.
�
If necessary, add engine oil.
For more information on engine oil, see
“Technical data” section (
�page 521) and
(
�page 523).
See the “Practical hints” section
(�page 437) if the low engine oil level
warning lamp in the instrument cluster
flashes.Adding engine oiliThe filling quantity between the upper
and lower marks on the oil dipstick is
approximately 2.1 US qt. (2.0 l).
!Only use approved engine oils and oil
filters required for vehicles with Main-
tenance System (U.S. vehicles) or
FSS PLUS (Canada vehicles). For a list-
ing of approved engine oils and oil fil-
ters, refer to the Factory Approved
Service Products pamphlet in your ve-
hicle literature portfolio, or contact an
authorized Mercedes-Benz Light Truck
Center.
Using engine oils and oil filters of spec-
ification other than those expressly re-
quired for the Maintenance System
(U.S. vehicles) or FSS PLUS (Canada
vehicles), or changing of oil and oil filter
at change intervals longer than those
called for by the Maintenance System
(U.S. vehicles) or FSS PLUS (Canada
vehicles) will result in engine damage
not covered by the Mercedes-Benz
Limited Warranty.
Page 352 of 561
351 Operation
Engine compartment
Coolant level
The engine coolant is a mixture of water
and anticorrosion / antifreeze. To check
the coolant level, the vehicle must be
parked on level ground and the engine
must be cool.
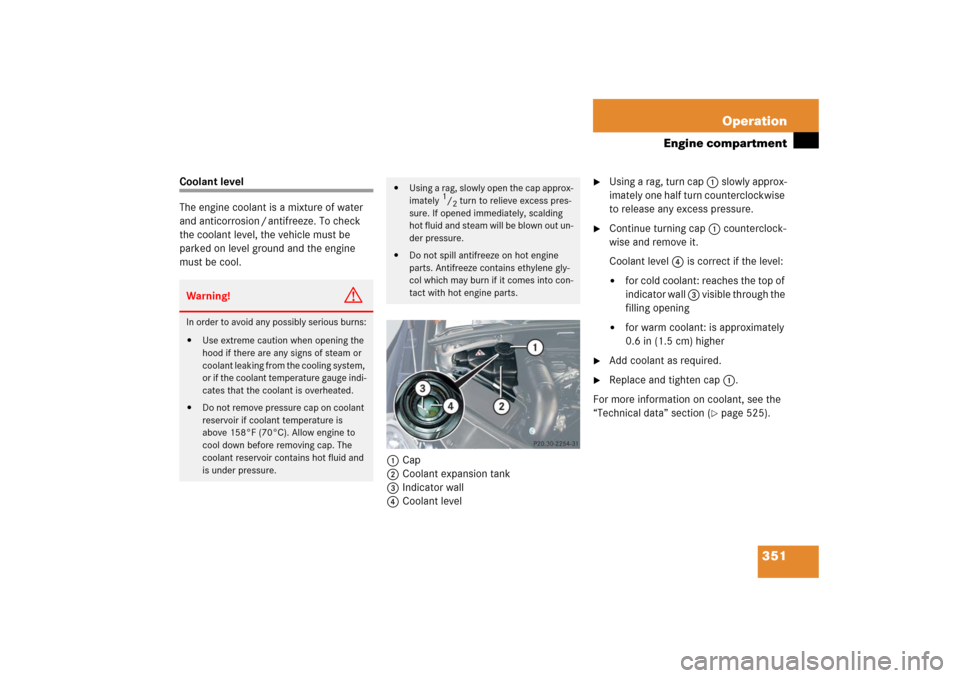
1Cap
2Coolant expansion tank
3Indicator wall
4Coolant level
�
Using a rag, turn cap 1 slowly approx-
imately one half turn counterclockwise
to release any excess pressure.
�
Continue turning cap 1 counterclock-
wise and remove it.
Coolant level 4 is correct if the level:�
for cold coolant: reaches the top of
indicator wall 3 visible through the
filling opening
�
for warm coolant: is approximately
0.6 in (1.5 cm) higher
�
Add coolant as required.
�
Replace and tighten cap 1.
For more information on coolant, see the
“Technical data” section (
�page 525).
Warning!
G
In order to avoid any possibly serious burns:�
Use extreme caution when opening the
hood if there are any signs of steam or
coolant leaking from the cooling system,
or if the coolant temperature gauge indi-
cates that the coolant is overheated.
�
Do not remove pressure cap on coolant
reservoir if coolant temperature is
above 158°F (70°C). Allow engine to
cool down before removing cap. The
coolant reservoir contains hot fluid and
is under pressure.
�
Using a rag, slowly open the cap approx-
imately
1/2 turn to relieve excess pres-
sure. If opened immediately, scalding
hot fluid and steam will be blown out un-
der pressure.
�
Do not spill antifreeze on hot engine
parts. Antifreeze contains ethylene gly-
col which may burn if it comes into con-
tact with hot engine parts.
Page 435 of 561
434 Practical hintsWhat to do if …
During severe operation conditions and
stop-and-go city traffic, the coolant tem-
perature may rise close to 248°F (120°C).
Display symbol
Display messages
Possible cause/consequence
Possible solution
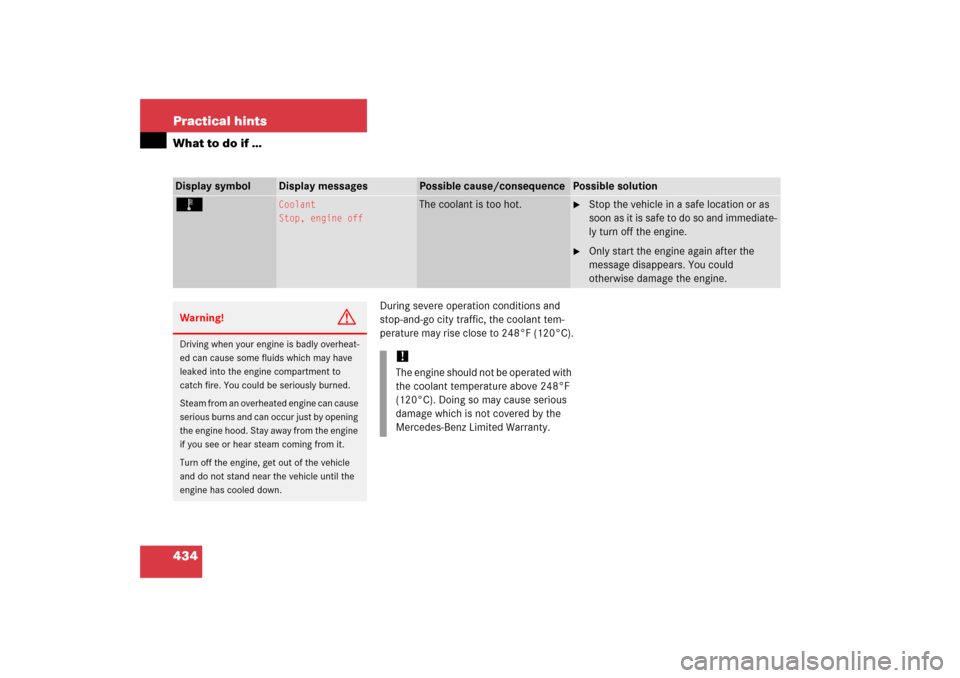
Ï
Coolant
Stop, engine off
The coolant is too hot.
�
Stop the vehicle in a safe location or as
soon as it is safe to do so and immediate-
ly turn off the engine.
�
Only start the engine again after the
message disappears. You could
otherwise damage the engine.
Warning!
G
Driving when your engine is badly overheat-
ed can cause some fluids which may have
leaked into the engine compartment to
catch fire. You could be seriously burned.
Steam from an overheated engine can cause
serious burns and can occur just by opening
the engine hood. Stay away from the engine
if you see or hear steam coming from it.
Turn off the engine, get out of the vehicle
and do not stand near the vehicle until the
engine has cooled down.
!The engine should not be operated with
the coolant temperature above 248°F
(120°C). Doing so may cause serious
damage which is not covered by the
Mercedes-Benz Limited Warranty.
Page 440 of 561
439 Practical hints
What to do if …
Display symbol
Display messages
Possible cause/consequence
Possible solution
A
Check gas cap
See Operator’s Manual
A loss of pressure has been
detected in the fuel system. The
fuel cap may not be closed
properly or the fuel system may
be leaky.
�
Check the fuel cap (
�page 342).
If it is not closed properly:
�
Close the fuel cap.
If it is closed properly:
�
Have the fuel system checked by an
authorized Mercedes-Benz Light Truck
Center.
a
Hood open
Trunk open
You are driving with the hood or
the tailgate open.
�
Close the hood (
�page 345) or the
tailgate (
�page 124).
You are trying to lock the vehicle
with the KEYLESS-GO* function
with a door or the tailgate open.
�
Close all doors and/or the tailgate
(�page 124).
Page 469 of 561
468 Practical hintsReplacing bulbsReplacing bulbs for front lamps
Before you start to replace a bulb for a
front lamp, do the following first:�
Turn the exterior lamp switch to
positionM (
�page 147).
�
Open the hood (
�page 345).
Halogen headlamps
1Low beam/high beam headlamp cover2Bulb socket for turn signal lamp
2Bulb socket for turn signal lamp
3Bulb socket for low beam headlamp
4Bulb socket for high beam headlampLow beam headlamp bulbs
�
Turn cover 1 counterclockwise.
�
Remove cover 1.
�
Turn bulb socket 3 counterclockwise.
�
Pull bulb socket 3 out of the head-
lamp housing.
�
Pull the low beam bulb out of bulb
socket 3.
�
Insert the new low beam bulb into bulb
socket 3.
�
Insert bulb socket 3 into the head-
lamp housing.
�
Turn bulb socket 3 clockwise until it
engages.
�
Place cover 1 on the opening in the
headlamp housing.
�
Turn cover 1 clockwise until it engag-
es.
Page 476 of 561
475 Practical hints
Replacing wiper blades
�Replacing wiper blades
Front wiper blades Removing
�
Remove the SmartKey from the starter
switch.
or
�
Vehicles with KEYLESS-GO*:
Make sure the vehicle’s on-board
electronics have status0 (
�page 39).
�
Fold the wiper arms forward until they
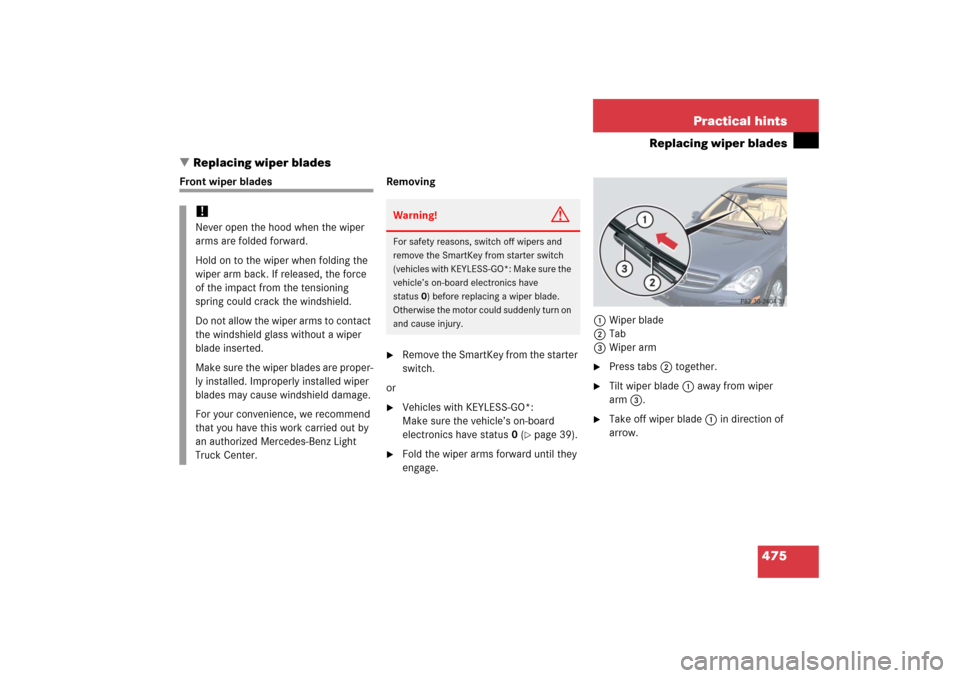
engage.1Wiper blade
2Tab
3Wiper arm
�
Press tabs2 together.
�
Tilt wiper blade 1 away from wiper
arm 3.
�
Take off wiper blade 1 in direction of
arrow.
!Never open the hood when the wiper
arms are folded forward.
Hold on to the wiper when folding the
wiper arm back. If released, the force
of the impact from the tensioning
spring could crack the windshield.
Do not allow the wiper arms to contact
the windshield glass without a wiper
blade inserted.
Make sure the wiper blades are proper-
ly installed. Improperly installed wiper
blades may cause windshield damage.
For your convenience, we recommend
that you have this work carried out by
an authorized Mercedes-Benz Light
Truck Center.
Warning!
G
For safety reasons, switch off wipers and
remove the SmartKey from starter switch
(vehicles with KEYLESS-GO*: Make sure the
vehicle’s on-board electronics have
status0) before replacing a wiper blade.
Otherwise the motor could suddenly turn on
and cause injury.
Page 498 of 561
497 Practical hints
Jump starting
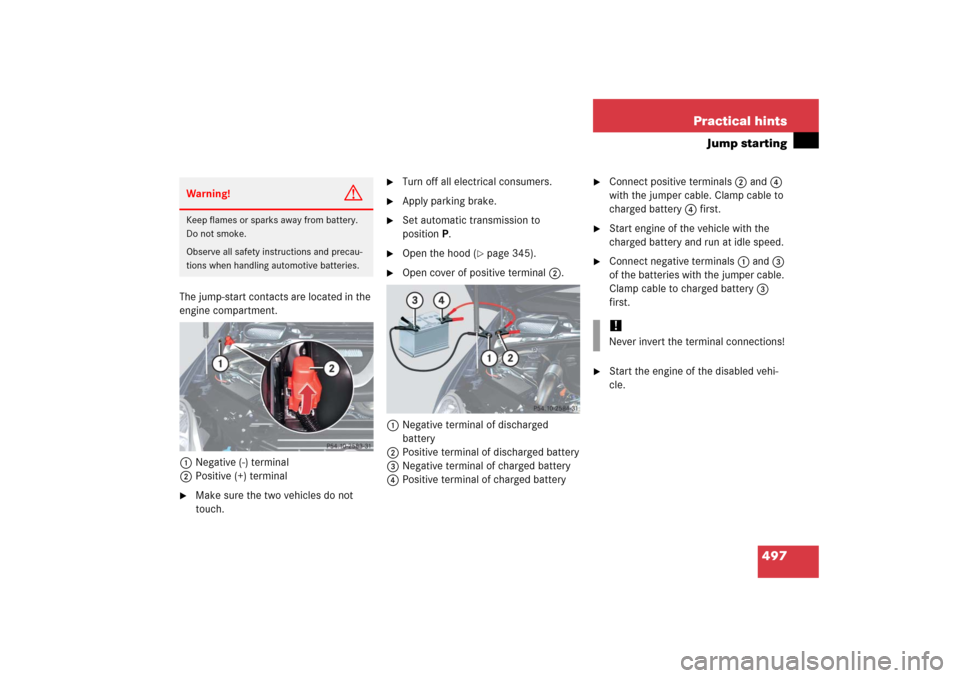
The jump-start contacts are located in the
engine compartment.
1Negative (-) terminal
2Positive (+) terminal �
Make sure the two vehicles do not
touch.
�
Turn off all electrical consumers.
�
Apply parking brake.
�
Set automatic transmission to
positionP.
�
Open the hood (
�page 345).
�
Open cover of positive terminal 2.
1Negative terminal of discharged
battery
2Positive terminal of discharged battery
3Negative terminal of charged battery
4Positive terminal of charged battery
�
Connect positive terminals2 and 4
with the jumper cable. Clamp cable to
charged battery 4 first.
�
Start engine of the vehicle with the
charged battery and run at idle speed.
�
Connect negative terminals1 and 3
of the batteries with the jumper cable.
Clamp cable to charged battery 3
first.
�
Start the engine of the disabled vehi-
cle.
Warning!
G
Keep flames or sparks away from battery.
Do not smoke.
Observe all safety instructions and precau-
tions when handling automotive batteries.
!Never invert the terminal connections!
Page 505 of 561
504 Practical hintsFusesMain fuse box
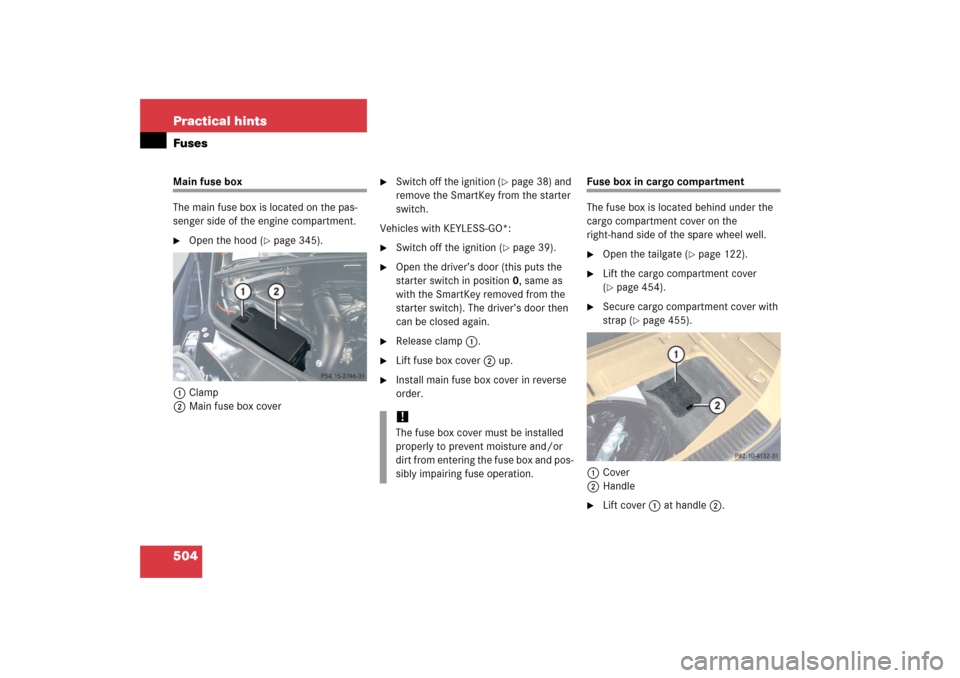
The main fuse box is located on the pas-
senger side of the engine compartment.�
Open the hood (
�page 345).
1Clamp
2Main fuse box cover
�
Switch off the ignition (
�page 38) and
remove the SmartKey from the starter
switch.
Vehicles with KEYLESS-GO*:
�
Switch off the ignition (
�page 39).
�
Open the driver’s door (this puts the
starter switch in position 0, same as
with the SmartKey removed from the
starter switch). The driver’s door then
can be closed again.
�
Release clamp1.
�
Lift fuse box cover2 up.
�
Install main fuse box cover in reverse
order.
Fuse box in cargo compartment
The fuse box is located behind under the
cargo compartment cover on the
right-hand side of the spare wheel well.�
Open the tailgate (
�page 122).
�
Lift the cargo compartment cover
(�page 454).
�
Secure cargo compartment cover with
strap (
�page 455).
1Cover
2Handle
�
Lift cover1 at handle 2.
!The fuse box cover must be installed
properly to prevent moisture and/or
dirt from entering the fuse box and pos-
sibly impairing fuse operation.