Page 185 of 561
184 Controls in detailControl systemSetting night security illumination
(Headlamps delayed shut-off)
Use this function to set whether and for
how long you would like the exterior lamps
to remain on during darkness after exiting
the vehicle and the doors closed.
With the delayed shut-off feature activated
and the exterior lamp switch in
positionU before the engine is turned
off, the following lamps will switch on
when the engine is turned off:�
Parking lamps
�
Tail lamps
�
License plate lamps
�
Side marker lamps
�
Front fog lamps*
If after turning off the engine you do not
open a door, the lamps will switch off auto-
matically after 60 seconds.
�
Move the selection marker with
buttonæ orç to the
Lighting
submenu.
�
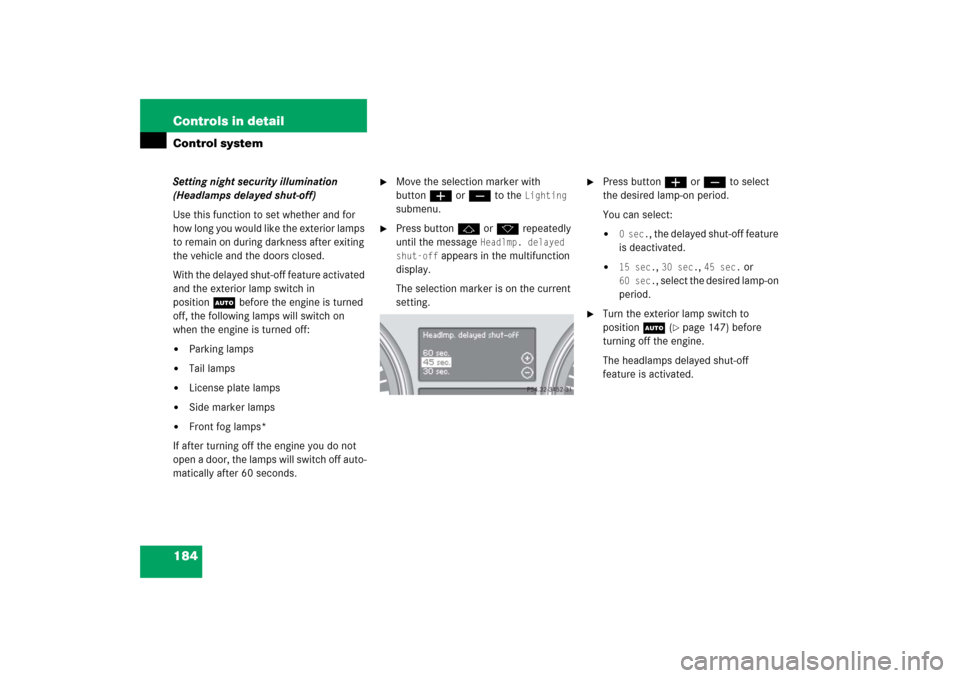
Press buttonj ork repeatedly
until the message
Headlmp. delayed
shut-off
appears in the multifunction
display.
The selection marker is on the current
setting.
�
Press buttonæ orç to select
the desired lamp-on period.
You can select:�
0 sec.
, the delayed shut-off feature
is deactivated.
�
15 sec.
, 30 sec.
, 45 sec.
or
60 sec.
, select the desired lamp-on
period.
�
Turn the exterior lamp switch to
positionU (
�page 147) before
turning off the engine.
The headlamps delayed shut-off
feature is activated.
Page 228 of 561
227 Controls in detail
Climate control
Deactivating
It is possible to deactivate the air condi-
tioning (cooling) function of the climate
control system. The air in the vehicle will
then no longer be cooled or dehumidified.�
Press button9 (
�page 218).
The indicator lamp on the button goes
out.Activating
Moist air can fog up the windows. You can
dehumidify the air with the air condition-
ing.
�
Press button9 (
�page 218) again.
The indicator lamp on the button
comes on.
The air conditioning uses the refrigerant
R134a. This refrigerant is free of CFCs
which are harmful to the ozone layer.
Residual heat and ventilation
With the engine switched off, it is possible
to continue to heat or ventilate the interior
for up to 30 minutes. This feature makes
use of the residual heat produced by the
engine.
!If the air conditioning cannot be turned
on again, this indicates that the air con-
ditioning is losing refrigerant. The com-
pressor has turned off.
Have the air conditioning checked at
the nearest authorized Mercedes-Benz
Light Truck Center.
iHow long the system will provide heat-
ing depends on�
the coolant temperature
�
the battery voltage
Regardless of the temperature and air
volume set on the climate control
panel, an interior temperature is aimed
at by 72°F (22°C) and the blower runs
on low speed to protect the vehicle bat-
tery.
Page 243 of 561
242 Controls in detail3-zone automatic climate control*Deactivating
It is possible to deactivate the air condi-
tioning (cooling) function of the automatic
climate control system. The air in the vehi-
cle will then no longer be cooled or dehu-
midified.�
Press button9 (
�page 232).
The indicator lamp on the button goes
out. The cooling function switches off
after a short delay.Activating
Moist air can fog up the windows. You can
dehumidify the air with the air condition-
ing.
�
Press button9 again.
The indicator lamp on the button
comes on.
The air conditioning uses the refrigerant
R-134a. This refrigerant is free of CFCs
which are harmful to the ozone layer.Using driver-side settings for all tem-
perature zones
You can use the settings of the driver’s
side, such as temperature, air volume and
air distribution, for all temperature zones.
These settings only need to be made once
and the climate control system will auto-
matically regulate the settings for all tem-
perature zones quickly and comfortably.
Activating�
Adjust the temperature, air volume and
air distribution (
�page 232).
�
Press button; (
�page 232).
The indicator lamp on the button
comes on.
The driver-side settings are used for all
temperature zones.
!If the air conditioning cannot be turned
on again, this indicates that the air
conditioning is losing refrigerant. The
compressor has turned off.
Have the air conditioning checked at
the nearest authorized Mercedes-Benz
Light Truck Center.
Page 443 of 561
442 Practical hintsWhat to do if …Display symbol
Display messages
Possible cause/consequence
Possible solution
.
3rd brake lamp
The high mounted brake lamp is
malfunctioning. This message
will only appear if all light
emitting diodes have stopped
working.
�
Visit an authorized Mercedes-Benz Light
Truck Center as soon as possible.
Brake lamp, left
Substitute bulb on
The left brake lamp is malfunc-
tioning. A substitute bulb is
being used.
�
Replace the bulb as soon as possible.
Brake lamp, right
Substitute bulb on
The right brake lamp is malfunc-
tioning. A substitute bulb is
being used.
�
Replace the bulb as soon as possible.
Brake lamp
Drive to workshop
Brake lamp illumination is de-
layed or lamp is permanently on.
�
Visit an authorized Mercedes-Benz Light
Truck Center as soon as possible.
Display malfunction
Visit workshop
The display for the lamps or the
system is malfunctioning.
�
Visit an authorized Mercedes-Benz Light
Truck Center as soon as possible.
Front foglamp,
left
The left front fog lamp is
malfunctioning.
�
Replace the bulb as soon as possible.
Front foglamp,
right
The right front fog lamp is
malfunctioning.
�
Replace the bulb as soon as possible.
Rear fog lamp
The rear fog lamp is malfunction-
ing.
�
Replace the bulb as soon as possible.
Page 466 of 561
465 Practical hints
Replacing bulbs
�Replacing bulbs
Bulbs
Safe vehicle operation depends on proper
exterior lighting and signaling. It is there-
fore essential that all bulbs and lamp as-
semblies are in good working order at all
times.
Correct headlamp adjustment is extremely
important. Have headlamps checked and
readjusted at regular intervals and when a
bulb has been replaced. See an authorized
Mercedes-Benz Light Truck Center for
headlamp adjustment.
iIf the headlamps or front fog lamps are
fogged up on the inside as a result of
high humidity, driving the vehicle a dis-
tance with the lights on should clear up
the fogging.
iBackup bulbs will be brought into use
when the following lamps malfunction:�
Turn signal lamps
�
Brake lamps
�
Parking lamps
�
Tail lamps
Read and observe messages in the
multifunction display (
�page 442).
Page 467 of 561
466 Practical hintsReplacing bulbsFront lamps Rear lamps
Lamp
Type
1
Parking/standing lamp
W 5 W
2
Turn signal lamp
PY 21 W
3
Additional turn signal
lamp
LED
4
Headlamps:
Low beam
H7 (55W)
Bi-Xenon headlamps*:
Low beam
1
1Vehicles with Bi-Xenon* headlamps: Do not
replace the Bi-Xenon bulbs yourself. Contact an
authorized Mercedes-Benz Light Truck Center.
D2S-35 W
5
Headlamps:
High beam/high beam
flasher
H7 (55W)
Bi-Xenon headlamps*:
High beam/high beam
flasher spot lamp
H7 (55W)
6
Sidemarker lamp
WY 5 W
7
Corner-illuminating
front fog lamp*
H11 (55W)
Lamp
Type
8
High-mounted brake
lamp
LED
9
Tail, brake, and
sidemarker lamp
P 21 W
a
Turn signal lamp
PY 21 W
b
Backup lamp
P 21 W
c
Rear fog lamp (driver’s
side only)
P 21 W
d
License plate lamps
C 5 W
Page 473 of 561
472 Practical hintsReplacing bulbs�
Turn bulb socket 5 clockwise until it
engages.
�
Insert corner-illuminating front fog
lamp 1 back into bumper.
�
Fasten retaining screws4.
�
Reinsert cover 2 and press it in until it
engages.
�
Fasten retaining screw3.Additional turn signal lamps bulbs
The additional turn signal lamps in the
exterior rear view mirrors have LEDs.
If a malfunction occurs or LEDs fail to func-
tion, the entire turn signal unit must be re-
placed. Have the turn signal unit replaced
by an authorized Mercedes-Benz Light
Truck Center.
Front sidemarker lamp bulbs
Since replacing the sidemarker lamp bulbs
is a technically highly demanding process,
we recommend you have the sidemarker
lamp bulbs replaced by an authorized
Mercedes-Benz Light Truck Center.
Replacing bulbs for rear lamps
Before you start to replace a bulb for a rear
lamp, do the following first:�
Turn the combination switch to
positionM (
�page 147).
Tail lamp unit
�
Open the tailgate (
�page 122).
iTo access the tail lamp units, you have
to remove the cover in the correspond-
ing side trim panel of the cargo com-
partment.
��
Page 540 of 561
539 Index
Closing the tailgate from the inside
electrically* 124
Closing the tailgate from the outside (vehi-
cles without KEYLESS-GO*) 126
Closing tilt/sliding sunroof*
In an emergency 462
Cockpit 22, 529
Cold tire inflation pressure 386, 529
Collapsible tire 457, 530
Collapsible wheel chock 457
Combination switch
High beam flasher 58
Turn signals 58
Windshield wipers 59
Compass 186, 327
Adjustment 186
Calibration 187
Setting the compass zone 186
Control and operation of radio
transmitters 339Control system 530
AUDIO menu 170
Convenience submenu 189
Display digital speedometer 169
Functions 165
Instrument cluster submenu 178,
180
Lighting submenu 182
Malfunction memory menu 173
Menus 164, 165
Selecting radio system 170
Selecting satellite radio* system 171
Settings menu 174
Standard display menu 168
Submenus 163, 165
TEL* menu 194
Trip computer menu 192
Vehicle submenu 186
Convenience submenu 189
Activating easy-entry/exit
feature* 189Coolant 351, 525
Adding 351
Anticorrosion/antifreeze
quantity 526
Checking level 351
Messages in display 433, 436
Temperature 341
Coolant level
Checking 351
Corner-illuminating front fog lamps* 152
Cruise control 264, 530
Canceling 266
Driving downhill 265
Driving uphill 265
Setting current speed 265
Setting speeds 269
Cruise control lever 264
Cup holder
Front center console 299
In rear center console 301
Cup holders 299
Cleaning 401
Curb weight 386, 530
Customer Assistance Center (CAC) 529