Page 460 of 561
459 Practical hints
Unlocking / locking in an emergency
�Unlocking / locking in an emergency
Unlocking the vehicle
If you cannot unlock the vehicle with the
SmartKey or KEYLESS-GO*, open the driv-
er’s door using the mechanical key.
Removing the mechanical key
SmartKey1Mechanical key locking tab
2Mechanical key
SmartKey with KEYLESS-GO*1Mechanical key locking tab
2Mechanical key�
Move locking tab1 in direction of
arrow.
�
Slide mechanical key2 out of the
housing.
iUnlocking the driver’s door with the
mechanical key will trigger the
anti-theft alarm system.
To cancel the alarm:�
Press buttonŒ or‹on the
SmartKey.
�
Insert the SmartKey in the starter
switch.
Vehicles with KEYLESS-GO*:�
Grasp an outside door handle.
The SmartKey with KEYLESS-GO
must be within 3 ft (1 m) of the ve-
hicle.
�
Press the KEYLESS-GO start / stop
button (
�page 40).
The SmartKey with KEYLESS-GO
must be inside the vehicle.
Page 461 of 561
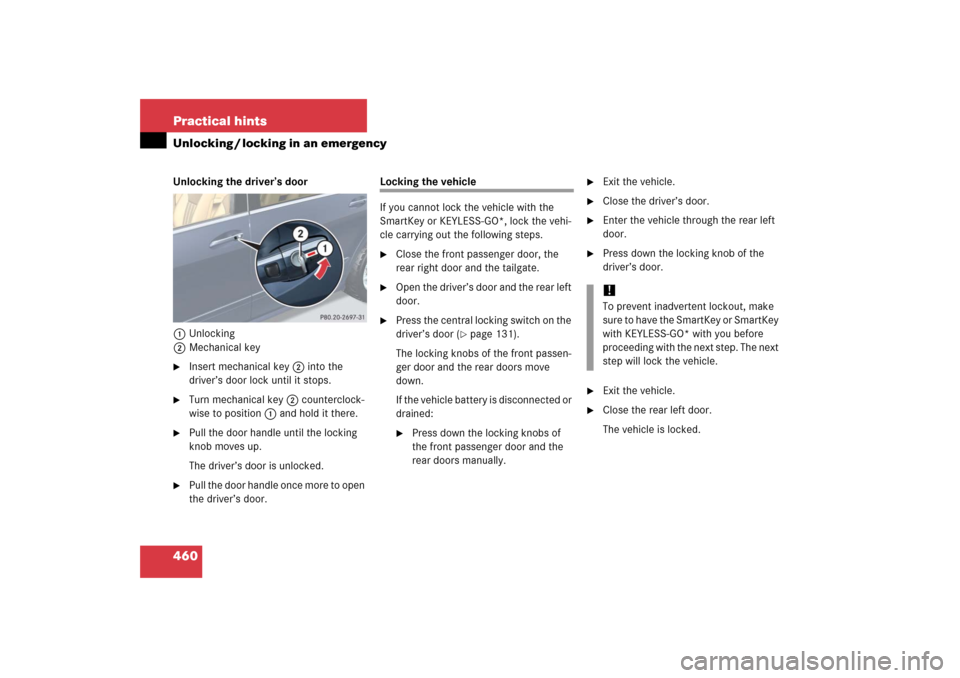
460 Practical hintsUnlocking / locking in an emergencyUnlocking the driver’s door
1Unlocking
2Mechanical key�
Insert mechanical key 2 into the
driver’s door lock until it stops.
�
Turn mechanical key 2 counterclock-
wise to position1 and hold it there.
�
Pull the door handle until the locking
knob moves up.
The driver’s door is unlocked.
�
Pull the door handle once more to open
the driver’s door.
Locking the vehicle
If you cannot lock the vehicle with the
SmartKey or KEYLESS-GO*, lock the vehi-
cle carrying out the following steps.�
Close the front passenger door, the
rear right door and the tailgate.
�
Open the driver’s door and the rear left
door.
�
Press the central locking switch on the
driver’s door (
�page 131).
The locking knobs of the front passen-
ger door and the rear doors move
down.
If the vehicle battery is disconnected or
drained:
�
Press down the locking knobs of
the front passenger door and the
rear doors manually.
�
Exit the vehicle.
�
Close the driver’s door.
�
Enter the vehicle through the rear left
door.
�
Press down the locking knob of the
driver’s door.
�
Exit the vehicle.
�
Close the rear left door.
The vehicle is locked.!To prevent inadvertent lockout, make
sure to have the SmartKey or SmartKey
with KEYLESS-GO* with you before
proceeding with the next step. The next
step will lock the vehicle.
Page 463 of 561
462 Practical hintsOpening / closing in an emergencyPower tilt/sliding sunroof*
You can open or close the tilt/sliding
sunroof manually should an electrical
malfunction occur.
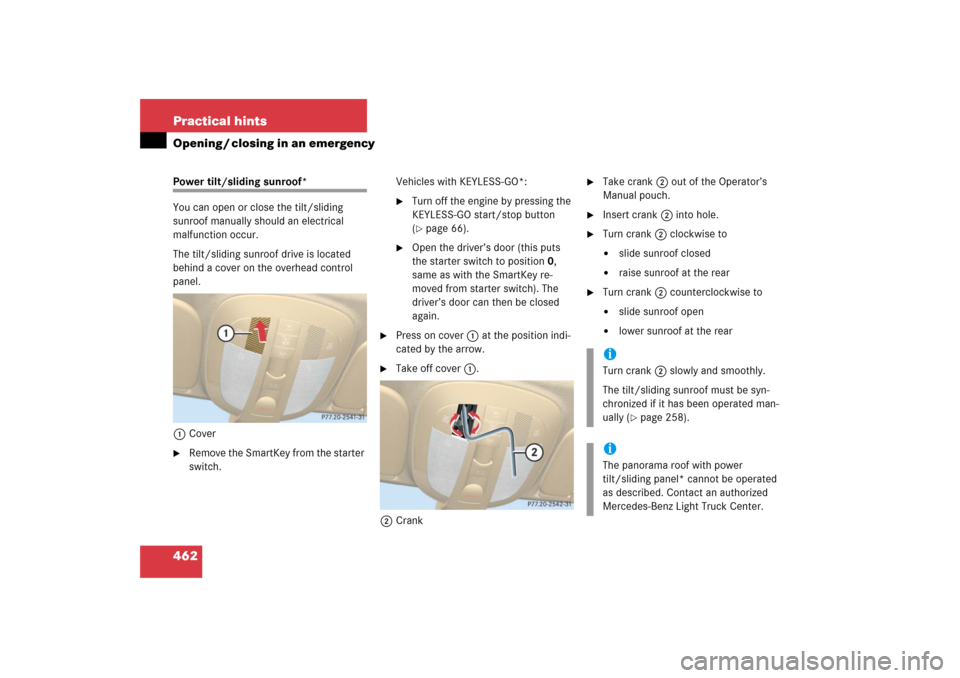
The tilt/sliding sunroof drive is located
behind a cover on the overhead control
panel.
1Cover�
Remove the SmartKey from the starter
switch.Vehicles with KEYLESS-GO*:
�
Turn off the engine by pressing the
KEYLESS-GO start/stop button
(�page 66).
�
Open the driver’s door (this puts
the starter switch to position0,
same as with the SmartKey re-
moved from starter switch). The
driver’s door can then be closed
again.
�
Press on cover1 at the position indi-
cated by the arrow.
�
Take off cover 1.
2Crank
�
Take crank 2 out of the Operator’s
Manual pouch.
�
Insert crank2 into hole.
�
Turn crank2 clockwise to�
slide sunroof closed
�
raise sunroof at the rear
�
Turn crank2 counterclockwise to�
slide sunroof open
�
lower sunroof at the rear
iTurn crank2 slowly and smoothly.
The tilt/sliding sunroof must be syn-
chronized if it has been operated man-
ually (
�page 258).
iThe panorama roof with power
tilt/sliding panel* cannot be operated
as described. Contact an authorized
Mercedes-Benz Light Truck Center.
Page 464 of 561
463 Practical hints
Replacing SmartKey batteries
�Replacing SmartKey batteries
If the batteries in the SmartKey or the
SmartKey with KEYLESS-GO* are dis-
charged, the vehicle can no longer be
locked or unlocked. It is recommended to
have the batteries replaced at an autho-
rized Mercedes-Benz Light Truck Center.
Batteries contain materials that can harm
the environment if disposed of improperly.
Recycling of batteries is the preferred
method of disposal. Many states require
sellers of batteries to accept old batteries
for recycling.
SmartKey
Replacement batteries: Lithium, type
CR 2025 or equivalent.�
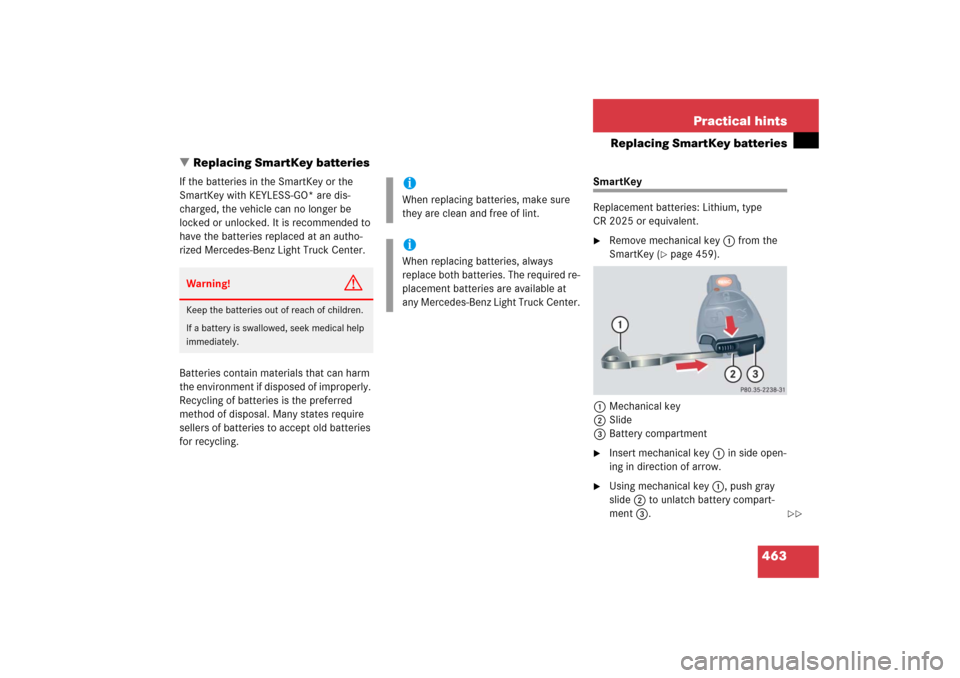
Remove mechanical key1 from the
SmartKey (
�page 459).
1Mechanical key
2Slide
3Battery compartment
�
Insert mechanical key 1 in side open-
ing in direction of arrow.
�
Using mechanical key 1, push gray
slide 2 to unlatch battery compart-
ment 3.
Warning!
G
Keep the batteries out of reach of children.
If a battery is swallowed, seek medical help
immediately.
iWhen replacing batteries, make sure
they are clean and free of lint.iWhen replacing batteries, always
replace both batteries. The required re-
placement batteries are available at
any Mercedes-Benz Light Truck Center.
��
Page 465 of 561
464 Practical hintsReplacing SmartKey batteries�
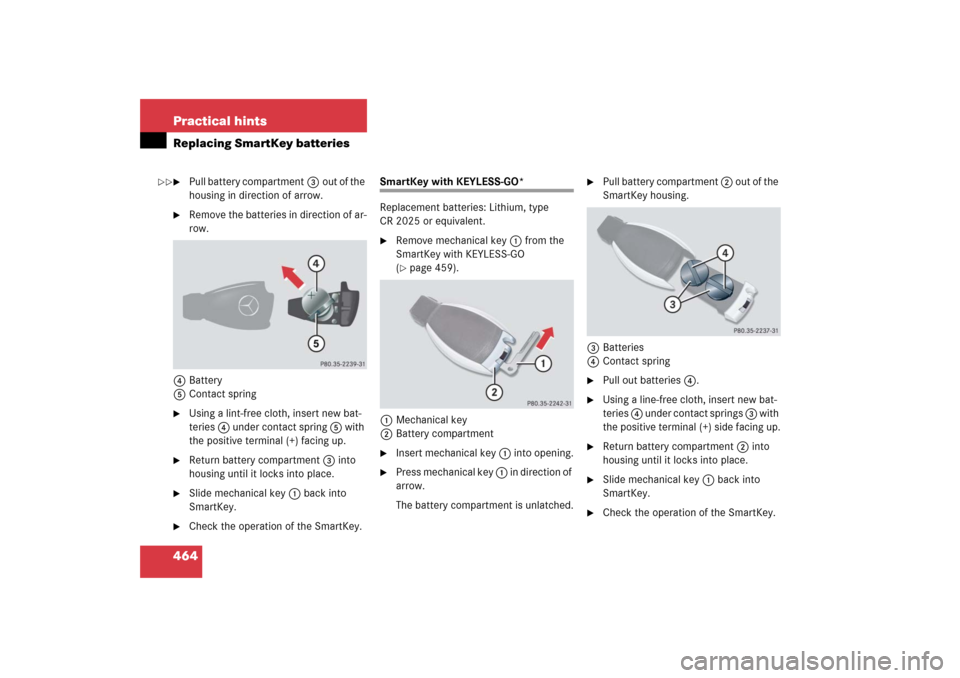
Pull battery compartment3out of the
housing in direction of arrow.
�
Remove the batteries in direction of ar-
row.
4Battery
5Contact spring
�
Using a lint-free cloth, insert new bat-
teries 4 under contact spring 5 with
the positive terminal (+) facing up.
�
Return battery compartment 3 into
housing until it locks into place.
�
Slide mechanical key 1 back into
SmartKey.
�
Check the operation of the SmartKey.
SmartKey with KEYLESS-GO*
Replacement batteries: Lithium, type
CR 2025 or equivalent.�
Remove mechanical key1 from the
SmartKey with KEYLESS-GO
(�page 459).
1Mechanical key
2Battery compartment
�
Insert mechanical key 1 into opening.
�
Press mechanical key 1 in direction of
arrow.
The battery compartment is unlatched.
�
Pull battery compartment 2 out of the
SmartKey housing.
3Batteries
4Contact spring
�
Pull out batteries4.
�
Using a line-free cloth, insert new bat-
teries 4 under contact springs 3 with
the positive terminal (+) side facing up.
�
Return battery compartment 2 into
housing until it locks into place.
�
Slide mechanical key 1 back into
SmartKey.
�
Check the operation of the SmartKey.
��
Page 476 of 561
475 Practical hints
Replacing wiper blades
�Replacing wiper blades
Front wiper blades Removing
�
Remove the SmartKey from the starter
switch.
or
�
Vehicles with KEYLESS-GO*:
Make sure the vehicle’s on-board
electronics have status0 (
�page 39).
�
Fold the wiper arms forward until they
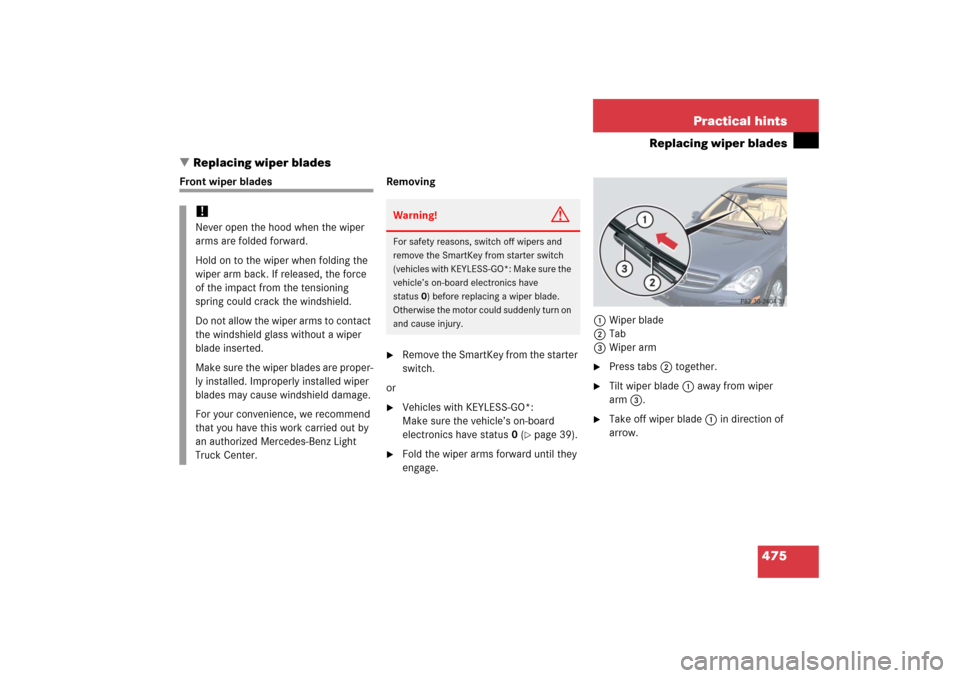
engage.1Wiper blade
2Tab
3Wiper arm
�
Press tabs2 together.
�
Tilt wiper blade 1 away from wiper
arm 3.
�
Take off wiper blade 1 in direction of
arrow.
!Never open the hood when the wiper
arms are folded forward.
Hold on to the wiper when folding the
wiper arm back. If released, the force
of the impact from the tensioning
spring could crack the windshield.
Do not allow the wiper arms to contact
the windshield glass without a wiper
blade inserted.
Make sure the wiper blades are proper-
ly installed. Improperly installed wiper
blades may cause windshield damage.
For your convenience, we recommend
that you have this work carried out by
an authorized Mercedes-Benz Light
Truck Center.
Warning!
G
For safety reasons, switch off wipers and
remove the SmartKey from starter switch
(vehicles with KEYLESS-GO*: Make sure the
vehicle’s on-board electronics have
status0) before replacing a wiper blade.
Otherwise the motor could suddenly turn on
and cause injury.
Page 477 of 561
476 Practical hintsReplacing wiper bladesInstalling
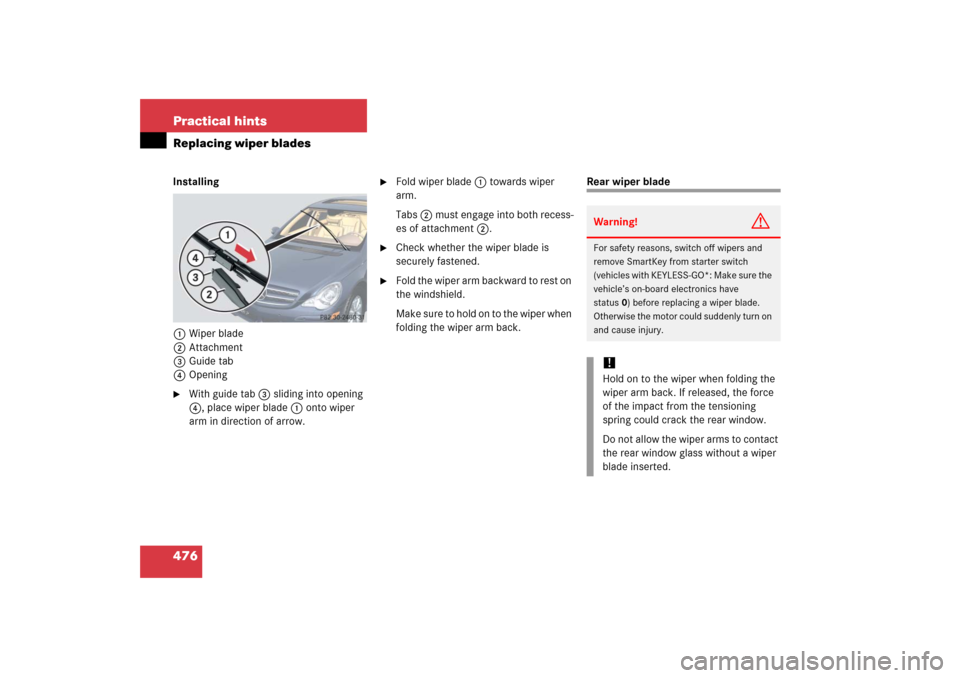
1Wiper blade
2Attachment
3Guide tab
4Opening�
With guide tab 3 sliding into opening
4, place wiper blade 1 onto wiper
arm in direction of arrow.
�
Fold wiper blade 1 towards wiper
arm.
Tabs 2 must engage into both recess-
es of attachment 2.
�
Check whether the wiper blade is
securely fastened.
�
Fold the wiper arm backward to rest on
the windshield.
Make sure to hold on to the wiper when
folding the wiper arm back.
Rear wiper bladeWarning!
G
For safety reasons, switch off wipers and
remove SmartKey from starter switch
(vehicles with KEYLESS-GO*: Make sure the
vehicle’s on-board electronics have
status0) before replacing a wiper blade.
Otherwise the motor could suddenly turn on
and cause injury.!Hold on to the wiper when folding the
wiper arm back. If released, the force
of the impact from the tensioning
spring could crack the rear window.
Do not allow the wiper arms to contact
the rear window glass without a wiper
blade inserted.
Page 478 of 561
477 Practical hints
Replacing wiper blades
Removing�
Remove the SmartKey from the starter
switch.
or
�
Vehicles with KEYLESS-GO*:
Make sure the vehicle’s on-board
electronics have status0 (
�page 39).
�
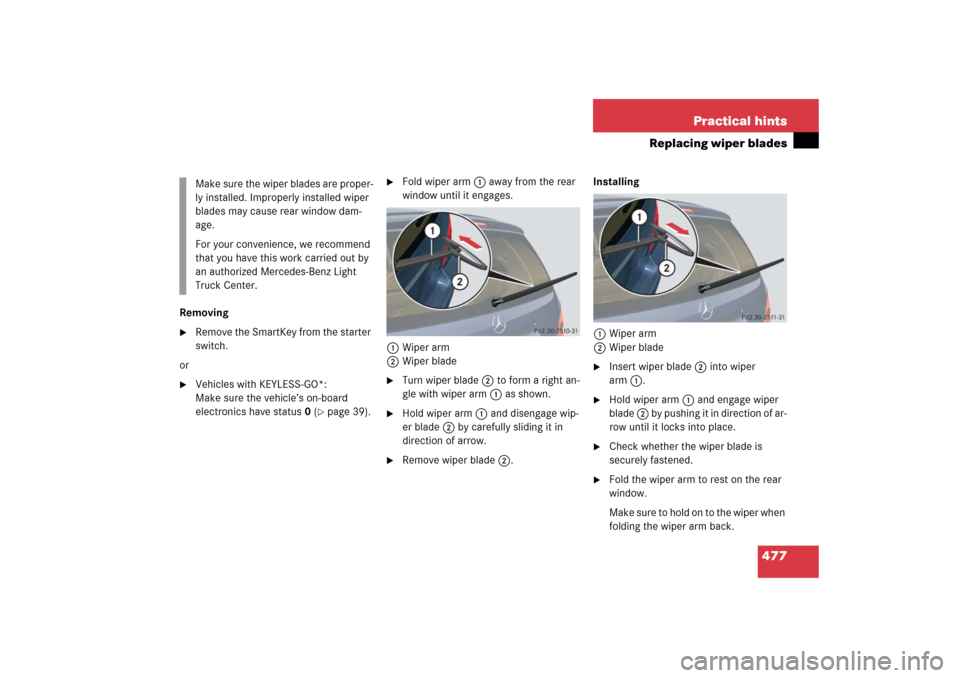
Fold wiper arm 1 away from the rear
window until it engages.
1Wiper arm
2Wiper blade
�
Turn wiper blade2 to form a right an-
gle with wiper arm 1 as shown.
�
Hold wiper arm 1 and disengage wip-
er blade 2 by carefully sliding it in
direction of arrow.
�
Remove wiper blade 2.Installing
1Wiper arm
2Wiper blade
�
Insert wiper blade 2 into wiper
arm1.
�
Hold wiper arm 1 and engage wiper
blade 2 by pushing it in direction of ar-
row until it locks into place.
�
Check whether the wiper blade is
securely fastened.
�
Fold the wiper arm to rest on the rear
window.
Make sure to hold on to the wiper when
folding the wiper arm back. Make sure the wiper blades are proper-
ly installed. Improperly installed wiper
blades may cause rear window dam-
age.
For your convenience, we recommend
that you have this work carried out by
an authorized Mercedes-Benz Light
Truck Center.