Page 238 of 561
.
The indicator lamp on the button goes
out.
Adjusting the air distribution for the")
237 Controls in detail
3-zone automatic climate control*
�
Press the desired air distribution but-
ton (
�page 232).
The indicator lamp on the button goes
out.
Adjusting the air distribution for the
center and side air vents
Opening the center air vents
�
Turn thumbwheels 5 and 6
(�page 230) upward.
The corresponding center air vents on
the left and right are open.
Closing the center air vents
�
Turn thumbwheels 5 and 6
(�page 230) downward.
The corresponding center air vents on
the left and right are closed.Opening the side air vents
�
Turn thumbwheels 2 and 7
(�page 230) downward.
The corresponding side air vents on the
left and right are open.
Closing the side air vents
�
Turn thumbwheels 2 and 7
(�page 230) downward.
The corresponding side air vents on the
left and right are closed.
Adjusting air volume
Five blower speeds are available.�
Press button�to decrease or
buttonQto increase air volume
(�page 232) to the desired level.
The indicator lamp on buttonU
goes out.
The AUTO
display disappears in the
display e (
�page 232) and the auto-
matic mode is switched off. The select-
ed blower speed appears in the
displaye (�page 232).
Page 239 of 561

238 Controls in detail3-zone automatic climate control*Front defroster
You can use this setting to defrost the
windshield, such as when it is iced up. You
can also use it to defog the windshield and
side windows.
Activating�
Press button0 (
�page 232).
The indicator lamp on the button
comes on.The air conditioning switches to the follow-
ing functions automatically:
�
maximum blower speed and heating
power
�
air flows onto the windshield and the
front side windows (side air vents must
be open)
�
the air conditioning compressor
switches on at outside temperatures
above approximately 41°F (5°C) for
air-drying
Deactivating
�
Press button0 (
�page 232).
The indicator lamp on the button goes
out. Defrosting is turned off.
The previous settings are once again in
effect.Windshield fogged on the outside
�
Switch the windshield wipers on
(�page 59).
�
Press buttonU (
�page 232).
AUTO appears in the display of control
panele (
�page 232). Air volume and
air distribution are controlled separate-
ly for each zone.
If the automatic air distribution and air vol-
ume are switched off:
�
Press buttons8 and Y
(�page 232).
iKeep this setting selected only until the
windshield or the side windows are
clear again.
When the defrost setting has been se-
lected, only the rear window defroster
can be switched on. No other settings
are possible.
iTo switch off, you can also press
button´ orU (
�page 232).
iKeep this setting selected only until the
windshield is clear again.
Page 240 of 561

239 Controls in detail
3-zone automatic climate control*
Maximum cooling MAX COOL
If the air distribution control as well as the
airflow volume control are set toU and
there is a high need for cooling, the
MAX COOL function is activated.
“MAX COOL” appears in the front and rear
display.
This provides the fastest possible cooling
of the vehicle interior (when windows and
tilt/sliding sunroof* or tilt/sliding panel*
are closed).
Air recirculation mode
Switch to air recirculation mode to prevent
unpleasant odors from entering the vehicle
from the outside (e.g. before driving
through a tunnel). This setting cuts off the
intake of outside air and recirculates the
air in the passenger compartment.Activating
�
Press button: (
�page 232).
The indicator lamp on the:button
comes on.
Warning!
G
Fogged windows impair visibility, endanger-
ing you and others. If the windows begin to
fog on the inside, switching off the air
recirculation mode immediately should clear
interior window fogging. If interior window
fogging persists, make sure the air
conditioning (
�page 241) is activated, or
press button0.
iThe air recirculation mode is activated
automatically at high outside tempera-
tures.
The indicator lamp on button:is
not lit when the air recirculation mode
is automatically switched on.
A quantity of outside air is added after
approximately 30 minutes.
If you have turned off the air condition-
ing (
�page 241) or the outside
temperature is below 41°F (5°C), the
air recirculation mode will not switch
on automatically.
Page 247 of 561
 slightly clockwise.
The rear automatic climate control will
correspondingly a")
246 Controls in detail3-zone automatic climate control*Increasing the temperature�
Turn temperature controla
(�page 244) slightly clockwise.
The rear automatic climate control will
correspondingly adjust the interior air
temperature for the rear passenger
compartment.
Decreasing the temperature
�
Turn temperature controla
(�page 244) slightly counterclock-
wise.
The rear automatic climate control will
correspondingly adjust the interior air
temperature for the rear passenger
compartment.Setting the temperature from the front
automatic climate control panel
You can adjust the temperature for the
rear automatic climate control from the
front panel.
�
Make sure the front automatic climate
control is switched on (
�page 234).
�
Press button> (
�page 232).
The indicator lamp on button>
comes on.
In displaye (
�page 232), you will see
the >symbol followed by
MODE
.
�
Set the desired temperature for the
rear passenger compartment using
temperature control 9 (
�page 232).
After approximately 3 seconds after
the last adjustment, the display switch-
es back to its standard display and the
indicator lamp on button> goes
out.Adjusting air volume
Adjusting manually
Five blower speeds are available.
�
Press button� to decrease or
buttonQ to increase air volume to
the desired level.
The indicator lamp on theU button
goes out. The selected blower speed is
shown by the indicator lamps for air
volume settings 9 (
�page 244).
Adjusting automatically
�
Press buttonU.
The indicator lamp on the button
comes on. The air volume is adjusted
automatically.iYou can also press the>button
once more to switch back to the stan-
dard display.
Page 266 of 561

2Setting current or lower speed
Adjustment in 1 mph or 5 m")
265 Controls in detail
Driving systems
1Setting current or higher speed
Adjustment in 1 mph or 5 mph
increments (Canada: 1 km/h or
10 km/h)
2Setting current or lower speed
Adjustment in 1 mph or 5 mph
increments (Canada: 1 km/h or
10 km/h)
3Canceling cruise control
4Resuming to last set speedSetting current speed
�
Accelerate or decelerate to the desired
speed.
�
Briefly lift1 or depress2 the cruise
control lever.
The current speed is set.
�
Remove your foot from the accelerator
pedal.
The cruise control is activated.
The last set speed appears in the multi-
function display for approximately
5 seconds.
Warning!
G
The cruise control brakes automatically so
that the set speed is not exceeded. The
brake pedal is depressed automatically to
do this.
Keep in mind that the cruise control is a con-
venience system designed to assist the driv-
er during vehicle operation. The driver is and
must always remain responsible for the ve-
hicle’s speed and for safe brake operation.
Keep driver’s foot area clear at all times, in-
cluding the area under the brake pedal. Ob-
jects stored in this area may impair pedal
movement which could interfere with the
braking ability of the cruise control system.
Do not place your foot under the brake pedal
- your foot could become caught.
iOn uphill grades, the cruise control
may not be able to maintain the set
speed. Once the grade eases, the set
speed will be resumed.
On downhill grades, the cruise control
maintains the set speed with active
braking action. In addition, on longer
downhill grades the automatic trans-
mission will automatically downshift.
Page 267 of 561

266 Controls in detailDriving systemsCanceling cruise control
There are several ways to cancel the cruise
control:�
Step on the brake pedal.
The cruise control is canceled. The last
speed set is stored for later use.
or
�
Briefly push the cruise control lever in
direction of arrow3 (
�page 265).
The cruise control is canceled. The last
speed set is stored for later use.
iThe last stored speed is canceled when
you turn off the engine.
iThe cruise control switches off auto-
matically when�
you step on the brake pedal
�
you depress the parking brake
pedal
The cruise control also switches off au-
tomatically when
�
the vehicle speed is below 20 mph
(30 km/h)
�
the ESP
® is in operation or switched
off with the ESP
® switch
(
�page 101)
�
you set the automatic transmission
toN while driving
An acoustic warning sounds and the
message
Cruise control off
appears
in the multifunction display.
!Setting the automatic transmission
toN while driving cancels the cruise
control. However, the automatic trans-
mission should not be set toN while
driving except to coast when the vehi-
cle is in danger of skidding (e.g. on icy
roads).iDepressing the accelerator pedal does
not deactivate the cruise control. After
brief acceleration (e.g. for passing), the
cruise control will resume the last
speed set.
Page 270 of 561
�
Briefly pull the cruise control lever in di-
rection of arrow4 (
�page 265).
The cruise control resumes th")
269 Controls in detail
Driving systems
Setting to last stored speed
(“Resume” function)�
Briefly pull the cruise control lever in di-
rection of arrow4 (
�page 265).
The cruise control resumes the last set
speed.
�
Remove your foot from the accelerator
pedal.
The last set speed appears in the multi-
function display for approximately
5seconds.
AIRMATIC*
AIRMATIC lets you set a suspension tuning
and automatically optimizes your vehicle’s
damping behavior and regulates the
vehicle level. The system consists of two
components:�
Suspension tuning:
Adaptive Damping System (ADS)*
(�page 269)
�
Vehicle level control* (
�page 270)Adaptive Damping System (ADS)*
The fine tuning of the damping is depen-
dent on:
�
road surface conditions
�
your driving style
�
your personal settings
The ADS switch is located on the upper
part of the center console.
1ADS switch
2Indicator lamp for SPORT setting
3Indicator lamp for COMF setting
Warning!
G
The speed stored in memory should only be
set again if prevailing road conditions per-
mit. Possible acceleration or deceleration
differences arising from returning to the pre-
set speed could cause an accident and/or
serious injury to you and others.
Page 273 of 561
272 Controls in detailDriving systemsRaised level
Only choose the raised level when the road
conditions permit. Otherwise:�
Fuel consumption may increase.
�
Handling characteristics of the vehicle
may be unfavorable.
�
Start the engine (
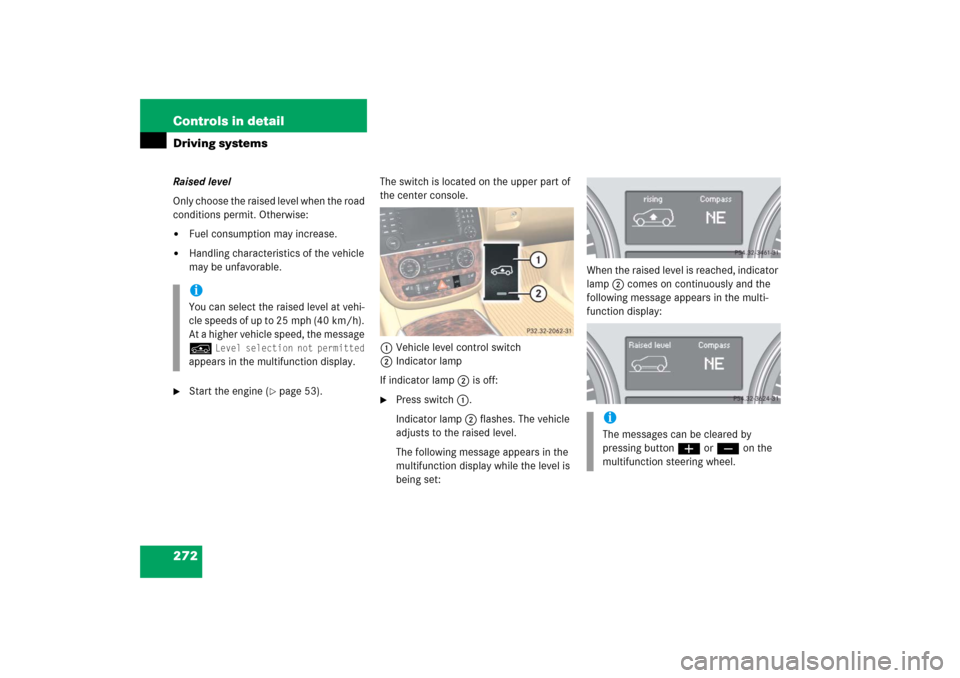
�page 53).The switch is located on the upper part of
the center console.
1Vehicle level control switch
2Indicator lamp
If indicator lamp2 is off:
�
Press switch1.
Indicator lamp2 flashes. The vehicle
adjusts to the raised level.
The following message appears in the
multifunction display while the level is
being set:When the raised level is reached, indicator
lamp2 comes on continuously and the
following message appears in the multi-
function display:
iYou can select the raised level at vehi-
cle speeds of up to 25 mph (40 km/h).
At a higher vehicle speed, the message
n
Level selection not permitted
appears in the multifunction display.
iThe messages can be cleared by
pressing buttonæ orç on the
multifunction steering wheel.