Page 8 of 539

Contents
At the gas station .............................. 323
Refueling ...................................... 323
Check regularly and
before a long trip.......................... 324
Engine compartment ......................... 326
Hood ............................................ 326
Engine oil ..................................... 327
Transmission fluid level ................ 332
Coolant level ................................ 332
Windshield/rear window
washer system and
headlamp cleaning system* ........ 333
Tires and wheels ................................ 335
Important guidelines .................... 335
Tire care and maintenance........... 336
Direction of rotation ..................... 338
Loading the vehicle ...................... 338
Recommended tire
inflation pressure ......................... 345
Checking tire inflation pressure ... 347
Tire labeling.................................. 355
Load identification ....................... 359
DOT, Tire Identification
Number (TIN) ............................... 360Maximum tire load ........................ 361
Maximum tire inflation pressure ... 362
Uniform Tire Quality Grading
Standards (U.S. vehicles) .............. 362
Tire ply material ............................ 364
Tire and loading terminology......... 365
Rotating tires ................................ 368
Winter driving ..................................... 369
Winter tires ................................... 369
Block heater (Canada only) ........... 370
Snow chains.................................. 370
Maintenance....................................... 371
Clearing the maintenance
service indicator ........................... 372
Maintenance service
term exceeded .............................. 372
Calling up the service indicator..... 372
Resetting the
maintenance service indicator ...... 373
Vehicle care........................................ 374
Cleaning and care of the vehicle ... 374
Practical hints.................................. 381
What to do if … ................................... 382
Lamps in instrument cluster ......... 382
Lamp in center console ................ 393
Vehicle status messages in the
multifunction display .................... 395
Where will I find ...? ............................ 430
First aid kit.................................... 430
Vehicle tool kit.............................. 430
Spare wheel .................................. 433
Unlocking/locking in an emergency .. 435
Unlocking the vehicle ................... 435
Locking the vehicle ....................... 436
Unlocking and opening
the tailgate ................................... 437
Fuel filler flap ................................ 438
Opening/closing in an emergency ..... 439
Power tilt/sliding sunroof* ........... 439
Replacing SmartKey batteries ............ 440
SmartKey ...................................... 440
SmartKey with KEYLESS-GO* ....... 441
Page 298 of 539
297 Operation
The first 1000 miles (1500 km)
Driving instructions
At the gas station
Engine compartment
Tires and wheels
Winter driving
Maintenance
Vehicle care
Page 324 of 539

323 Operation
At the gas station
�At the gas station
Refueling
The fuel filler flap is located on the
right-hand side of the vehicle towards the
rear. Locking/unlocking the vehicle with
the SmartKey or the SmartKey with
KEYLESS-GO* automatically
locks/unlocks the fuel filler flap.
�
Turn the engine off�
by turning the SmartKey to
position0. Remove the SmartKey
from the starter switch.
�
by pressing the KEYLESS-GO*
start/stop button (
�page 35).
Open the driver’s door (with the
driver’s door open, starter switch is
now in position0, same as
SmartKey removed from starter
switch).
�
Open the fuel filler flap by pushing at
the point indicated by the arrow.
The fuel filler flap springs open.
�
Turn the fuel cap to the left and hold on
to it until possible pressure is released.
�
Take off the cap.
To prevent fuel vapors from escaping
into open air, fully insert filler nozzle
unit.
�
Only fill your tank until the filler nozzle
unit cuts out - do not top up or over-
fill.
Warning!
G
Gasoline is highly flammable and poisonous.
It burns violently and can cause serious
injury. Whenever you are around gasoline,
avoid inhaling fumes and skin contact, extin-
guish all smoking materials. Never allow
sparks, flame or smoking materials near
gasoline!
Warning!
G
Overfilling of the fuel tank may create pres-
sure in the system which could cause a gas
discharge. This could cause the gas to spray
back out when removing the fuel pump noz-
zle, which could cause personal injury.
��
Page 325 of 539

324 OperationAt the gas station�
Replace the fuel cap by turning it
clockwise until it audibly engages.
�
Close the fuel filler flap.
Check regularly and before a long trip�
Open the hood (
�page 326).
Example ML 5001Brake fluid
2Coolant level
3Windshield washer system and
headlamp cleaning system*
Engine oil level
For more information on engine oil, see
“Engine oil” (
�page 327).Brake fluid
Coolant
For normal replenishing, use water (pota-
ble water quality).
For more information, see “Coolant level”
(
�page 332) and see “Fuels, coolants, lu-
bricants, etc.” (
�page 493).
iOnly use premium unleaded gasoline
with a minimum Posted Octane Rating
of 91 (average of 96 RON/86 MON).
Information on gasoline quality can
normally be found on the fuel pump.
For more information on gasoline, see
the Factory Approved Service Products
pamphlet.iLeaving the engine running and the fuel
cap open can cause the yellow engine
malfunction indicator lamp
?(USA only), ±(Canada only)
to illuminate.
For more information, see “Practical
hints” (
�page 385).
!If you find that the brake fluid in the
brake fluid reservoir has fallen to the
minimum mark or below, have the
brake system checked for brake pad
thickness and leaks immediately. Noti-
fy an authorized Mercedes-Benz Light
Truck Center immediately. Do not add
brake fluid as this will not solve the
problem. For more information, see
“Practical hints” (
�page 381).
��
Page 326 of 539
325 Operation
At the gas station
Windshield/rear window washer
system and headlamp cleaning
system*
For more information on refilling the wash-
er reservoir, see “Windshield/rear window
washer system and headlamp cleaning
system*” (
�page 333).
Vehicle lighting
Check function and cleanliness. For infor-
mation on replacing light bulbs, see “Re-
placing bulbs” (�page 443).
For more information, see “Exterior lamp
switch” (
�page 138).
Tire inflation pressure
For more information, see “Checking tire
inflation pressure” (
�page 347).
Page 352 of 539
The TPMS only functions on wheels that
are equipped with the")
351 Operation
Tires and wheels
Checking tire pressure electronically
with the Advanced Tire Pressure Moni-
toring System* (Advanced TPMS*)The TPMS only functions on wheels that
are equipped with the proper electronic
sensors. It monitors the tire inflation pres-
sure, as selected by the driver, in all four
tires. A warning is issued to alert you to a
decrease in pressure in one or more of the
tires.
Tire pressure inquiries are made using the
multifunction display.The present inflation
pressures are displayed only after a few
minutes’ travel time.
�
Switch on the ignition (
�page 34).
�
Press thej or kbutton until
the current inflation pressures for each
tire appear in the multifunction display.
iThe Advanced T
ire P
ressure M
onitoring
S
ystem* (Advanced TPMS*) is
equipped with a combination low tire
pressure/TPMS malfunction telltale in
the instrument cluster (
�page 24). De-
pending on how the telltale illuminates,
it indicates a low tire pressure condi-
tion or a malfunction in the TPMS sys-
tem itself:
�
If the telltale illuminates continu-
ously, one or more of your tires is
significantly under-inflated. There is
no malfunction in the TPMS.
�
If the telltale flashes for 60 seconds
and then stays illuminated, the
TPMS system itself is not operating
properly.
iPossible differences between the read-
ings of a tire pressure gauge of an air
hose, e.g. gas station equipment, and
the vehicle’s control system can occur.
Usually the readings issued by the con-
trol system are more precise.
iWhen the message
Tire pressure
display appears after driving sev-
eral minutes
appears in the display,
the individual inflation pressure values
are matched with the tires. The individ-
ual values are displayed after a few
minutes driving.
iWith a spare wheel without wheel sen-
sor mounted, the system may still indi-
cate the tire inflation pressure of the
removed wheel for some minutes. If
this happens, keep in mind that the in-
dicated value where the spare wheel is
mounted does not reflect the actual
spare tire inflation pressure.
Page 389 of 539
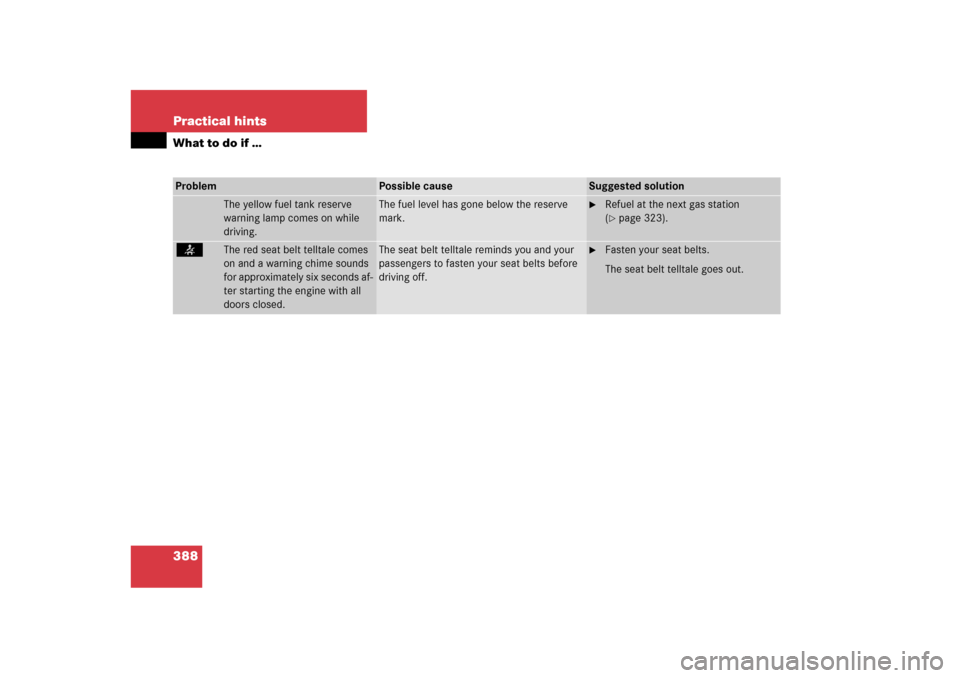
388 Practical hintsWhat to do if …Problem
Possible cause
Suggested solution
The yellow fuel tank reserve
warning lamp comes on while
driving.
The fuel level has gone below the reserve
mark.
�
Refuel at the next gas station
(�page 323).
<
The red seat belt telltale comes
on and a warning chime sounds
for approximately six seconds af-
ter starting the engine with all
doors closed.
The seat belt telltale reminds you and your
passengers to fasten your seat belts before
driving off.
�
Fasten your seat belts.
The seat belt telltale goes out.
Page 417 of 539

416 Practical hintsWhat to do if …Display symbol
Display messages
Possible cause
Possible solution
A
Reserve fuel
The fuel level has dropped below
the reserve mark.
�
Refuel at the next gas station
(�page 323).
Check gas cap
See Operator’s Manual
A loss of pressure has been de-
tected in the fuel system. The
fuel cap may not be closed prop-
erly or the fuel system may be
leaky.
�
Check the fuel cap (
�page 323).
If it is not closed properly:
�
Close the fuel cap.
If it is closed properly:
�
Have the fuel system checked by an au-
thorized Mercedes-Benz Light Truck Cen-
ter.
a
Hood open
Trunk open
You are driving with the hood or
the tailgate open.
�
Close the hood (
�page 326) or the tail-
gate (
�page 120).
F
Key
Check battery
The SmartKey with
KEYLESS-GO* batteries are
discharged.
�
Change the batteries (
�page 440).
Please do
not forget key
This display appears (for a maxi-
mum of 60 seconds) if the driv-
er’s door is opened with the
engine shut off and no SmartKey
in the starter switch.
This message is only a reminder.
�
Insert SmartKey in the starter switch.
�
Take the SmartKey with KEYLESS-GO*
with you when leaving the vehicle.

Driving instructions
At the gas station
Engine compartment
Tires and wheels
Winter driving
Maintenance
Vehicle care")