Page 324 of 539

323 Operation
At the gas station
�At the gas station
Refueling
The fuel filler flap is located on the
right-hand side of the vehicle towards the
rear. Locking/unlocking the vehicle with
the SmartKey or the SmartKey with
KEYLESS-GO* automatically
locks/unlocks the fuel filler flap.
�
Turn the engine off�
by turning the SmartKey to
position0. Remove the SmartKey
from the starter switch.
�
by pressing the KEYLESS-GO*
start/stop button (
�page 35).
Open the driver’s door (with the
driver’s door open, starter switch is
now in position0, same as
SmartKey removed from starter
switch).
�
Open the fuel filler flap by pushing at
the point indicated by the arrow.
The fuel filler flap springs open.
�
Turn the fuel cap to the left and hold on
to it until possible pressure is released.
�
Take off the cap.
To prevent fuel vapors from escaping
into open air, fully insert filler nozzle
unit.
�
Only fill your tank until the filler nozzle
unit cuts out - do not top up or over-
fill.
Warning!
G
Gasoline is highly flammable and poisonous.
It burns violently and can cause serious
injury. Whenever you are around gasoline,
avoid inhaling fumes and skin contact, extin-
guish all smoking materials. Never allow
sparks, flame or smoking materials near
gasoline!
Warning!
G
Overfilling of the fuel tank may create pres-
sure in the system which could cause a gas
discharge. This could cause the gas to spray
back out when removing the fuel pump noz-
zle, which could cause personal injury.
��
Page 343 of 539
342 OperationTires and wheelsStep 6 (if applicable)�
If your vehicle will be towing a trailer,
load from your trailer will be trans-
ferred to your vehicle. Consult this
manual to determine how this reduces
the available cargo and luggage load
capacity of your vehicle (
�page 344).
The following table shows examples on
how to calculate total and cargo load
capacities with varying seating configura-
tions and number and size of occupants.
The following examples use a load limit
of 1500 lbs. This is for illustration
purposes only. Make sure you are using
the actual load limit for your vehicle stated
on the vehicle’s placard (
�page 339).
��
Page 345 of 539

(�page 344) as to not ex")
344 OperationTires and wheelsCertification label
Even after careful determination of the
combined weight of all occupants, cargo
and the trailer tongue load (if applicable)
(�page 344) as to not exceed the permis-
sible load limit, you must make sure that
your vehicle never exceeds the Gross
Vehicle Weight Rating (GVWR) and the
Gross Axle Weight Rating (GAWR) for ei-
ther the front or rear axle. You can obtain
the GVWR and GAWR from the
Certification label. The Certification Label
can be found on the driver’s door B-pillar,
see “Technical data” (
�page 481).Gross Vehicle Weight Rating (GVWR): The
total weight of the vehicle, all occupants,
all cargo, and the trailer tongue load
(
�page 344) must never exceed the
GVWR.
Gross Axle Weight Rating (GAWR): The to-
tal allowable weight that can be carried by
a single axle (front or rear).
To assure that your vehicle does not ex-
ceed the maximum permissible weight
limits (GVWR and GAWR for front and rear
axle), have the loaded vehicle (including
driver, passengers and all cargo and, if ap-
plicable, trailer fully loaded) weighed on a
suitable commercial scale.Trailer tongue load
The tongue load of any trailer is an impor-
tant weight to measure because it affects
the load you can carry in your vehicle. If a
trailer is towed, the tongue load must be
added to the weight of all occupants riding
and any cargo you are carrying in the
vehicle. The tongue load typically is
between 10% and 15% of the trailer weight
and everything loaded in it.
For more information on trailer tongue
load, see “Loading a trailer” (
�page 315).
Page 377 of 539

376 OperationVehicle careEngine cleaning
Prior to cleaning the engine compartment
make sure to protect electrical compo-
nents and connectors from the intrusion of
water and cleaning agents.
Corrosion protection, such as
MB Anticorrosion Wax, should be applied
to the engine compartment after every en-
gine cleaning. Before applying, all control
linkage bushings and joints should be lu-
bricated. The poly-V-belt and all pulleys
should be protected from any wax.
Vehicle washing
Do not use hot water or wash your vehicle
in direct sunlight. Only use a mild car wash
detergent, such as Mercedes-Benz
approved Car Shampoo.
Thoroughly spray the vehicle with a dif-
fused jet of water. Direct only a very weak
spray towards the ventilation intake. Use
plenty of water and rinse the sponge and
chamois frequently.Rinse with clear water and thoroughly dry
with a chamois. Do not allow cleaning
agents to dry on the finish.In the winter, thoroughly remove all traces
of road salt as soon as possible.
When washing the underbody, do not for-
get to clean the inner sides of the wheels.
!Due to the width of the vehicle, fold in
exterior rear view mirrors prior to run-
ning the vehicle through an automatic
car wash to prevent damage to the mir-
rors.iAfter running the vehicle through an au-
tomatic car wash, wipe any wax off of
the windshield (
�page 378) and the
wiper blade inserts (�page 378). This
will prevent smears and reduce wiping
noise which can be caused by residual
wax on the windshield.
iVehicles with KEYLESS-GO*:
If a door handle is hit by a strong jet of
water, and a SmartKey with
KEYLESS-GO* is in close proximity, i.e.
within approximately 3 ft (approxi-
mately 1 m), the vehicle could be inad-
vertently locked or unlocked.
Page 382 of 539
381 Practical hints
What to do if …
Where will I find ...?
Unlocking/locking in an emergency
Opening/closing in an emergency
Replacing SmartKey batteries
Replacing bulbs
Replacing wiper blades
Flat tire
Battery
Jump starting
Towing the vehicle
Fuses
Page 431 of 539
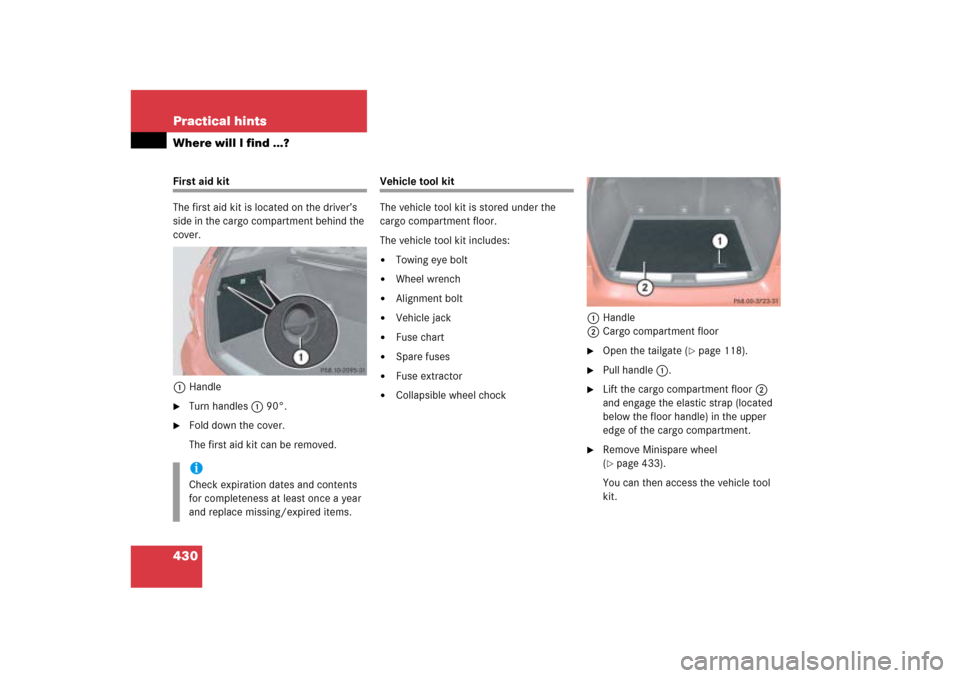
430 Practical hintsWhere will I find ...?First aid kit
The first aid kit is located on the driver’s
side in the cargo compartment behind the
cover.
1Handle�
Turn handles1 90°.
�
Fold down the cover.
The first aid kit can be removed.
Vehicle tool kit
The vehicle tool kit is stored under the
cargo compartment floor.
The vehicle tool kit includes:�
Towing eye bolt
�
Wheel wrench
�
Alignment bolt
�
Vehicle jack
�
Fuse chart
�
Spare fuses
�
Fuse extractor
�
Collapsible wheel chock1Handle
2Cargo compartment floor
�
Open the tailgate (
�page 118).
�
Pull handle1.
�
Lift the cargo compartment floor2
and engage the elastic strap (located
below the floor handle) in the upper
edge of the cargo compartment.
�
Remove Minispare wheel
(�page 433).
You can then access the vehicle tool
kit.
iCheck expiration dates and contents
for completeness at least once a year
and replace missing/expired items.
Page 432 of 539

431 Practical hints
Where will I find ...?
Trunk area shown with spare wheel
removed1Wheel bolt wrench with screwdriver
2Vehicle jack
3Collapsible wheel chock
4Spare fuses, fuse chart, fuse extractor
5Towing eye bolt
6Alignment bolt
7Wheel bolts for 17" light alloy rims or
Minispare wheel1Wheel bolt wrench
2Screwdriver
3Interchangeable slot
Screwdriver2 is placed inside the handle
of wheelbolt wrench1.Vehicle jack
iVehicles with scissors-type jack see
separate instructions.
!To prevent damage, always disengage
the elastic strap and lower the cargo
compartment floor (
�page 430) be-
fore closing the tailgate.
Warning!
G
The jack is designed exclusively for jacking
up the vehicle at the jack take-up brackets
built into both sides of the vehicle. To help
avoid personal injury, use the jack only to lift
the vehicle during a wheel change. Never
get beneath the vehicle while it is supported
by the jack. Keep hands and feet away from
the area under the lifted vehicle. Always
firmly set parking brake and block wheels
before raising vehicle with jack.
Do not disengage parking brake while the
vehicle is raised. Be certain that the jack is
always vertical (plumb line) when in use, es-
pecially on hills. Always try to use the jack
on level surface.
Make sure that the jack arm is fully seated
in the jack take-up bracket. Always lower
the vehicle onto sufficient capacity jack-
stands before working under the vehicle.
Page 434 of 539

433 Practical hints
Where will I find ...?
�
Tilt both plates upward1.
�
Fold the lower plate outward2.
�
Guide the tabs of the lower plate all the
way into the openings of base plate3.
For information on where to place wheel
chocks when changing a wheel, see “Lift-
ing the vehicle” (
�page 457).
Spare wheel
Minispare wheel
The Minispare wheel is located under the
cargo compartment floor.
1Minispare wheel
2Towing eye bolt
3Alignment bolt
4Retaining screw
5Wheel bolt wrench with screwdriver
�
Open the tailgate (
�page 118).
�
Lift the cargo compartment floor
(�page 430) and engage the elastic
strap (located below the floor handle)
in the upper edge of the cargo com-
partment.
iRemove spare wheel to gain access to
remaining tools in vehicle tool kit
(�page 431).
Warning!
G
The dimensions of the Minispare wheel are
different from those of the road wheels. As
a result, the vehicle handling characteristics
change when driving with a mounted
Minispare wheel.!To prevent damage, always disengage
the elastic strap and lower the cargo
compartment floor (
�page 430) be-
fore closing the tailgate.
��