Page 438 of 539
 is required to open the tailgate.
If the tailgate can no longer be")
437 Practical hints
Unlocking/locking in an emergency
Unlocking and opening the tailgate
A minimum height clearance of 7 ft
(2.15 m) is required to open the tailgate.
If the tailgate can no longer be unlocked
and opened using the Œbutton on the
SmartKey or the KEYLESS-GO* function,
use the manual release to unlock and open
the tailgate.
The manual release is located on the inside
of the tailgate.
1Release lever
2Cover�
Remove cover2 from the trim on the
tailgate.
�
Push release lever1 all the way to the
left.
�
Lift the tailgate.!Always make sure there is sufficient
overhead clearance.iIf the vehicle has previously been
locked from the outside using the
SmartKey or SmartKey with
KEYLESS-GO*, opening the tailgate
from the inside will trigger the
anti-theft alarm system.
To cancel the alarm, do one of the
following:
With the SmartKey:�
Press buttonŒ or‹ on the
SmartKey.
�
Insert the SmartKey in the starter
switch.
With KEYLESS-GO*:�
Grasp an outside door handle.
The SmartKey with KEYLESS-GO
must be within 3 ft (1 m) of the ve-
hicle.
or
�
Press the KEYLESS-GO start/stop
button.
The SmartKey with KEYLESS-GO
must be inside the vehicle.
Page 439 of 539
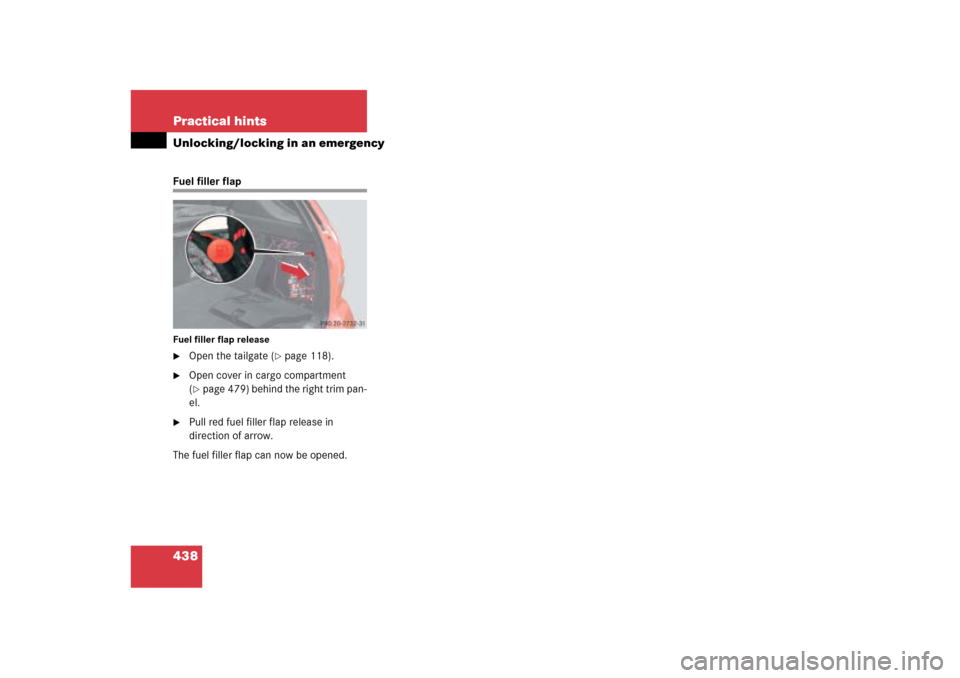
438 Practical hintsUnlocking/locking in an emergencyFuel filler flapFuel filler flap release�
Open the tailgate (
�page 118).
�
Open cover in cargo compartment
(�page 479) behind the right trim pan-
el.
�
Pull red fuel filler flap release in
direction of arrow.
The fuel filler flap can now be opened.
Page 451 of 539
450 Practical hintsReplacing bulbs4Bulb socket of front fog lamp bulb�
Turn bulb socket4 with the bulb
counterclockwise and remove it.
�
Insert new bulb socket4 with the bulb
into the lamp and turn it clockwise.
�
Plug electrical connector onto the bulb
socket4.
�
Reinstall front fog lamp2 into the
bumper.
�
Reinstall cover1 into the bumper un-
til it engages.
Replacing bulbs for rear lamps
Before you start to replace a bulb for a rear
lamp, do the following first:�
Turn the exterior lamp switch to
positionM (
�page 138).
�
Open the tailgate.
�
Open the cover in the cargo compart-
ment.
For the driver’s side rear lamps, see
“First aid kit” (
�page 430).
For the passenger-side rear lamps, see
“Fuse box in cargo compartment”
(
�page 479).Vehicles without sound system*:
�
Remove the additional cover on the
driver’s side.
1Screw
�
Turn the screws1 90° counterclock-
wise and remove the storage bin.
��
Page 452 of 539
451 Practical hints
Replacing bulbs
Example rear lamp passenger-side1Brake lamp
2Backup lamp
3Rear fog lamp (only driver’s side), tail
lamp, parking and standing lamp
4Side marker lamp
5Turn signal lamp�
Turn the respective bulb socket with
the bulb counterclockwise and remove
it.
�
Press gently onto the respective bulb
and turn counterclockwise out of its
bulb socket.
�
Press the new bulb gently into its bulb
socket and turn clockwise until it en-
gages.
�
Align bulb socket and turn it clockwise.
License plate lamp
1License plate lamp cover
2Screw
�
Loosen both screws2.
�
Remove license plate lamp cover1.
�
Replace the tubular bulb.
�
Reinstall license plate lamp cover1.
�
Retighten screws2.
Adjusting headlamp aim
VVertical centerline
HHeadlamp mounting high, measured
from the center
iHigh beam adjustments simultaneous-
ly aim the low beam.
Vehicle should have a normal tailgate
load.
Page 457 of 539

456 Practical hintsFlat tire
Preparing the vehicle�
Park the vehicle as far as possible from
moving traffic on a hard surface.
�
Turn on the hazard warning flashers.
�
Turn the steering wheel so that the
front wheels are in a straight ahead po-
sition.
�
Set the parking brake.
�
Shift automatic transmission to park
positionP.
Vehicles with Air suspension package*:
�
Do not open or close a door or tailgate
while mounting the spare wheel.
Vehicles with SmartKey:
�
Turn off the engine (
�page 34).
�
Remove the SmartKey from the starter
switch.Vehicles with KEYLESS-GO*:
�
Turn off the engine by pressing the
KEYLESS-GO* button once
(�page 63).
�
Open the driver’s door (this puts the
starter switch in position0, same as
with the SmartKey removed from the
starter switch). The driver’s door then
can be closed again.
�
Have any passenger exit the vehicle at
a safe distance from the roadway.
Warning!
G
The dimensions of the Minispare wheel are
different from those of the road wheels. As
a result, the vehicle handling characteristics
change when driving with a mounted
Minispare wheel. Adapt your driving style
accordingly.
The Minispare wheel is for temporary use
only. When driving with a Minispare wheel
mounted, ensure proper tire pressure and
do not exceed a vehicle speed of
50 mph (80 km/h).
Drive to the nearest Mercedes-Benz Light
Truck Center as soon as possible to have the
Minispare wheel replaced with a regular
road wheel.
Never operate the vehicle with more than
one spare wheel mounted.
Do not switch off the ESP
® when a
Minispare wheel is mounted.
iOpen doors only when conditions are
safe to do so.
Page 480 of 539
479 Practical hintsFuses
Fuse box in cargo compartment
The fuse box is located on the
passenger-side in the cargo compartment
behind the cover.
1Lock
2CoverRemoving/installing cover
�
Open the tailgate.
�
Turn both locks1 90°, e.g. with a coin
or a screwdriver.
�
Remove cover2.
�
Install cover2 in reverse order.
Fuse box in passenger compartment
The fuse box is located in the dashboard
on the front passenger side.
1CoverOpening
�
Open the passenger door.
�
Open the glove box (
�page 270).
�
Insert flat, blunt object as a lever into
the edge of the cover1 at the position
indicated by the arrow.
�
Loosen cover1 from dashboard using
lever.
�
Using your hands, pull cover1 out
and remove.
Closing
�
Hook cover1 into the opening at the
front.
�
Press cover1 back on until it engag-
es.!Do not use sharp objects such as a
screwdriver to open the fuse box
cover1 in the dashboard, as this
could damage it.
Page 512 of 539
 328
Engine oil with the
oil dipstick (ML 350 only) 330
Oil level 327
Tire inflate pressure 325
Vehicle lighting 32")
511 Index
Checking
Coolant level 332
Engine oil with the
control system (ML 500 only) 328
Engine oil with the
oil dipstick (ML 350 only) 330
Oil level 327
Tire inflate pressure 325
Vehicle lighting 325
Checking tire pressure
electronically with the
Advanced Tire Pressure Monitoring
System* (Advanced TPMS*) 351
Checking weights
Trailer and vehicle 315
Checklist
Off-road driving 307
Returning from off-road driving 313
Child safety 78
Air bags 68
Infant and child
restraint systems 73, 78
LATCH type child seat mounts 88Child safety switch see Blocking of rear
door window operation
Cigarette lighter*
Front center console 275
Cleaning
Carpet 379
Cup holder 379
Gear selector lever 379
Hard plastic trim items 379
Headlamps 194
Headliner 379
Instrument cluster 379
Leather upholstery* 380
Light alloy wheels 379
MB Tex upholstery 380
Plastic and rubber parts 380
Seat belts 379
Steering wheel 379
Windows 378
Windshield 56
Wiper blades 378
Cleaning and care of the vehicle 374
Cleaning tires 337Climate control 202
Adjusting 207
Adjusting air volume 208
deactivating 206
Defrosting 208
Rear passenger compartment 213
Rear window defroster 200
Setting the temperature 207
Clock 165
Closing
Glove box 270
Hood 327
Power tilt/sliding sunroof* 439
Side windows 231
Side windows with
KEYLESS-GO* 234
Tailgate 120
Vehicle with KEYLESS-GO* 123,
124
Tilt/sliding sunroof* 235
Tilt/sliding sunroof* with
KEYLESS-GO* 234
Windows 230
Page 513 of 539
 121
Closing tilt/sliding sunroof*
In")
512 IndexClosing the tailgate 123, 124
Closing the tailgate from
the inside electrically* 120
Closing the tailgate from the
outside (vehicles without
KEYLESS-GO*) 121
Closing tilt/sliding sunroof*
In an emergency 439
Cockpit 22, 501
Cold tire inflation pressure 365
Combination switch 142
High beam 54
Turn signals 54
Windshield wipers 55
Compass 295
Adjusting compass zone 171
Calibrating 171
Zone map North America 295
Zone map South America 295
Control and operation
of radio transmitters 320Control system 502
AUDIO menu 157
Convenience submenu 173
Display digital speedometer 156
Functions 154
Instrument cluster
submenu 164, 165
Lighting submenu 167
Menus 153, 154
Message memory menu 159
Selecting radio system 157
Selecting satellite radio* station
(USA only) 157
Settings menu 161
Standard display menu 156
Submenus 152, 154
TEL* menu 178
Trip computer menu 177
Vehicle submenu 171
Convenience submenu 173
Activating easy-entry/exit
feature* 173
Setting parking position*
for exterior rear view mirror 174Coolant 332, 497
Adding 333
Anticorrosion/antifreeze
quantity 498
Checking level 332
Messages in display 410, 412
Temperature 322
Coolant level
Checking 332
Corner-illuminating front fog lamps* 143
Switching off 144
Switching on 143, 144
Crossing obstacles 311
Cruise control 238, 502
Canceling 240
Driving downhill 240
Driving uphill 240
Message in display 398
Setting current speed 239
Setting speeds 243
Cruise control lever 238, 246

, tail
lamp, parking and standing lamp
4Side marker lamp
5Turn signal")
