Page 317 of 539
.
Most states and all Canadian provinces
require�
safety chains between your tow v")
316 OperationDriving instructionsAttaching a trailer
Observe maximum permitted trailer
dimensions (width and length).
Most states and all Canadian provinces
require�
safety chains between your tow vehicle
and the trailer.
The chains should be criss-crossed
under the trailer tongue. They must be
attached to the hitch receiver, and not
to the vehicle’s bumper or axle.
Make sure to leave enough slack in the
chains to permit turning corners.
�
a separate brake system at various
trailer weights.
�
a break-away switch on trailers with a
separate brake system.
The switch activates the trailer brakes
in the possible event that the trailer
might separate from the tow vehicle.
�
Start the engine (
�page 34).
�
Make sure the automatic transmission
is set toP.
�
Set the parking brake for the vehicle
(�page 52).
�
Vehicles with ADS*: Set the vehicle
level to Highway (
�page 250).
�
Vehicle with ADS*: Set the ADS* to
AUTO or COMFORT (
�page 249).
�
Stop the engine (
�page 34).
�
Attach the trailer.
!Do not connect a trailer brake system
(if trailer is so equipped) directly to the
vehicle’s hydraulic brake system, as
your vehicle is equipped with antilock
brakes. If you do, neither the vehicle’s
brakes nor the trailer’s brakes will func-
tion properly.iThe provided vehicle electrical wiring
harness for trailer towing has a brake
signal wire (color orange) for hook-up
to a brake controller.
You should consider using a trailer
sway control system. For further infor-
mation see an authorized
Mercedes-Benz Light Truck Center.
Warning!
G
Vehicles with ADS*:
Do not lock or unlock any doors or the tail-
gate while attaching or uncoupling the trail-
er. Do not open or close any doors or the
tailgate while attaching or uncoupling the
trailer. Make sure no one operates the ADS*
switch (
�page 249) or the vehicle level
control* switch (
�page 252) while a trailer
is being attached or uncoupled. The vehicle
level could change, and you could injure
yourself and/or others.
Page 319 of 539
.
A lower gear and reduction of speed re-
duces the chance")
318 OperationDriving instructions�
If the transmission hunts between
gears on inclines, manually shift to a
lower gear (select 4, 3, 2 or 1).
A lower gear and reduction of speed re-
duces the chance of engine overload-
ing and/or overheating.
�
On very steep inclines, not manageable
with automatic transmission in1,
switch on off-road driving program
(�page 248).
�
When going down a long hill, shift into
a lower gear and use the engine’s brak-
ing effect.
Avoid riding the brakes, thus overheat-
ing the vehicle and trailer brakes.
�
If the engine coolant rises to an ex-
tremely high temperature (coolant tem-
perature needle approaching the red
zone) when the air conditioning is on,
turn off the air conditioning system.
Engine coolant heat can be additionally
vented by opening the windows,
switching the climate control fan speed
to high and setting the temperature
control to the maximum hot position.
�
Extreme care must be exercised since
your vehicle with a trailer will require
additional passing distance ahead than
when driving without a trailer.
Because your vehicle and trailer is
longer than your vehicle alone, you will
also need to go much farther ahead of
the passed vehicle before you can re-
turn to your lane.Uncoupling the trailer
�
Start the engine (
�page 34).
�
Make sure the automatic transmission
is set toP.
�
Set the parking brake for the vehicle
(�page 52) and for the trailer.
�
Close all doors and the tailgate.
Detach the trailer immediately after-
ward as follows:
�
Disconnect all electrical plug connec-
tors.
�
Uncouple the trailer.
!If the trailer should begin to sway, re-
duce the vehicle’s speed immediately.
In no case attempt to straighten out the
tow vehicle and trailer by increasing
the speed.
Page 417 of 539

416 Practical hintsWhat to do if …Display symbol
Display messages
Possible cause
Possible solution
A
Reserve fuel
The fuel level has dropped below
the reserve mark.
�
Refuel at the next gas station
(�page 323).
Check gas cap
See Operator’s Manual
A loss of pressure has been de-
tected in the fuel system. The
fuel cap may not be closed prop-
erly or the fuel system may be
leaky.
�
Check the fuel cap (
�page 323).
If it is not closed properly:
�
Close the fuel cap.
If it is closed properly:
�
Have the fuel system checked by an au-
thorized Mercedes-Benz Light Truck Cen-
ter.
a
Hood open
Trunk open
You are driving with the hood or
the tailgate open.
�
Close the hood (
�page 326) or the tail-
gate (
�page 120).
F
Key
Check battery
The SmartKey with
KEYLESS-GO* batteries are
discharged.
�
Change the batteries (
�page 440).
Please do
not forget key
This display appears (for a maxi-
mum of 60 seconds) if the driv-
er’s door is opened with the
engine shut off and no SmartKey
in the starter switch.
This message is only a reminder.
�
Insert SmartKey in the starter switch.
�
Take the SmartKey with KEYLESS-GO*
with you when leaving the vehicle.
Page 428 of 539
427 Practical hints
What to do if …
Display symbol
Display messages
Possible cause
Possible solution
t
Call failed
This message may appear if a phone con-
nection cannot be established.
&
Tailgate
open
This message will appear whenever the
tailgate is open.
�
Close the tailgate (
�page 120).
W
Washer fluid
Check level
The fluid level has dropped to about
1/3
of total reservoir capacity.�
Add washer fluid (
�page 333).
Page 431 of 539
430 Practical hintsWhere will I find ...?First aid kit
The first aid kit is located on the driver’s
side in the cargo compartment behind the
cover.
1Handle�
Turn handles1 90°.
�
Fold down the cover.
The first aid kit can be removed.
Vehicle tool kit
The vehicle tool kit is stored under the
cargo compartment floor.
The vehicle tool kit includes:�
Towing eye bolt
�
Wheel wrench
�
Alignment bolt
�
Vehicle jack
�
Fuse chart
�
Spare fuses
�
Fuse extractor
�
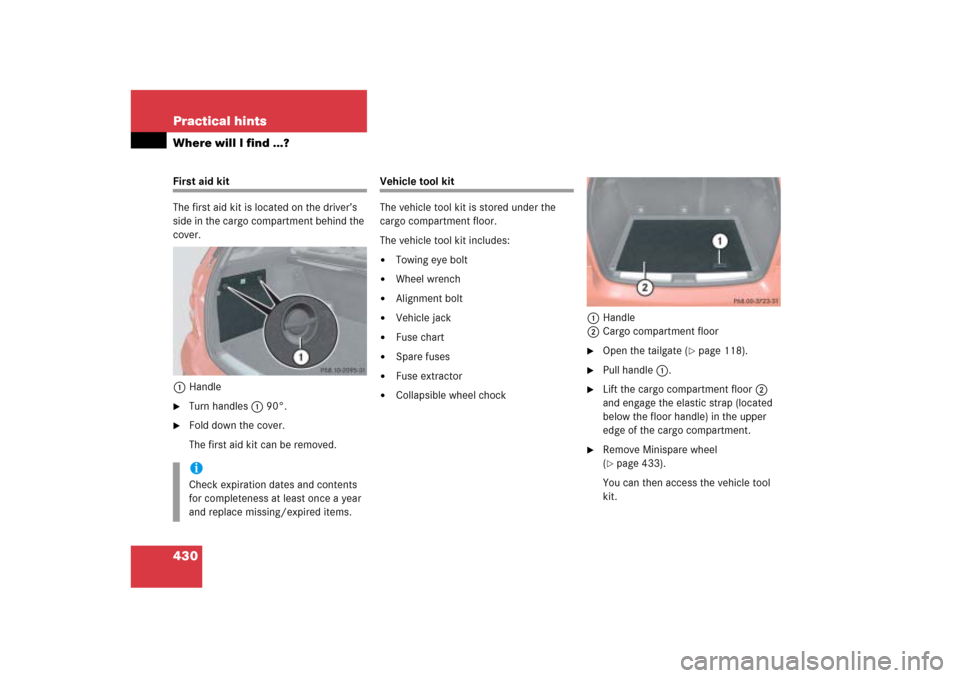
Collapsible wheel chock1Handle
2Cargo compartment floor
�
Open the tailgate (
�page 118).
�
Pull handle1.
�
Lift the cargo compartment floor2
and engage the elastic strap (located
below the floor handle) in the upper
edge of the cargo compartment.
�
Remove Minispare wheel
(�page 433).
You can then access the vehicle tool
kit.
iCheck expiration dates and contents
for completeness at least once a year
and replace missing/expired items.
Page 432 of 539

431 Practical hints
Where will I find ...?
Trunk area shown with spare wheel
removed1Wheel bolt wrench with screwdriver
2Vehicle jack
3Collapsible wheel chock
4Spare fuses, fuse chart, fuse extractor
5Towing eye bolt
6Alignment bolt
7Wheel bolts for 17" light alloy rims or
Minispare wheel1Wheel bolt wrench
2Screwdriver
3Interchangeable slot
Screwdriver2 is placed inside the handle
of wheelbolt wrench1.Vehicle jack
iVehicles with scissors-type jack see
separate instructions.
!To prevent damage, always disengage
the elastic strap and lower the cargo
compartment floor (
�page 430) be-
fore closing the tailgate.
Warning!
G
The jack is designed exclusively for jacking
up the vehicle at the jack take-up brackets
built into both sides of the vehicle. To help
avoid personal injury, use the jack only to lift
the vehicle during a wheel change. Never
get beneath the vehicle while it is supported
by the jack. Keep hands and feet away from
the area under the lifted vehicle. Always
firmly set parking brake and block wheels
before raising vehicle with jack.
Do not disengage parking brake while the
vehicle is raised. Be certain that the jack is
always vertical (plumb line) when in use, es-
pecially on hills. Always try to use the jack
on level surface.
Make sure that the jack arm is fully seated
in the jack take-up bracket. Always lower
the vehicle onto sufficient capacity jack-
stands before working under the vehicle.
Page 434 of 539

433 Practical hints
Where will I find ...?
�
Tilt both plates upward1.
�
Fold the lower plate outward2.
�
Guide the tabs of the lower plate all the
way into the openings of base plate3.
For information on where to place wheel
chocks when changing a wheel, see “Lift-
ing the vehicle” (
�page 457).
Spare wheel
Minispare wheel
The Minispare wheel is located under the
cargo compartment floor.
1Minispare wheel
2Towing eye bolt
3Alignment bolt
4Retaining screw
5Wheel bolt wrench with screwdriver
�
Open the tailgate (
�page 118).
�
Lift the cargo compartment floor
(�page 430) and engage the elastic
strap (located below the floor handle)
in the upper edge of the cargo com-
partment.
iRemove spare wheel to gain access to
remaining tools in vehicle tool kit
(�page 431).
Warning!
G
The dimensions of the Minispare wheel are
different from those of the road wheels. As
a result, the vehicle handling characteristics
change when driving with a mounted
Minispare wheel.!To prevent damage, always disengage
the elastic strap and lower the cargo
compartment floor (
�page 430) be-
fore closing the tailgate.
��
Page 437 of 539

436 Practical hintsUnlocking/locking in an emergencyUnlocking the driver’s door
1Unlocking
2Mechanical key�
Insert the mechanical key2 into the
driver’s door lock until it stops.
�
Turn the mechanical key2 counter-
clockwise to position1.
�
Pull the door handle until the locking
knob moves up (
�page 117).
The driver’s door is unlocked.
�
Pull the door handle again to open the
driver’s door.
Locking the vehicle
If you cannot lock the vehicle using the
SmartKey or KEYLESS-GO*, do the follow-
ing:�
Close the passenger door, the rear
doors and the tailgate.
�
Press the lower part of the central
locking switch in the door control panel
(�page 126).
�
Check to see whether the locking
knobs on the doors have moved down.
�
If necessary push them down manually.
Except for the driver’s door, the vehicle
should now be locked.1Locking
2Mechanical key
�
Remove the mechanical key out of the
SmartKey (
�page 435).
�
Insert the mechanical key2 into the
driver’s door lock until it stops.
�
Turn the mechanical key2 clockwise
to position1.
The driver’s door is locked.