Page 140 of 539

139 Controls in detail
Lighting
Manual headlamp mode
The low beam headlamps and the parking
lamps can be switched on and off with the
exterior lamp switch.
Automatic headlamp mode
The following lamps switch on and off au-
tomatically depending on the brightness of
the ambient light:�
Low beam headlamps
�
Tail and parking lamps
�
License plate lamps
�
Side marker lamps
iWith the SmartKey removed from the
starter switch and the driver’s door
open, a warning sounds if the parking
lamps or low beam headlamps are
switched on.
The message
Switch off lights
appears in the multifunction display.
iWith the daytime running lamp mode
activated and the engine running, the
low beam headlamps cannot be
switched off manually.
To activate the daytime running lamp
mode, see “Setting daytime running
lamp mode (USA only)” (
�page 140).
Warning!
G
If the exterior lamp switch is set toU,�
the headlamps may switch off unexpect-
edly when the system senses bright
ambient light, for example light from
oncoming traffic.
�
the headlamps will not be automatically
switched on under foggy conditions.
To minimize risk to you and to others,
activate headlamps by turning exterior lamp
switch toB when driving or when traffic
and/or ambient lighting conditions require
you to do so.
In low ambient lighting conditions, only
switch from positionU toB with the
vehicle at a standstill in a safe location.
Switching fromUtoB will briefly
switch off the headlamps. Doing so while
driving in low ambient lighting conditions
may result in an accident.
The automatic headlamp feature is only an
aid to the driver. The driver is responsible for
the operation of the vehicle’s lights at all
times.
Page 142 of 539

141 Controls in detail
Lighting
USA only
By default, the daytime running lamp mode
is deactivated. Activate the daytime
running lamp mode using the control
system, see “Setting daytime running lamp
mode (USA only)” (
�page 167).
When the engine is running, and you turn
the exterior lamp switch to positionC
orB, the manual headlamp mode has
priority over the daytime running lamp
mode.
The corresponding exterior lamps switch
on (
�page 54).
Locator lighting and night security
illumination
The locator lighting and the night security
illumination are described in the “Control
system” section, see “Setting locator light-
ing” (�page 168) and “Setting night secu-
rity illumination” (
�page 169).Fog lamps
Warning!
G
In low ambient lighting or foggy conditions,
only switch from positionU toB with
the vehicle at a standstill in a safe location.
Switching fromU toB will briefly
switch off the headlamps. Doing so while
driving in low ambient lighting conditions
may result in an accident.iFog lamps will operate with the parking
lamps and/or the low beam headlamps
on. Fog lamps should only be used in
conjunction with low beam headlamps.
Consult your State or Province Motor
Vehicle Regulations regarding permis-
sible lamp operation.
iFog lamps cannot be switched on with
the exterior lamp switch in
positionU. For switching on the fog
lamps, turn the exterior lamp switch to
positionB first.
Page 145 of 539

144 Controls in detailLightingSwitching off corner-illuminating front
fog lamps
The combination switch for the turn signal
resets automatically after major steering
wheel movements. This will switch off the
corner-illuminating front fog lamps if they
were activated by switching on the left or
right turn signal.
If the turn signal should stay on after mak-
ing the turn, the turn signal and cornering
fog lamp can be switched off by returning
the combination switch to its original posi-
tion.Driving rearward
Switching on corner-illuminating front
fog lamps
�
Shift the automatic transmission in
positionR.
The inverse front fog lamp comes on
automatically depending on the
steering direction and steering angle.
Switching off corner-illuminating front
fog lamps
�
Shift the automatic transmission out of
positionR.
The respective front fog lamp goes out.
Hazard warning flasher
The hazard warning flasher can be
switched on at all times, even with the
SmartKey removed from the starter switch
or with the SmartKey with KEYLESS-GO*
removed from the vehicle.
The hazard warning flasher switches on
automatically when an air bag deploys.
The hazard warning flasher switch is
located on the upper part of the center
console.
1Hazard warning flasher switch
Page 146 of 539
145 Controls in detail
Lighting
Switching on hazard warning flasher�
Press hazard warning flasher
switch1.
All turn signals are flashing.
Switching off hazard warning flasher
�
Press hazard warning flasher switch1
again.
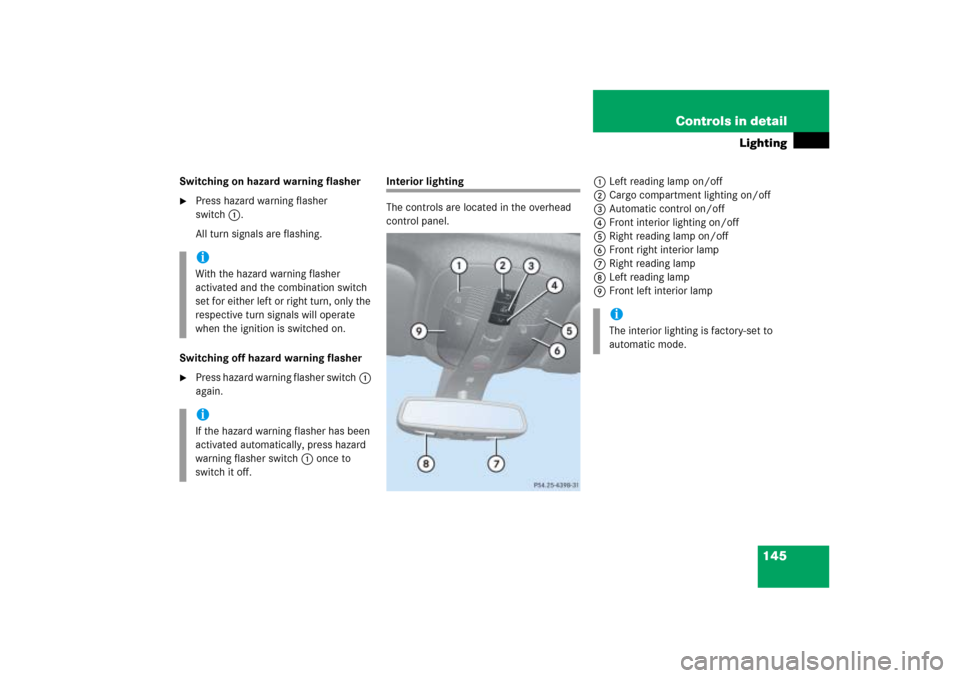
Interior lighting
The controls are located in the overhead
control panel.1Left reading lamp on/off
2Cargo compartment lighting on/off
3Automatic control on/off
4Front interior lighting on/off
5Right reading lamp on/off
6Front right interior lamp
7Right reading lamp
8Left reading lamp
9Front left interior lamp
iWith the hazard warning flasher
activated and the combination switch
set for either left or right turn, only the
respective turn signals will operate
when the ignition is switched on.iIf the hazard warning flasher has been
activated automatically, press hazard
warning flasher switch1 once to
switch it off.
iThe interior lighting is factory-set to
automatic mode.
Page 151 of 539

150 Controls in detailControl systemThe control system is activated as soon as
the SmartKey in the starter switch is
turned to position1 or as soon as the
KEYLESS-GO start/stop button* is in
position1. The control system enables you
to:�
call up information about your vehicle
�
change vehicle settings
For example, you can use the control sys-
tem to find out when your vehicle is next
due for service, to set the language for
messages in the instrument cluster dis-
play, and much more.
The control system relays information to
the multifunction display.
Multifunction display
1Trip odometer
2Main odometer
3Gear position indicator (currently se-
lected gear position highlighted)
4Outside temperature
For more information on menus displayed
in the multifunction display, see “Menus”
(�page 153).
iThe displays for the audio systems (ra-
dio, CD player etc.) will appear in
English, regardless of the language
selected.
Warning!
G
A driver’s attention to the road and traffic
conditions must always be his/her primary
focus when driving.
For your safety and the safety of others, se-
lecting features through the multifunction
steering wheel should only be done by the
driver when traffic and road conditions per-
mit it to be done safely.
Bear in mind that at a speed of just 30 mph
(approximately 50 km/h), your vehicle is
covering a distance of 44 feet (approximate-
ly 14 m) every second.
Page 155 of 539
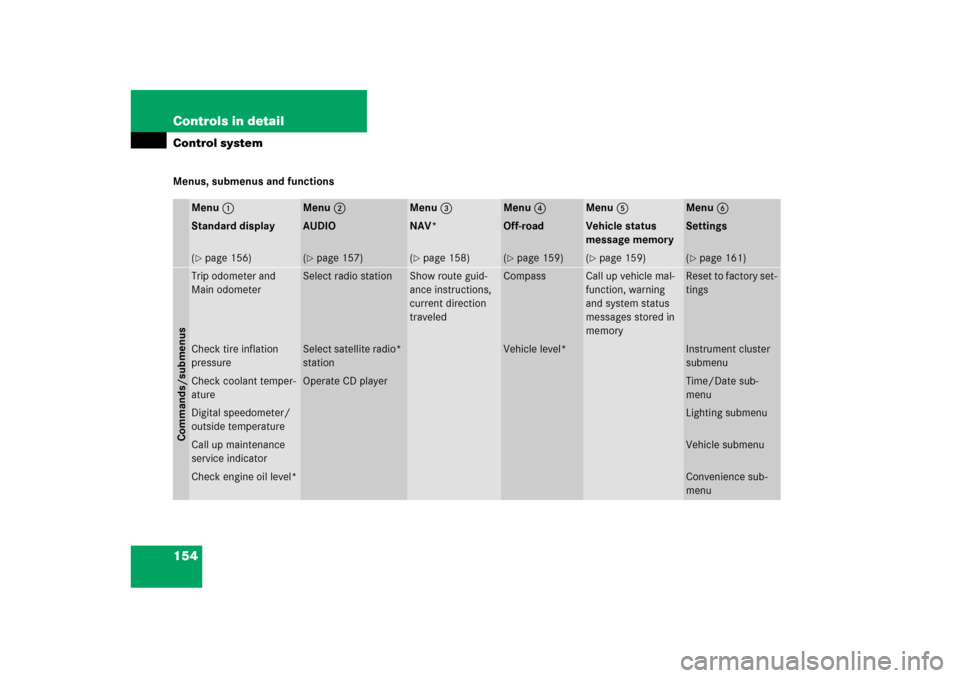
154 Controls in detailControl systemMenus, submenus and functions
Menu1
Menu2
Menu3
Menu4
Menu5
Menu6
Standard display
AUDIO
NAV*
Off-road
Vehicle status
message memory
Settings
(�page 156)
(�page 157)
(�page 158)
(�page 159)
(�page 159)
(�page 161)
Commands/submenusTrip odometer and
Main odometer
Select radio station
Show route guid-
ance instructions,
current direction
traveled
Compass
Call up vehicle mal-
function, warning
and system status
messages stored in
memory
Reset to factory set-
tings
Check tire inflation
pressure
Select satellite radio*
station
Vehicle level*
Instrument cluster
submenu
Check coolant temper-
ature
Operate CD player
Time/Date sub-
menu
Digital speedometer/
outside temperature
Lighting submenu
Call up maintenance
service indicator
Vehicle submenu
Check engine oil level*
Convenience sub-
menu
Page 160 of 539

159 Controls in detail
Control system
�
With the Modular COMAND system
switched on and route guidance acti-
vated, the direction of travel and
maneuver instructions appear in the
multifunction display.
Please refer to the COMAND manual for in-
structions on how to activate the route
guidance system.
Off-road menu
Use the
Off-road
menu to display the
settings for Air suspension* and compass.
�
Press buttonè orÿ repeatedly
until you see one of the following mes-
sages in the multifunction display (de-
pending on vehicle configuration):
Compass
Example Vehicle level* settings�
Press buttonk orj repeatedly
until the desired setting is found.
Vehicle status message memory menu
Use the vehicle status message memory
menu to scan malfunction and warning
messages that may be stored in the
system. Such messages appear in the mul-
tifunction display and are based on condi-
tions or system status the vehicle’s system
has recorded.Warning!
G
Malfunction and warning messages are only
indicated for certain systems and are inten-
tionally not very detailed. The malfunction
and warning messages are simply a remind-
er with respect to the operation of certain
systems and do not replace the owner’s
and/or driver’s responsibility to maintain
the vehicle’s operating safety by having all
required maintenance and safety checks
performed on the vehicle and by bringing
the vehicle to an authorized Mercedes-Benz
Light Truck Center to address the malfunc-
tion and warning messages.
Page 196 of 539

195 Controls in detail
Good visibility
Auto-dimming rear view mirror*
The reflection brightness of the exterior
rear view mirror on the driver’s side and
the interior rear view mirror will respond
automatically to glare when�
the ignition is switched on
�
incoming light from headlamps falls on
the sensor in the interior rear view
mirror
The rear view mirror will not react if
�
reverse gearR is engaged
�
the interior light is turned on
Warning!
G
The auto-dimming function does not react if
incoming light is not aimed directly at sen-
sors in the interior rear view mirror.
The interior rear view mirror and the exterior
rear view mirror on the driver’s side do not
react, for example, when transporting cargo
which covers the rear window.
Glare can endanger you and others.Warning!
G
In case of an accident, liquid electrolyte may
escape from the mirror housing if the mirror
glass breaks.
Electrolyte has an irritating effect. Do not
allow the liquid to come into contact with
eyes, skin, clothing, or respiratory system.
In case it does, immediately flush affected
area with water, and seek medical help if
necessary.
!Electrolyte drops coming into contact
with the vehicle paint finish can be
completely removed only while in the
liquid state and by applying plenty of
water.Warning!
G
Exercise care when using the passen-
ger-side exterior rear view mirror. The mirror
surface is convex (outwardly curved surface
for a wider field of view). Objects in mirror
are closer than they appear. Check your
interior rear view mirror or glance over your
shoulder before changing lanes.