Page 144 of 539

143 Controls in detail
Lighting
�
Push the combination switch in
direction of arrow1 to switch on the
high beam.
The high beam headlamp indicator
lampA in the instrument cluster
comes on (
�page 24).
�
Pull the combination switch in direction
of arrow2 to its original position to
switch off the high beam.
The high beam headlamp indicator
lampA in the instrument cluster
goes out.
High beam flasher
�
Pull the combination switch briefly in
direction of arrow2.
Corner-illuminating front fog lamps*
The corner-illuminating front fog lamps im-
prove illumination of the road onto which
you are turning.
The corner-illuminating front fog lamps will
operate with the engine running and with�
the exterior lamp switch in
positionB (
�page 138)
or
�
the exterior lamp switch in
positionU (
�page 138)
or
�
the daytime running lamp mode
activated (
�page 140)Driving forward
Switching on corner-illuminating front
fog lamps
�
Depending on whether you are turning
left or right, switch on the left or right
turn signal (
�page 54).
The respective front fog lamp comes on
and illuminates the area in the direc-
tion into which you are turning.
iCorner-illuminating front fog lamps will
only come on in low ambient lighting
conditions.
The corner-illuminating front fog lamps
function is not available at a vehicle
speed above 25 mph (40 km/h).
iThe corner-illuminating front fog lamps
will come on automatically depending
on the steering angle, even if you did
not switch on either turn signal. If the
corner-illuminating front fog lamps
came on automatically, they will also
go out automatically depending on the
steering angle.
Page 397 of 539
396 Practical hintsWhat to do if …
On the pages that follow, you will find a
compilation of the most important warning
and malfunction messages that may
appear in the multifunction display.
For your convenience the messages are
divided into two sections:�
Text messages (
�page 397)
�
Symbol messages (
�page 407)
iSwitching on the ignition causes all
instrument cluster lamps (except low
beam headlamp indicator lamp, high
beam headlamp indicator lamp, and
turn signal indicator lamps unless acti-
vated) as well as the multifunction dis-
play to come on. Make sure the lamps
and multifunction display are in work-
ing order before starting your journey.
Page 420 of 539

419 Practical hints
What to do if …
Display symbol
Display messages
Possible cause
Possible solution
.
Active headlamp
currently unavailable
The active Bi-Xenon* headlamps
system is malfunctioning.
�
Visit an authorized Mercedes-Benz Light
Truck Center as soon as possible.
Active headlamps
Substitute bulb on
The active Bi-Xenon* headlamps
system is malfunctioning. An-
other light is being used.
�
Visit an authorized Mercedes-Benz Light
Truck Center as soon as possible.
Active headlamps
inoperative
The active Bi-Xenon* headlamps
system is malfunctioning.
�
Visit an authorized Mercedes-Benz Light
Truck Center as soon as possible.
Active headlamp
s
Display malfunction
The active Bi-Xenon* headlamp
system is malfunctioning.
�
Visit an authorized Mercedes-Benz Light
Truck Center as soon as possible.
High beam,
left
The left high beam lamp is mal-
functioning.
�
Replace the bulb as soon as possible.
High beam,
right
The right high beam lamp is mal-
functioning.
�
Replace the bulb as soon as possible.
License plate lamp,
left
The left license plate lamp is
malfunctioning.
�
Replace the bulb as soon as possible.
License plate lamp,
right
The right license plate lamp is
malfunctioning.
�
Replace the bulb as soon as possible.
Page 444 of 539

443 Practical hints
Replacing bulbs
�Replacing bulbs
Bulbs
Safe vehicle operation depends on proper
exterior lighting and signaling. It is there-
fore essential that all bulbs and lamp as-
semblies are in good working order at all
times.
Correct headlamp adjustment is extremely
important. Have headlamps checked and
readjusted at regular intervals. See an
authorized Mercedes-Benz Light Truck
Center for headlamp adjustment.Front lamps
iSubstitute bulbs will be brought into
use when the following lamps malfunc-
tion:�
Brake lamps
�
Parking lamps
�
Turn signal lamps
�
Tail lamps
Observe the messages in the multi-
function display (
�page 418).
iIf the headlamps or front fog lamps are
fogged up on the inside as a result of
high humidity, driving the vehicle a dis-
tance with the lights on should clear up
the fogging.
Lamp
Type
1
Parking and standing
lamp
W5W
2
High beam/high
beam flasher lamp
H7 (55 W)
3
Low beam
1
1Vehicles with Bi-Xenon headlamps*: Do not re-
place the Bi-Xenon bulbs yourself. See your autho-
rized Mercedes-Benz Light Truck Center.
H7 (55 W)
Bi-Xenon*:
D2S-35 W
4
Additional turn signal
lamp
LED
5
Side marker lamp
WY 5 W
6
Turn signal lamp
3457 AK S-8
(30/2.2 cp
bulb)
7
Front fog lamp
H11 (55 W)
Page 446 of 539
445 Practical hints
Replacing bulbs
Have the LEDs and bulbs for the following
lamps replaced by an authorized
Mercedes-Benz Light Truck Center:�
Additional turn signals in the exterior
rear view mirrors
�
Bi-Xenon lamps*
�
Front fog lamps (vehicles with sport
package*)
�
High mounted brake lamp
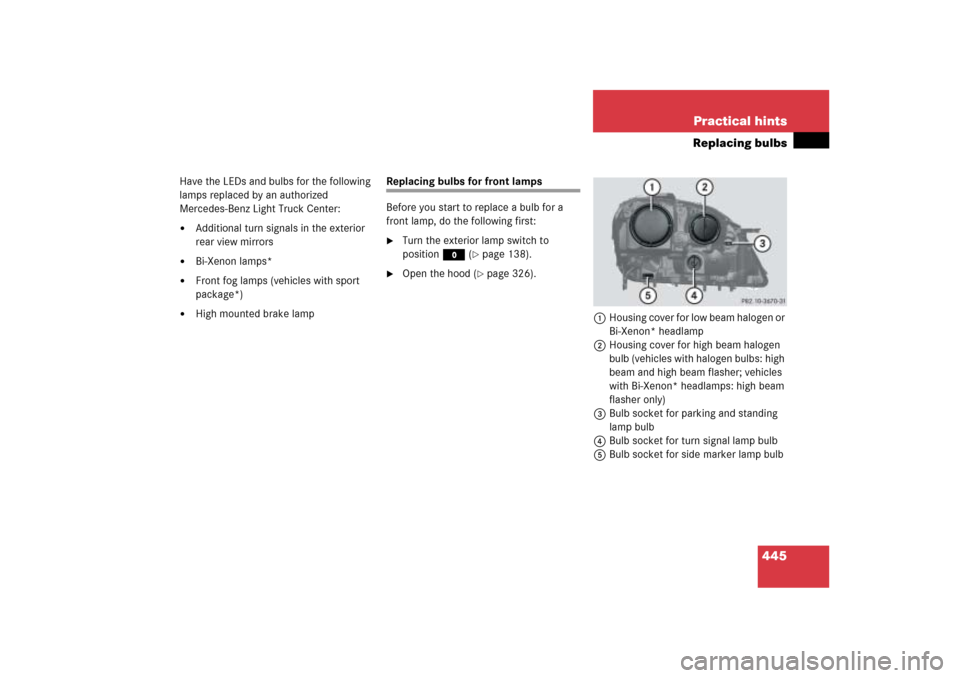
Replacing bulbs for front lamps
Before you start to replace a bulb for a
front lamp, do the following first:�
Turn the exterior lamp switch to
positionM (
�page 138).
�
Open the hood (
�page 326).
1Housing cover for low beam halogen or
Bi-Xenon* headlamp
2Housing cover for high beam halogen
bulb (vehicles with halogen bulbs: high
beam and high beam flasher; vehicles
with Bi-Xenon* headlamps: high beam
flasher only)
3Bulb socket for parking and standing
lamp bulb
4Bulb socket for turn signal lamp bulb
5Bulb socket for side marker lamp bulb
Page 447 of 539
446 Practical hintsReplacing bulbsReplacing low beam bulbs
1Housing cover for low beam halogen or
Bi-Xenon* headlamp
2Electrical connector for low beam
headlamp bulb (halogen headlamps
only)Bi-Xenon* headlamp Low beam halogen headlamp
�
Turn housing cover1 counterclock-
wise and remove it.
�
Turn electrical connector2 with bulb
counterclockwise out of housing.
�
Remove old bulb from connector.
�
Insert the new bulb so that its socket
locates in the recess of the lamp hous-
ing.
�
Place electrical connector2 with bulb
into housing and turn clockwise.
�
Align housing cover1 and turn it
clockwise.
Warning!
G
Do not remove the cover
1
for the
Bi-Xenon* headlamp. Because of high volt-
age in Xenon* lamps, it is dangerous to re-
place the bulb or repair the lamp and its
components. We recommend that you have
such work done by a qualified technician.
Page 448 of 539
447 Practical hints
Replacing bulbs
Replacing high beam halogen bulb,
parking and standing lamp
1Housing cover for high beam halogen
bulb (vehicles with halogen bulbs: high
beam and high beam flasher; vehicles
with Bi-Xenon* headlamps: high beam
flasher only), parking and standing
lamp2Electrical connector for high beam
halogen bulb (vehicles with halogen
bulbs: high beam and high beam flash-
er; vehicles with Bi-Xenon* headlamps:
high beam flasher only)High beam halogen bulb
�
Turn housing cover1 counterclock-
wise and remove it.
�
Turn electrical connector2 with bulb
counterclockwise out of housing.
�
Remove old bulb from connector.
�
Insert the new bulb so that its socket
locates in the recess of the lamp hous-
ing.
�
Place electrical connector2 with bulb
into housing and turn clockwise.
�
Align housing cover1 and turn it
clockwise.
Page 452 of 539
451 Practical hints
Replacing bulbs
Example rear lamp passenger-side1Brake lamp
2Backup lamp
3Rear fog lamp (only driver’s side), tail
lamp, parking and standing lamp
4Side marker lamp
5Turn signal lamp�
Turn the respective bulb socket with
the bulb counterclockwise and remove
it.
�
Press gently onto the respective bulb
and turn counterclockwise out of its
bulb socket.
�
Press the new bulb gently into its bulb
socket and turn clockwise until it en-
gages.
�
Align bulb socket and turn it clockwise.
License plate lamp
1License plate lamp cover
2Screw
�
Loosen both screws2.
�
Remove license plate lamp cover1.
�
Replace the tubular bulb.
�
Reinstall license plate lamp cover1.
�
Retighten screws2.
Adjusting headlamp aim
VVertical centerline
HHeadlamp mounting high, measured
from the center
iHigh beam adjustments simultaneous-
ly aim the low beam.
Vehicle should have a normal tailgate
load.

Bi-Xeno")

, tail
lamp, parking and standing lamp
4Side marker lamp
5Turn signal")