Page 426 of 539
425 Practical hints
What to do if …
Display symbol
Display messages
Possible cause
Possible solution
<
Seat belt system
Drive to workshop
The seat belt system is malfunctioning.
�
Visit an authorized Mercedes-Benz
Light Truck Center as soon as possi-
ble.
9
Service memory full
See Operator’s Manual
The maintenance service memory cannot
save any more data.
�
Have the service memory checked by
an authorized Mercedes-Benz Light
Truck Center.
K
Close
tilt/sliding sunroof
You have opened the driver’s door with
the SmartKey removed from the starter
switch and the sliding portion of the
tilt/sliding sunroof* open.
�
Close the tilt/sliding sunroof*
(�page 235).
J
Close
tilt/sliding sunroof
You have opened the driver’s door with
the SmartKey removed from the starter
switch and the tilt portion of the
tilt/sliding sunroof* open.
�
Close the tilt/sliding sunroof*
(�page 235).
Page 436 of 539
435 Practical hints
Unlocking/locking in an emergency
�Unlocking/locking in an emergency
Unlocking the vehicle
If you cannot unlock the vehicle using the
SmartKey or SmartKey with
KEYLESS-GO*, open the driver’s door us-
ing the mechanical key.
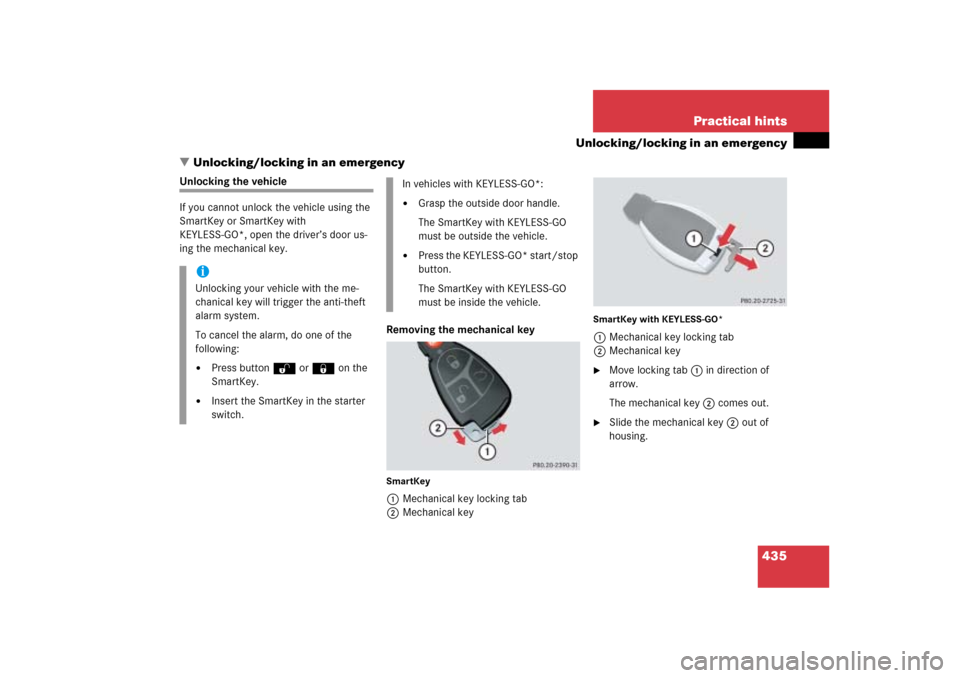
Removing the mechanical key
SmartKey1Mechanical key locking tab
2Mechanical key
SmartKey with KEYLESS-GO*1Mechanical key locking tab
2Mechanical key�
Move locking tab1 in direction of
arrow.
The mechanical key2 comes out.
�
Slide the mechanical key2 out of
housing.
iUnlocking your vehicle with the me-
chanical key will trigger the anti-theft
alarm system.
To cancel the alarm, do one of the
following:�
Press buttonŒ or‹on the
SmartKey.
�
Insert the SmartKey in the starter
switch.
In vehicles with KEYLESS-GO*:�
Grasp the outside door handle.
The SmartKey with KEYLESS-GO
must be outside the vehicle.
�
Press the KEYLESS-GO* start/stop
button.
The SmartKey with KEYLESS-GO
must be inside the vehicle.
Page 438 of 539
 is required to open the tailgate.
If the tailgate can no longer be")
437 Practical hints
Unlocking/locking in an emergency
Unlocking and opening the tailgate
A minimum height clearance of 7 ft
(2.15 m) is required to open the tailgate.
If the tailgate can no longer be unlocked
and opened using the Œbutton on the
SmartKey or the KEYLESS-GO* function,
use the manual release to unlock and open
the tailgate.
The manual release is located on the inside
of the tailgate.
1Release lever
2Cover�
Remove cover2 from the trim on the
tailgate.
�
Push release lever1 all the way to the
left.
�
Lift the tailgate.!Always make sure there is sufficient
overhead clearance.iIf the vehicle has previously been
locked from the outside using the
SmartKey or SmartKey with
KEYLESS-GO*, opening the tailgate
from the inside will trigger the
anti-theft alarm system.
To cancel the alarm, do one of the
following:
With the SmartKey:�
Press buttonŒ or‹ on the
SmartKey.
�
Insert the SmartKey in the starter
switch.
With KEYLESS-GO*:�
Grasp an outside door handle.
The SmartKey with KEYLESS-GO
must be within 3 ft (1 m) of the ve-
hicle.
or
�
Press the KEYLESS-GO start/stop
button.
The SmartKey with KEYLESS-GO
must be inside the vehicle.
Page 440 of 539

439 Practical hints
Opening/closing in an emergency
�Opening/closing in an emergency
Power tilt/sliding sunroof*
You can open or close the tilt/sliding
sunroof manually should an electrical
malfunction occur.
The tilt/sliding sunroof drive is located be-
hind the cover on the overhead control
panel.
1Cover�
Remove the SmartKey from the starter
switch.Vehicles with SmartKey with
KEYLESS-GO*
�
Turn off the engine by pressing the
KEYLESS-GO* once (
�page 36).
�
Open the driver’s door (this puts the
starter switch in position 0, same as
with the SmartKey removed from the
starter switch). The driver’s door then
can be closed again.
�
Push cover1 at the location marked
by the arrow.
2Crank
�
Take crank2 out of the Operator’s
Manual pouch.
�
Insert crank2 through hole.
�
Turn crank2 clockwise to:�
slide sunroof open
�
raise sunroof at the rear
�
Turn crank2 counterclockwise to:�
slide sunroof closed
�
lower sunroof at the rear
iTurn crank2 slowly and smoothly.
The tilt/sliding sunroof must be syn-
chronized if it has been operated man-
ually (
�page 237).
Page 446 of 539
445 Practical hints
Replacing bulbs
Have the LEDs and bulbs for the following
lamps replaced by an authorized
Mercedes-Benz Light Truck Center:�
Additional turn signals in the exterior
rear view mirrors
�
Bi-Xenon lamps*
�
Front fog lamps (vehicles with sport
package*)
�
High mounted brake lamp
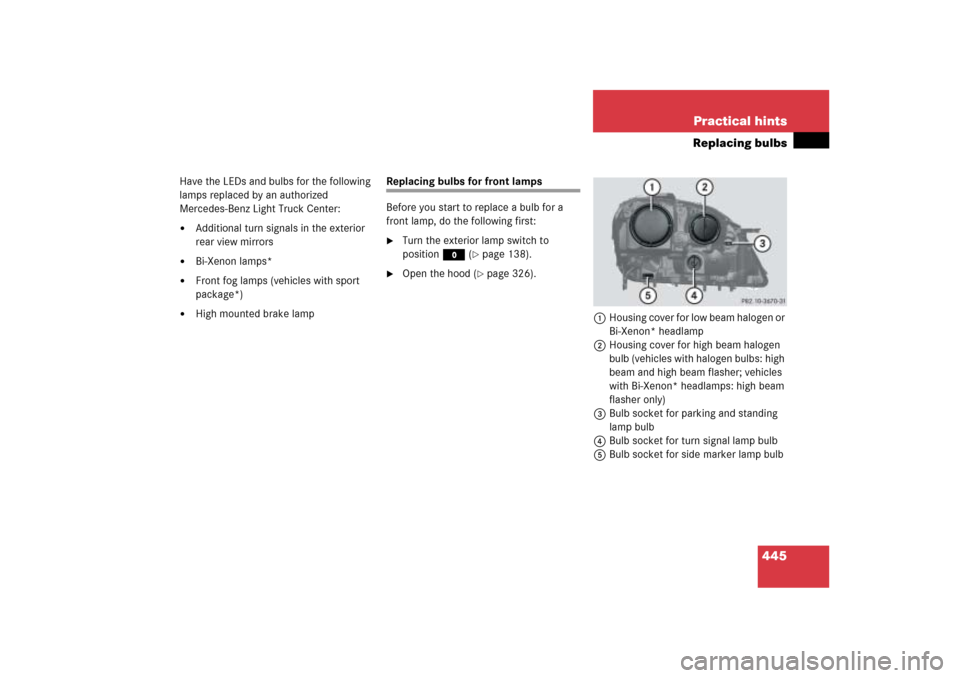
Replacing bulbs for front lamps
Before you start to replace a bulb for a
front lamp, do the following first:�
Turn the exterior lamp switch to
positionM (
�page 138).
�
Open the hood (
�page 326).
1Housing cover for low beam halogen or
Bi-Xenon* headlamp
2Housing cover for high beam halogen
bulb (vehicles with halogen bulbs: high
beam and high beam flasher; vehicles
with Bi-Xenon* headlamps: high beam
flasher only)
3Bulb socket for parking and standing
lamp bulb
4Bulb socket for turn signal lamp bulb
5Bulb socket for side marker lamp bulb
Page 451 of 539
450 Practical hintsReplacing bulbs4Bulb socket of front fog lamp bulb�
Turn bulb socket4 with the bulb
counterclockwise and remove it.
�
Insert new bulb socket4 with the bulb
into the lamp and turn it clockwise.
�
Plug electrical connector onto the bulb
socket4.
�
Reinstall front fog lamp2 into the
bumper.
�
Reinstall cover1 into the bumper un-
til it engages.
Replacing bulbs for rear lamps
Before you start to replace a bulb for a rear
lamp, do the following first:�
Turn the exterior lamp switch to
positionM (
�page 138).
�
Open the tailgate.
�
Open the cover in the cargo compart-
ment.
For the driver’s side rear lamps, see
“First aid kit” (
�page 430).
For the passenger-side rear lamps, see
“Fuse box in cargo compartment”
(
�page 479).Vehicles without sound system*:
�
Remove the additional cover on the
driver’s side.
1Screw
�
Turn the screws1 90° counterclock-
wise and remove the storage bin.
��
Page 454 of 539
453 Practical hints
Replacing wiper blades
�Replacing wiper blades
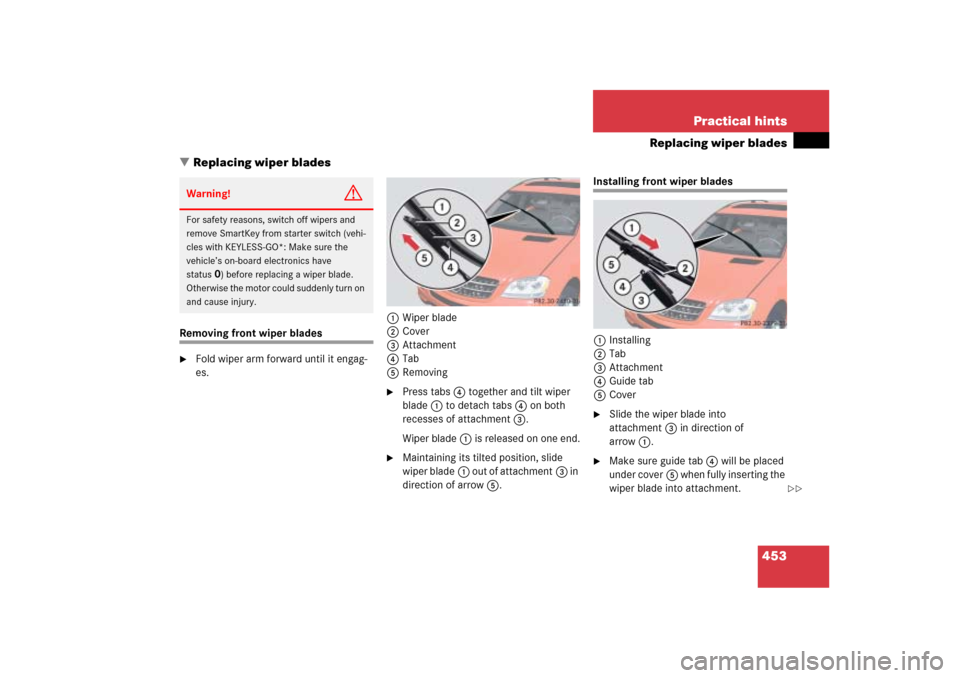
Removing front wiper blades�
Fold wiper arm forward until it engag-
es.1Wiper blade
2Cover
3Attachment
4Tab
5Removing
�
Press tabs4 together and tilt wiper
blade1 to detach tabs4 on both
recesses of attachment3.
Wiper blade1 is released on one end.
�
Maintaining its tilted position, slide
wiper blade1 out of attachment3 in
direction of arrow5.
Installing front wiper blades
1Installing
2Tab
3Attachment
4Guide tab
5Cover�
Slide the wiper blade into
attachment3 in direction of
arrow1.
�
Make sure guide tab4 will be placed
under cover5 when fully inserting the
wiper blade into attachment.
Warning!
G
For safety reasons, switch off wipers and
remove SmartKey from starter switch (vehi-
cles with KEYLESS-GO*: Make sure the
vehicle’s on-board electronics have
status
0) before replacing a wiper blade.
Otherwise the motor could suddenly turn on
and cause injury.
��
Page 455 of 539

454 Practical hintsReplacing wiper blades�
Let tab2 latch into both recesses of
attachment3.
�
Check if the wiper blade is securely
fastened.
�
Fold the wiper arm backward to rest on
the windshield.
Make sure you hold on to the wiper arm
when folding it back.
Removing rear wiper blade�
Fold wiper arm1 (
�page 455) for-
ward until it engages.
!Never open the hood when the wiper
arms are folded forward.
Hold on to the wiper when folding the
wiper arm back. If released, the force
of the impact from the tensioning
spring could crack the windshield.
Do not allow the wiper arms to contact
the windshield glass without a wiper
blade inserted.
Make certain that the wiper blades are
properly installed. Improperly installed
wiper blades may cause windshield
damage.
For your convenience, we recommend
that you have this work carried out by
an authorized Mercedes-Benz Light
Truck Center.
Warning!
G
For safety reasons, switch off wipers and
remove SmartKey from starter switch (vehi-
cles with KEYLESS-GO*: Make sure the
vehicle’s on-board electronics have
status
0) before replacing a wiper blade.
Otherwise the motor could suddenly turn on
and cause injury.
��