Page 416 of 539

415 Practical hints
What to do if …
When the
Add 1 qt. engine oil when
next refueling
(Canada:
1 liter
) mes-
sage appears while the engine is running
and at operating temperature, the engine
oil level has dropped to approximately the
minimum level.
When this occurs, the warning will first
come on intermittently and then stay on if
the oil level drops further.Visually check for oil leaks. If no obvious oil
leaks are noted, drive to the nearest
service station where the engine oil should
be topped to the required level with an ap-
proved oil specified in the Factory
Approved Service Products pamphlet.
Display symbol
Display messages
Possible cause
Possible solution
N
Engine oil level
Visit workshop
The engine oil has dropped to a
critical level.
�
Check the engine oil level (
�page 328)
(ML 500 only), or (
�page 330) (ML 350
only) and add oil as required
(
�page 331).
�
If you must add engine oil frequently, have
the engine checked for possible leaks.
Oil sensor malfunction
Visit workshop
The measuring system is mal-
functioning.
�
Have the measuring system checked by
an authorized Mercedes-Benz Light Truck
Center.
!The engine oil level warnings should
not be ignored. Extended driving with
the symbol displayed could result in
serious engine damage that is not
covered by the Mercedes-Benz Limited
Warranty.
Page 417 of 539

416 Practical hintsWhat to do if …Display symbol
Display messages
Possible cause
Possible solution
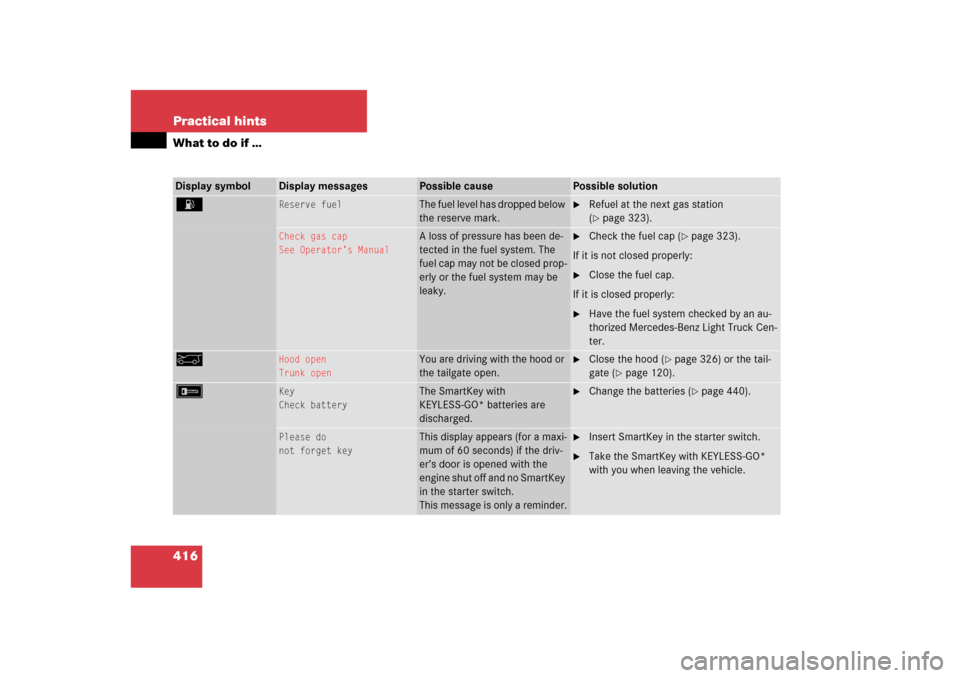
A
Reserve fuel
The fuel level has dropped below
the reserve mark.
�
Refuel at the next gas station
(�page 323).
Check gas cap
See Operator’s Manual
A loss of pressure has been de-
tected in the fuel system. The
fuel cap may not be closed prop-
erly or the fuel system may be
leaky.
�
Check the fuel cap (
�page 323).
If it is not closed properly:
�
Close the fuel cap.
If it is closed properly:
�
Have the fuel system checked by an au-
thorized Mercedes-Benz Light Truck Cen-
ter.
a
Hood open
Trunk open
You are driving with the hood or
the tailgate open.
�
Close the hood (
�page 326) or the tail-
gate (
�page 120).
F
Key
Check battery
The SmartKey with
KEYLESS-GO* batteries are
discharged.
�
Change the batteries (
�page 440).
Please do
not forget key
This display appears (for a maxi-
mum of 60 seconds) if the driv-
er’s door is opened with the
engine shut off and no SmartKey
in the starter switch.
This message is only a reminder.
�
Insert SmartKey in the starter switch.
�
Take the SmartKey with KEYLESS-GO*
with you when leaving the vehicle.
Page 418 of 539

417 Practical hints
What to do if …
Display symbol
Display messages
Possible cause
Possible solution
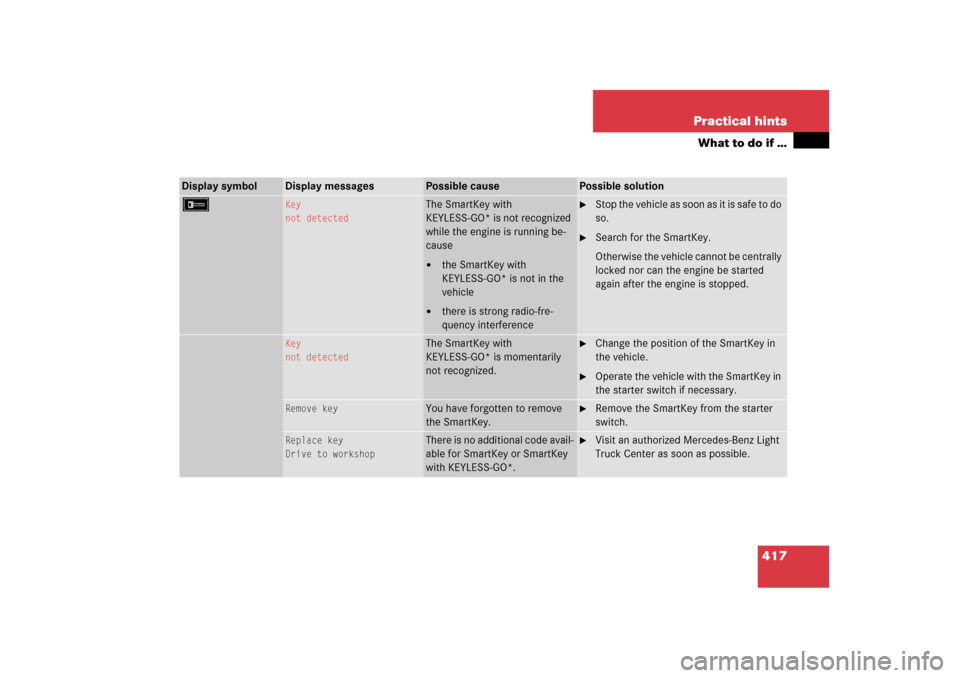
F
Key
not detected
The SmartKey with
KEYLESS-GO* is not recognized
while the engine is running be-
cause�
the SmartKey with
KEYLESS-GO* is not in the
vehicle
�
there is strong radio-fre-
quency interference
�
Stop the vehicle as soon as it is safe to do
so.
�
Search for the SmartKey.
Otherwise the vehicle cannot be centrally
locked nor can the engine be started
again after the engine is stopped.
Key
not detected
The SmartKey with
KEYLESS-GO* is momentarily
not recognized.
�
Change the position of the SmartKey in
the vehicle.
�
Operate the vehicle with the SmartKey in
the starter switch if necessary.
Remove key
You have forgotten to remove
the SmartKey.
�
Remove the SmartKey from the starter
switch.
Replace key
Drive to workshop
There is no additional code avail-
able for SmartKey or SmartKey
with KEYLESS-GO*.
�
Visit an authorized Mercedes-Benz Light
Truck Center as soon as possible.
Page 440 of 539

439 Practical hints
Opening/closing in an emergency
�Opening/closing in an emergency
Power tilt/sliding sunroof*
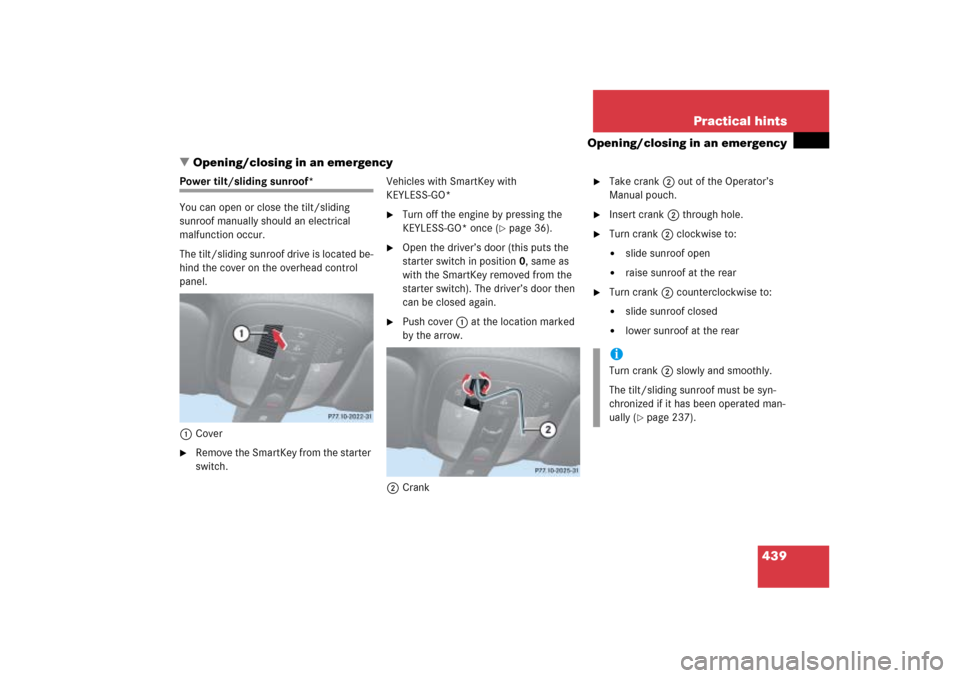
You can open or close the tilt/sliding
sunroof manually should an electrical
malfunction occur.
The tilt/sliding sunroof drive is located be-
hind the cover on the overhead control
panel.
1Cover�
Remove the SmartKey from the starter
switch.Vehicles with SmartKey with
KEYLESS-GO*
�
Turn off the engine by pressing the
KEYLESS-GO* once (
�page 36).
�
Open the driver’s door (this puts the
starter switch in position 0, same as
with the SmartKey removed from the
starter switch). The driver’s door then
can be closed again.
�
Push cover1 at the location marked
by the arrow.
2Crank
�
Take crank2 out of the Operator’s
Manual pouch.
�
Insert crank2 through hole.
�
Turn crank2 clockwise to:�
slide sunroof open
�
raise sunroof at the rear
�
Turn crank2 counterclockwise to:�
slide sunroof closed
�
lower sunroof at the rear
iTurn crank2 slowly and smoothly.
The tilt/sliding sunroof must be syn-
chronized if it has been operated man-
ually (
�page 237).
Page 457 of 539

456 Practical hintsFlat tire
Preparing the vehicle�
Park the vehicle as far as possible from
moving traffic on a hard surface.
�
Turn on the hazard warning flashers.
�
Turn the steering wheel so that the
front wheels are in a straight ahead po-
sition.
�
Set the parking brake.
�
Shift automatic transmission to park
positionP.
Vehicles with Air suspension package*:
�
Do not open or close a door or tailgate
while mounting the spare wheel.
Vehicles with SmartKey:
�
Turn off the engine (
�page 34).
�
Remove the SmartKey from the starter
switch.Vehicles with KEYLESS-GO*:
�
Turn off the engine by pressing the
KEYLESS-GO* button once
(�page 63).
�
Open the driver’s door (this puts the
starter switch in position0, same as
with the SmartKey removed from the
starter switch). The driver’s door then
can be closed again.
�
Have any passenger exit the vehicle at
a safe distance from the roadway.
Warning!
G
The dimensions of the Minispare wheel are
different from those of the road wheels. As
a result, the vehicle handling characteristics
change when driving with a mounted
Minispare wheel. Adapt your driving style
accordingly.
The Minispare wheel is for temporary use
only. When driving with a Minispare wheel
mounted, ensure proper tire pressure and
do not exceed a vehicle speed of
50 mph (80 km/h).
Drive to the nearest Mercedes-Benz Light
Truck Center as soon as possible to have the
Minispare wheel replaced with a regular
road wheel.
Never operate the vehicle with more than
one spare wheel mounted.
Do not switch off the ESP
® when a
Minispare wheel is mounted.
iOpen doors only when conditions are
safe to do so.
Page 459 of 539

458 Practical hintsFlat tire�
On wheel to be changed, loosen but do
not yet remove the wheel bolts
(approximately one full turn with
wrench).
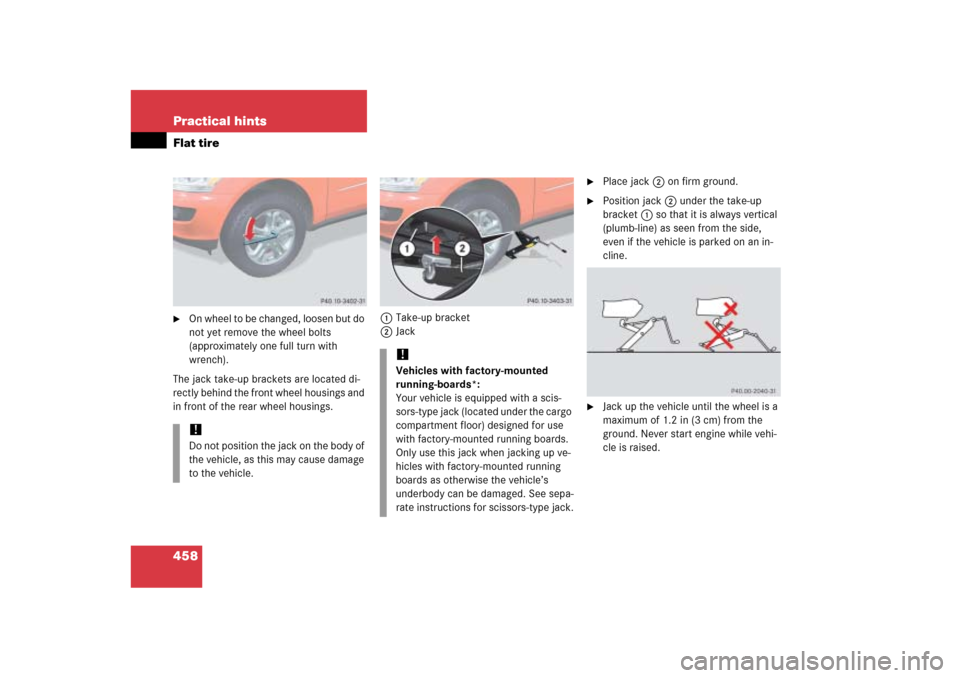
The jack take-up brackets are located di-
rectly behind the front wheel housings and
in front of the rear wheel housings.1Take-up bracket
2Jack
�
Place jack2 on firm ground.
�
Position jack2 under the take-up
bracket1 so that it is always vertical
(plumb-line) as seen from the side,
even if the vehicle is parked on an in-
cline.
�
Jack up the vehicle until the wheel is a
maximum of 1.2 in (3 cm) from the
ground. Never start engine while vehi-
cle is raised.
!Do not position the jack on the body of
the vehicle, as this may cause damage
to the vehicle.
!Vehicles with factory-mounted
running-boards*:
Your vehicle is equipped with a scis-
sors-type jack (located under the cargo
compartment floor) designed for use
with factory-mounted running boards.
Only use this jack when jacking up ve-
hicles with factory-mounted running
boards as otherwise the vehicle’s
underbody can be damaged. See sepa-
rate instructions for scissors-type jack.
Page 460 of 539

459 Practical hints
Flat tire
Removing the wheel
1Alignment bolt�
Unscrew upper-most wheel bolt and
remove it.
�
Replace this wheel bolt with alignment
bolt1 supplied with the tool kit
(�page 430).
�
Remove the remaining bolts.
�
Remove the wheel.Mounting the new wheel
1Wheel bolt for 18" and 19" light alloy
rims*
2Wheel bolt for 17" light alloy rims or
Minispare wheel (located in vehicle tool
kit (
�page 431))
Warning!
G
The jack is intended only for lifting the
vehicle briefly for wheel changes. It is not
suited for performing maintenance work
under the vehicle.�
Never start the engine when the vehicle
is raised.
�
Never lie down under the raised vehicle.
!Do not place wheel bolts in sand or dirt.
This could result in damage to the bolts
and wheel hub threads.
!Wheel bolts2 must be used when
mounting 17" light alloy rims or the
Minispare wheel. The use of any wheel
bolts other than wheel bolts2 for
17" light alloy rims or the Minispare
wheel will physically damage the vehi-
cle’s brakes.
��
Page 464 of 539

463 Practical hints
Battery
!
The battery is a valve-regulated lead
acid (VRLA) battery, also referred to as
“fleece” battery. Such batteries do not
require topping-up of the electrolyte
level. VRLA batteries therefore do not
have cell caps and the battery cover is
non-removable. Do not attempt to
open the battery as otherwise the bat-
tery will be damaged.
Even though VRLA batteries do not
require topping-up of the electrolyte
level and cannot be opened to check
the electrolyte level, the battery condi-
tion must be checked periodically by
performing a battery conductance test.
Refer to Maintenance Booklet for bat-
tery condition testing intervals.
As with any other battery, the battery
may discharge if the vehicle is not
operated for an extended period of
time. You can connect a battery
maintenance charge unit tested and
approved for use on your vehicle model
or disconnect the battery to prevent
battery discharge. Contact an
authorized Mercedes-Benz Light Truck
Center for more information.
!The factory-equipped VRLA battery is
leak-proofed. Only use a battery as re-
placement that has the same security
features and is of identical size,
voltage, and capacity as the
factory-equipped battery.
The battery, the battery ventilation
tube (
�page 468) and the vent plug
(
�page 468) must always be securely
installed when the vehicle is in opera-
tion.
Warning!
G
Jump starting must only be done using the
jump-start contacts located in the engine
compartment (
�page 470).