Page 431 of 539
430 Practical hintsWhere will I find ...?First aid kit
The first aid kit is located on the driver’s
side in the cargo compartment behind the
cover.
1Handle�
Turn handles1 90°.
�
Fold down the cover.
The first aid kit can be removed.
Vehicle tool kit
The vehicle tool kit is stored under the
cargo compartment floor.
The vehicle tool kit includes:�
Towing eye bolt
�
Wheel wrench
�
Alignment bolt
�
Vehicle jack
�
Fuse chart
�
Spare fuses
�
Fuse extractor
�
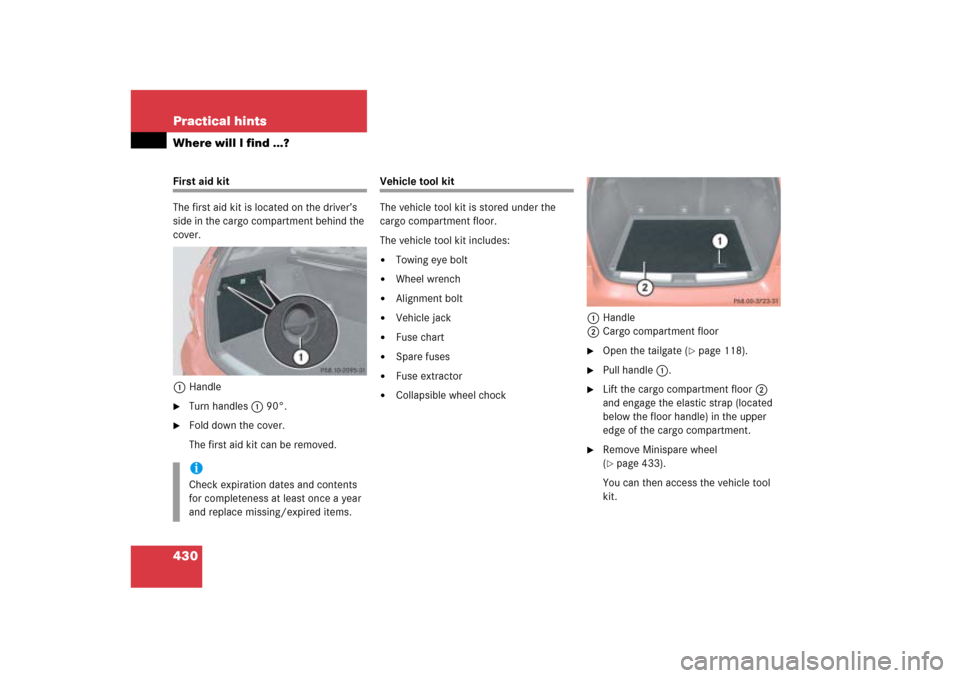
Collapsible wheel chock1Handle
2Cargo compartment floor
�
Open the tailgate (
�page 118).
�
Pull handle1.
�
Lift the cargo compartment floor2
and engage the elastic strap (located
below the floor handle) in the upper
edge of the cargo compartment.
�
Remove Minispare wheel
(�page 433).
You can then access the vehicle tool
kit.
iCheck expiration dates and contents
for completeness at least once a year
and replace missing/expired items.
Page 432 of 539

431 Practical hints
Where will I find ...?
Trunk area shown with spare wheel
removed1Wheel bolt wrench with screwdriver
2Vehicle jack
3Collapsible wheel chock
4Spare fuses, fuse chart, fuse extractor
5Towing eye bolt
6Alignment bolt
7Wheel bolts for 17" light alloy rims or
Minispare wheel1Wheel bolt wrench
2Screwdriver
3Interchangeable slot
Screwdriver2 is placed inside the handle
of wheelbolt wrench1.Vehicle jack
iVehicles with scissors-type jack see
separate instructions.
!To prevent damage, always disengage
the elastic strap and lower the cargo
compartment floor (
�page 430) be-
fore closing the tailgate.
Warning!
G
The jack is designed exclusively for jacking
up the vehicle at the jack take-up brackets
built into both sides of the vehicle. To help
avoid personal injury, use the jack only to lift
the vehicle during a wheel change. Never
get beneath the vehicle while it is supported
by the jack. Keep hands and feet away from
the area under the lifted vehicle. Always
firmly set parking brake and block wheels
before raising vehicle with jack.
Do not disengage parking brake while the
vehicle is raised. Be certain that the jack is
always vertical (plumb line) when in use, es-
pecially on hills. Always try to use the jack
on level surface.
Make sure that the jack arm is fully seated
in the jack take-up bracket. Always lower
the vehicle onto sufficient capacity jack-
stands before working under the vehicle.
Page 434 of 539

433 Practical hints
Where will I find ...?
�
Tilt both plates upward1.
�
Fold the lower plate outward2.
�
Guide the tabs of the lower plate all the
way into the openings of base plate3.
For information on where to place wheel
chocks when changing a wheel, see “Lift-
ing the vehicle” (
�page 457).
Spare wheel
Minispare wheel
The Minispare wheel is located under the
cargo compartment floor.
1Minispare wheel
2Towing eye bolt
3Alignment bolt
4Retaining screw
5Wheel bolt wrench with screwdriver
�
Open the tailgate (
�page 118).
�
Lift the cargo compartment floor
(�page 430) and engage the elastic
strap (located below the floor handle)
in the upper edge of the cargo com-
partment.
iRemove spare wheel to gain access to
remaining tools in vehicle tool kit
(�page 431).
Warning!
G
The dimensions of the Minispare wheel are
different from those of the road wheels. As
a result, the vehicle handling characteristics
change when driving with a mounted
Minispare wheel.!To prevent damage, always disengage
the elastic strap and lower the cargo
compartment floor (
�page 430) be-
fore closing the tailgate.
��
Page 460 of 539
.")
459 Practical hints
Flat tire
Removing the wheel
1Alignment bolt�
Unscrew upper-most wheel bolt and
remove it.
�
Replace this wheel bolt with alignment
bolt1 supplied with the tool kit
(�page 430).
�
Remove the remaining bolts.
�
Remove the wheel.Mounting the new wheel
1Wheel bolt for 18" and 19" light alloy
rims*
2Wheel bolt for 17" light alloy rims or
Minispare wheel (located in vehicle tool
kit (
�page 431))
Warning!
G
The jack is intended only for lifting the
vehicle briefly for wheel changes. It is not
suited for performing maintenance work
under the vehicle.�
Never start the engine when the vehicle
is raised.
�
Never lie down under the raised vehicle.
!Do not place wheel bolts in sand or dirt.
This could result in damage to the bolts
and wheel hub threads.
!Wheel bolts2 must be used when
mounting 17" light alloy rims or the
Minispare wheel. The use of any wheel
bolts other than wheel bolts2 for
17" light alloy rims or the Minispare
wheel will physically damage the vehi-
cle’s brakes.
��
Page 461 of 539

460 Practical hintsFlat tire�
Clean contact surfaces of wheel and
wheel hub.
�
Guide spare wheel onto the alignment
bolt and push it on the wheel hub.
�
Insert wheel bolts and tighten them
slightly.
�
Unscrew the alignment bolt.
�
Insert the remaining wheel bolt and
tighten it slightly.Lowering the vehicle
�
Lower vehicle by turning crank coun-
terclockwise until vehicle is resting ful-
ly on its own weight.
�
Remove the jack.
!To avoid paint damage, place wheel flat
against hub and hold it there while
installing first wheel bolt.Warning!
G
Always replace wheel bolts that are
damaged or rusted.
Never apply oil or grease to wheel bolts.
Damaged wheel hub threads should be
repaired immediately. Do not continue to
drive under these circumstances! Contact
an authorized Mercedes-Benz Light Truck
Center or call Roadside Assistance.
Incorrect wheel bolts or improperly tight-
ened wheel bolts can cause the wheel to
come off. This could cause an accident.
Make sure to use the correct wheel bolts.
Warning!
G
Use only genuine equipment
Mercedes-Benz wheel bolts. Other wheel
bolts may come loose.
Do not tighten the wheel bolts when the ve-
hicle is raised. Otherwise the vehicle could
fall off the jack.
��
Page 477 of 539
476 Practical hintsTowing the vehicleStranded vehicle
Freeing a stranded vehicle, on which the
wheels are dug into sand or mud, should
be done with the greatest of care, especial-
ly if the vehicle is heavily loaded.
Avoid pulling the vehicle jerkily or diago-
nally, since it could result in damage to the
chassis alignment.
Never try to free a vehicle that is still cou-
pled to a trailer.
If possible, a vehicle should be pulled back-
ward in its own previously made tracks.
Page 502 of 539

Prevents the wheels from locking up
during braking so that the vehicle can
continue to be steered.
Accessory weight
(
�page 365)
ADS*
(Adaptive D
a")
501 Technical terms
ABS
(A
ntilock B
rake S
ystem)
Prevents the wheels from locking up
during braking so that the vehicle can
continue to be steered.
Accessory weight
(
�page 365)
ADS*
(Adaptive D
amping S
ystem*)
Automatically adapts the optimum sus-
pension damping to prevailing driving
conditions.
Air suspension*
Automatically selects the optimum sus-
pension tuning and ride height for your
vehicle. Air suspension consists of two
components:
�
Adaptive Damping System
�
Vehicle level control
Air pressure
(
�page 365)Alignment bolt
Metal pin with thread. The centering
pin is an aid used when changing a tire
to align the wheel with the wheel hub.
Aspect ratio
(
�page 365)
Bar
(�page 365)
BAS
(Brake A
ssist S
ystem)
System for potentially reducing braking
distances in emergency braking situa-
tions. The system is activated when it
senses an emergency based on how
fast the brake is applied.
Bead
(
�page 365)
Bi-Xenon headlamps*
Headlamps which use an electric arc as
the light source and produce a more
intense light than filament headlamps.
Bi-Xenon headlamps produce low
beam and high beam.CAC
(C
ustomer A
ssistance C
enter)
Mercedes-Benz customer service
center, which can help you with any
questions about your vehicle and
provide assistance in the event of a
breakdown.
CAN system
(C
ontroller A
rea N
etwork)
Data bus network serving to control
vehicle functions such as door locking
or windshield wiping.
Cockpit
All instruments, switches, buttons and
indicator/warning lamps in the
passenger compartment needed for
vehicle operation and monitoring.
Cold tire inflation pressure
(
�page 365)