Page 317 of 539

316 OperationDriving instructionsAttaching a trailer
Observe maximum permitted trailer
dimensions (width and length).
Most states and all Canadian provinces
require�
safety chains between your tow vehicle
and the trailer.
The chains should be criss-crossed
under the trailer tongue. They must be
attached to the hitch receiver, and not
to the vehicle’s bumper or axle.
Make sure to leave enough slack in the
chains to permit turning corners.
�
a separate brake system at various
trailer weights.
�
a break-away switch on trailers with a
separate brake system.
The switch activates the trailer brakes
in the possible event that the trailer
might separate from the tow vehicle.
�
Start the engine (
�page 34).
�
Make sure the automatic transmission
is set toP.
�
Set the parking brake for the vehicle
(�page 52).
�
Vehicles with ADS*: Set the vehicle
level to Highway (
�page 250).
�
Vehicle with ADS*: Set the ADS* to
AUTO or COMFORT (
�page 249).
�
Stop the engine (
�page 34).
�
Attach the trailer.
!Do not connect a trailer brake system
(if trailer is so equipped) directly to the
vehicle’s hydraulic brake system, as
your vehicle is equipped with antilock
brakes. If you do, neither the vehicle’s
brakes nor the trailer’s brakes will func-
tion properly.iThe provided vehicle electrical wiring
harness for trailer towing has a brake
signal wire (color orange) for hook-up
to a brake controller.
You should consider using a trailer
sway control system. For further infor-
mation see an authorized
Mercedes-Benz Light Truck Center.
Warning!
G
Vehicles with ADS*:
Do not lock or unlock any doors or the tail-
gate while attaching or uncoupling the trail-
er. Do not open or close any doors or the
tailgate while attaching or uncoupling the
trailer. Make sure no one operates the ADS*
switch (
�page 249) or the vehicle level
control* switch (
�page 252) while a trailer
is being attached or uncoupled. The vehicle
level could change, and you could injure
yourself and/or others.
Page 319 of 539
318 OperationDriving instructions�
If the transmission hunts between
gears on inclines, manually shift to a
lower gear (select 4, 3, 2 or 1).
A lower gear and reduction of speed re-
duces the chance of engine overload-
ing and/or overheating.
�
On very steep inclines, not manageable
with automatic transmission in1,
switch on off-road driving program
(�page 248).
�
When going down a long hill, shift into
a lower gear and use the engine’s brak-
ing effect.
Avoid riding the brakes, thus overheat-
ing the vehicle and trailer brakes.
�
If the engine coolant rises to an ex-
tremely high temperature (coolant tem-
perature needle approaching the red
zone) when the air conditioning is on,
turn off the air conditioning system.
Engine coolant heat can be additionally
vented by opening the windows,
switching the climate control fan speed
to high and setting the temperature
control to the maximum hot position.
�
Extreme care must be exercised since
your vehicle with a trailer will require
additional passing distance ahead than
when driving without a trailer.
Because your vehicle and trailer is
longer than your vehicle alone, you will
also need to go much farther ahead of
the passed vehicle before you can re-
turn to your lane.Uncoupling the trailer
�
Start the engine (
�page 34).
�
Make sure the automatic transmission
is set toP.
�
Set the parking brake for the vehicle
(�page 52) and for the trailer.
�
Close all doors and the tailgate.
Detach the trailer immediately after-
ward as follows:
�
Disconnect all electrical plug connec-
tors.
�
Uncouple the trailer.
!If the trailer should begin to sway, re-
duce the vehicle’s speed immediately.
In no case attempt to straighten out the
tow vehicle and trailer by increasing
the speed.
Page 384 of 539
383 Practical hints
What to do if …
Problem
Possible cause
Suggested solution
;
(USA only)
3
(Canada only)
The red brake warning lamp
comes on while driving and
you hear a warning sound.
You are driving with the
parking brake set.
�
Release the parking brake.
The ESP
® control unit may be
malfunctioning.
The driving safety systems
may not be available.
�
Continue driving with added caution.
Whe el s m a y loc k du ring har d br ak ing,
reducing steering capability.
�
Read and observe messages in the
display.
Warning!
G
Driving with the brake warning lamp illumi-
nated can result in an accident. Have your
brake system checked immediately if the
brake warning lamp stays on. Do not add
brake fluid before checking the brake
system. Overfilling the brake fluid reservoir
can result in spilling brake fluid on hot en-
gine parts and the brake fluid catching fire.
You can be seriously burned.
!If you find that the brake fluid in the
brake fluid reservoir has fallen to the
minimum mark or below, have the
brake system checked for brake pad
thickness and leaks.
Page 386 of 539
385 Practical hints
What to do if …
Problem
Possible cause
Suggested solution
?
(USA only)
±
(Canada only)
The yellow engine malfunction
indicator lamp comes on while
driving.
There is a malfunction in:�
The fuel management
system
�
The ignition system
�
The emission control
system
�
Systems which affect
emissions
Such malfunctions may result
in excessive emissions values
and may switch the engine to
its limp-home (emergency op-
eration) mode (
�page 192).
�
Have the vehicle checked as soon as
possible by an authorized
Mercedes-Benz Light Truck Center.
An on-board diagnostic connector is
used by the service station to link the
vehicle to the shop diagnostics
system. It allows the accurate identifi-
cation of system malfunctions through
the readout of diagnostic trouble
codes. It is located in the front left area
of the footwell next to the parking
brake pedal.
Page 410 of 539
409 Practical hints
What to do if …
Display symbol
Display message
Possible cause
Possible solution
;
(USA only)
!
(Canada only)
Release
parking brake
You are driving with the parking
brake set.
�
Release the parking brake (
�page 52).
Brake fluid too low
Visit workshop
There is insufficient brake fluid
in the reservoir.
�
Risk of accident! Stop the vehicle and no-
tify an authorized Mercedes-Benz Light
Truck Center. Do not add brake fluid! This
will not solve the problem.
Warning!
G
Driving with the message
Brake fluid
too low Visit workshop
displayed can
result in an accident. Have your brake
system checked immediately. Do not add
brake fluid before checking the brake
system. Overfilling the brake fluid reservoir
can result in spilling brake fluid on hot
engine parts and the brake fluid catching
fire. You can be seriously burned.!If you find that the brake fluid in the
brake fluid reservoir has fallen to the
minimum mark or below, have the
brake system checked for brake pad
thickness and leaks.
!Brake pad thickness must be visually
inspected by a qualified technician at
the intervals specified in the
Maintenance Booklet.
Page 432 of 539
431 Practical hints
Where will I find ...?
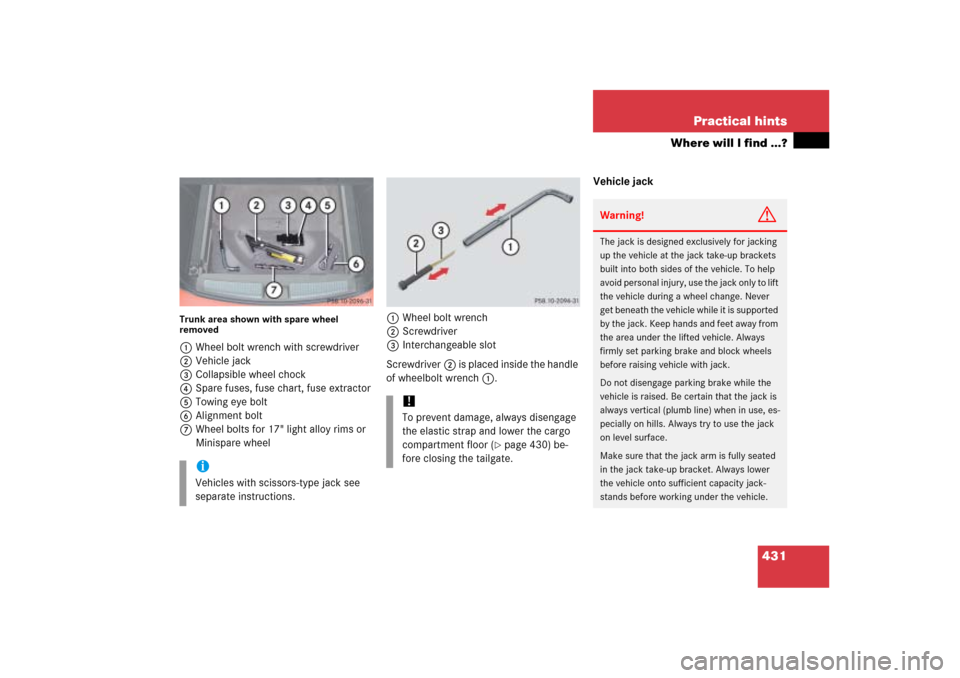
Trunk area shown with spare wheel
removed1Wheel bolt wrench with screwdriver
2Vehicle jack
3Collapsible wheel chock
4Spare fuses, fuse chart, fuse extractor
5Towing eye bolt
6Alignment bolt
7Wheel bolts for 17" light alloy rims or
Minispare wheel1Wheel bolt wrench
2Screwdriver
3Interchangeable slot
Screwdriver2 is placed inside the handle
of wheelbolt wrench1.Vehicle jack
iVehicles with scissors-type jack see
separate instructions.
!To prevent damage, always disengage
the elastic strap and lower the cargo
compartment floor (
�page 430) be-
fore closing the tailgate.
Warning!
G
The jack is designed exclusively for jacking
up the vehicle at the jack take-up brackets
built into both sides of the vehicle. To help
avoid personal injury, use the jack only to lift
the vehicle during a wheel change. Never
get beneath the vehicle while it is supported
by the jack. Keep hands and feet away from
the area under the lifted vehicle. Always
firmly set parking brake and block wheels
before raising vehicle with jack.
Do not disengage parking brake while the
vehicle is raised. Be certain that the jack is
always vertical (plumb line) when in use, es-
pecially on hills. Always try to use the jack
on level surface.
Make sure that the jack arm is fully seated
in the jack take-up bracket. Always lower
the vehicle onto sufficient capacity jack-
stands before working under the vehicle.
Page 444 of 539
443 Practical hints
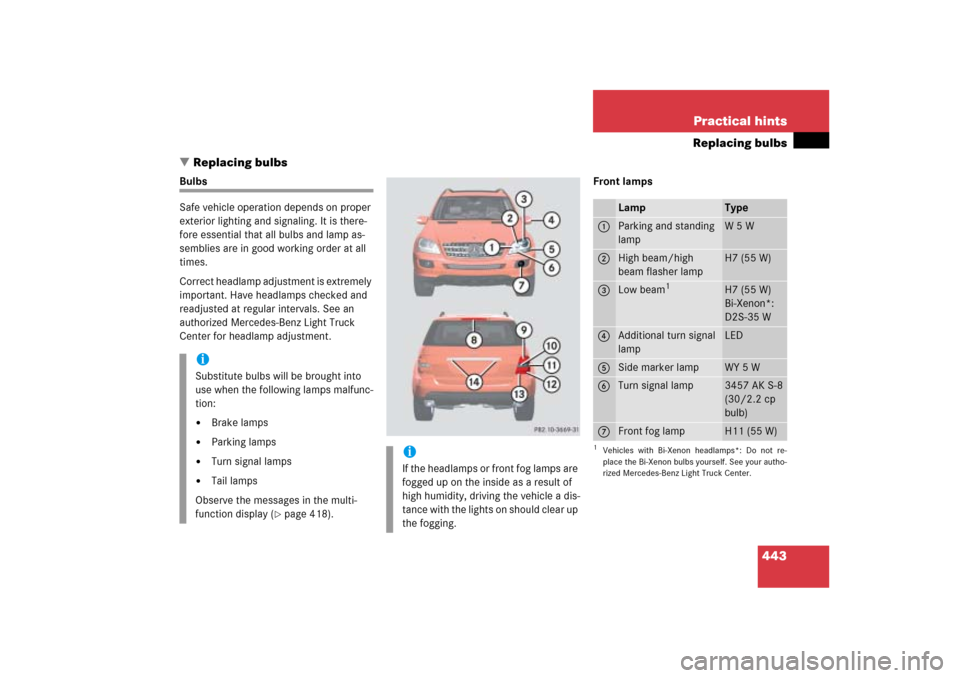
Replacing bulbs
�Replacing bulbs
Bulbs
Safe vehicle operation depends on proper
exterior lighting and signaling. It is there-
fore essential that all bulbs and lamp as-
semblies are in good working order at all
times.
Correct headlamp adjustment is extremely
important. Have headlamps checked and
readjusted at regular intervals. See an
authorized Mercedes-Benz Light Truck
Center for headlamp adjustment.Front lamps
iSubstitute bulbs will be brought into
use when the following lamps malfunc-
tion:�
Brake lamps
�
Parking lamps
�
Turn signal lamps
�
Tail lamps
Observe the messages in the multi-
function display (
�page 418).
iIf the headlamps or front fog lamps are
fogged up on the inside as a result of
high humidity, driving the vehicle a dis-
tance with the lights on should clear up
the fogging.
Lamp
Type
1
Parking and standing
lamp
W5W
2
High beam/high
beam flasher lamp
H7 (55 W)
3
Low beam
1
1Vehicles with Bi-Xenon headlamps*: Do not re-
place the Bi-Xenon bulbs yourself. See your autho-
rized Mercedes-Benz Light Truck Center.
H7 (55 W)
Bi-Xenon*:
D2S-35 W
4
Additional turn signal
lamp
LED
5
Side marker lamp
WY 5 W
6
Turn signal lamp
3457 AK S-8
(30/2.2 cp
bulb)
7
Front fog lamp
H11 (55 W)
Page 445 of 539
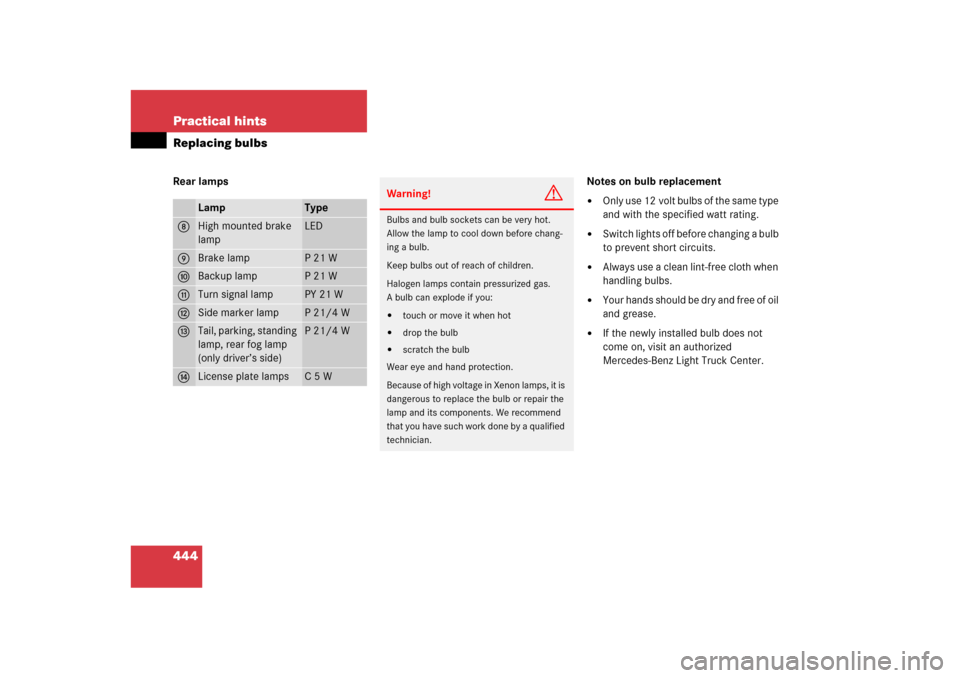
444 Practical hintsReplacing bulbsRear lamps Notes on bulb replacement
�
Only use 12 volt bulbs of the same type
and with the specified watt rating.
�
Switch lights off before changing a bulb
to prevent short circuits.
�
Always use a clean lint-free cloth when
handling bulbs.
�
Your hands should be dry and free of oil
and grease.
�
If the newly installed bulb does not
come on, visit an authorized
Mercedes-Benz Light Truck Center.
Lamp
Type
8
High mounted brake
lamp
LED
9
Brake lamp
P21W
a
Backup lamp
P21W
b
Turn signal lamp
PY 21 W
c
Side marker lamp
P21/4W
d
Tail, parking, standing
lamp, rear fog lamp
(only driver’s side)
P21/4W
e
License plate lamps
C5W
Warning!
G
Bulbs and bulb sockets can be very hot.
Allow the lamp to cool down before chang-
ing a bulb.
Keep bulbs out of reach of children.
Halogen lamps contain pressurized gas.
A bulb can explode if you:�
touch or move it when hot
�
drop the bulb
�
scratch the bulb
Wear eye and hand protection.
Because of high voltage in Xenon lamps, it is
dangerous to replace the bulb or repair the
lamp and its components. We recommend
that you have such work done by a qualified
technician.