Page 170 of 539

169 Controls in detail
Control system
�
Move the selection marker to the Lighting
submenu using theæ
orç button.
�
Press buttonj ork repeatedly
until you see this message in the dis-
play:
Function Surround lighting
.
The selection marker is on the current
setting.
�
Press buttonæ orç to select
the desired setting.
The locator lighting will be switched on
or off.
�
Turn the exterior lamp switch to
positionU when exiting the vehicle
(�page 138).Setting night security illumination
(Headlamps delayed shut-off)
Use this function to set whether and how
long you would like the exterior lamps to
illuminate during darkness after exiting the
vehicle and all doors closed.
With the delayed shut-off feature activated
and the exterior lamp switch in
position
U
before the engine is turned
off, the following lamps will switch on
when the engine is turned off:
�
Parking lamps
�
Tail lamps
�
License plate lamps
�
Side marker lamps
�
Front fog lamps
�
Move the selection marker to the Lighting
submenu using theæ
orç button.
�
Press buttonj ork repeatedly
until you see this message in the dis-
play:
Headlmp. delayed shut-off
.
The selection marker is on the current
setting.
iYou can reactivate this function within
ten minutes by opening a door.
If after turning off the engine you do not
open a door or do not close an opened
door, the lamps will automatically
switch off after 60 seconds.
��
Page 213 of 539

212 Controls in detailClimate controlActivating
Moist air can fog up the windows. You can
dehumidify the air with the air condition-
ing.�
Press button2 again.
The indicator lamp on button2
comes on.
The air conditioning uses the refrigerant
R134a. This refrigerant is free of CFCs
which are harmful to the ozone layer.
Residual heat and ventilation
With the engine switched off, it is possible
to continue to heat or ventilate the interior
for up to 30 minutes. This feature makes
use of the residual heat produced by the
engine.Activating
�
Turn the SmartKey in the starter switch
to position0or1, or remove it from
the starter switch.
�
Press buttonT (
�page 204).
The indicator lamp on buttonT
comes on.
Deactivating
�
Press buttonT (
�page 204).
The indicator lamp on buttonT
goes out.
!If the air conditioning cannot be turned
on again, this indicates that the air con-
ditioning is losing refrigerant. The com-
pressor has turned itself off.
Have the air conditioning checked at
the nearest authorized Mercedes-Benz
Light Truck Center.
iHow long the system will provide heat-
ing depends on the coolant tempera-
ture and the battery voltage.
Regardless of the temperature and air
volume set on the climate control panel
an interior temperature is aimed at by
72°F (22°C) and the blower runs for
the protection of the battery on low
stage.
Page 227 of 539
 function of the automatic
climate control system. The air in the vehi")
226 Controls in detail3-zone automatic climate control*Deactivating
It is possible to deactivate the air condi-
tioning (cooling) function of the automatic
climate control system. The air in the vehi-
cle will then no longer be cooled or dehu-
midified.�
Press button2 (
�page 218).
The indicator lamp on button2
goes out.
The cooling function switches off after
a short delay.Activating
Moist air can fog up the windows. You can
dehumidify the air with the air condition-
ing.
�
Press button2 again.
The indicator lamp on button2
comes on.
The air conditioning system uses the refrig-
erant R-134a. This refrigerant is free of
CFCs which are harmful to the ozone layer.
Residual heat and ventilation
With the engine switched off, it is possible
to continue to heat or ventilate the interior
for up to 30 minutes. This feature makes
use of the residual heat produced by the
engine.
!If the air conditioning cannot be turned
on again, this indicates that the air
conditioning is losing refrigerant. The
compressor has turned itself off.
Have the air conditioning checked at
the nearest authorized Mercedes-Benz
Light Truck Center.
iHow long the system will provide heat-
ing depends on the coolant tempera-
ture and the battery voltage.
Regardless of the temperature and air
volume set on the climate control panel
an interior temperature is aimed at by
72°F (22°C) and the blower runs for
the protection of the battery on low
stage.
Page 419 of 539

418 Practical hintsWhat to do if …Display symbol
Display messages
Possible cause
Possible solution
.
3rd brake lamp
The high mounted brake lamp is
malfunctioning. This message
will only appear if all light emit-
ting diodes have stopped work-
ing.
�
Visit an authorized Mercedes-Benz Light
Truck Center as soon as possible.
Brake lamp, left
Substitute bulb on
The left brake lamp is malfunc-
tioning. A substitute bulb is be-
ing used.
�
Visit an authorized Mercedes-Benz Light
Truck Center as soon as possible.
Brake lamp, right
Substitute bulb on
The right brake lamp is malfunc-
tioning. A substitute bulb is be-
ing used.
�
Visit an authorized Mercedes-Benz Light
Truck Center as soon as possible.
Display malfunction
Visit workshop
The display for the lamps or the
system is malfunctioning.
�
Visit an authorized Mercedes-Benz Light
Truck Center as soon as possible.
Front foglamp,
left
The left front fog lamp is mal-
functioning.
�
Replace the bulb as soon as possible.
Front foglamp,
right
The right front fog lamp is mal-
functioning.
�
Replace the bulb as soon as possible.
Rear foglamp,
left
The left rear fog lamp is malfunc-
tioning.
�
Replace the bulb as soon as possible.
Rear foglamp,
right
The right rear fog lamp is mal-
functioning.
�
Replace the bulb as soon as possible.
Page 444 of 539

443 Practical hints
Replacing bulbs
�Replacing bulbs
Bulbs
Safe vehicle operation depends on proper
exterior lighting and signaling. It is there-
fore essential that all bulbs and lamp as-
semblies are in good working order at all
times.
Correct headlamp adjustment is extremely
important. Have headlamps checked and
readjusted at regular intervals. See an
authorized Mercedes-Benz Light Truck
Center for headlamp adjustment.Front lamps
iSubstitute bulbs will be brought into
use when the following lamps malfunc-
tion:�
Brake lamps
�
Parking lamps
�
Turn signal lamps
�
Tail lamps
Observe the messages in the multi-
function display (
�page 418).
iIf the headlamps or front fog lamps are
fogged up on the inside as a result of
high humidity, driving the vehicle a dis-
tance with the lights on should clear up
the fogging.
Lamp
Type
1
Parking and standing
lamp
W5W
2
High beam/high
beam flasher lamp
H7 (55 W)
3
Low beam
1
1Vehicles with Bi-Xenon headlamps*: Do not re-
place the Bi-Xenon bulbs yourself. See your autho-
rized Mercedes-Benz Light Truck Center.
H7 (55 W)
Bi-Xenon*:
D2S-35 W
4
Additional turn signal
lamp
LED
5
Side marker lamp
WY 5 W
6
Turn signal lamp
3457 AK S-8
(30/2.2 cp
bulb)
7
Front fog lamp
H11 (55 W)
Page 445 of 539

444 Practical hintsReplacing bulbsRear lamps Notes on bulb replacement
�
Only use 12 volt bulbs of the same type
and with the specified watt rating.
�
Switch lights off before changing a bulb
to prevent short circuits.
�
Always use a clean lint-free cloth when
handling bulbs.
�
Your hands should be dry and free of oil
and grease.
�
If the newly installed bulb does not
come on, visit an authorized
Mercedes-Benz Light Truck Center.
Lamp
Type
8
High mounted brake
lamp
LED
9
Brake lamp
P21W
a
Backup lamp
P21W
b
Turn signal lamp
PY 21 W
c
Side marker lamp
P21/4W
d
Tail, parking, standing
lamp, rear fog lamp
(only driver’s side)
P21/4W
e
License plate lamps
C5W
Warning!
G
Bulbs and bulb sockets can be very hot.
Allow the lamp to cool down before chang-
ing a bulb.
Keep bulbs out of reach of children.
Halogen lamps contain pressurized gas.
A bulb can explode if you:�
touch or move it when hot
�
drop the bulb
�
scratch the bulb
Wear eye and hand protection.
Because of high voltage in Xenon lamps, it is
dangerous to replace the bulb or repair the
lamp and its components. We recommend
that you have such work done by a qualified
technician.
Page 446 of 539
445 Practical hints
Replacing bulbs
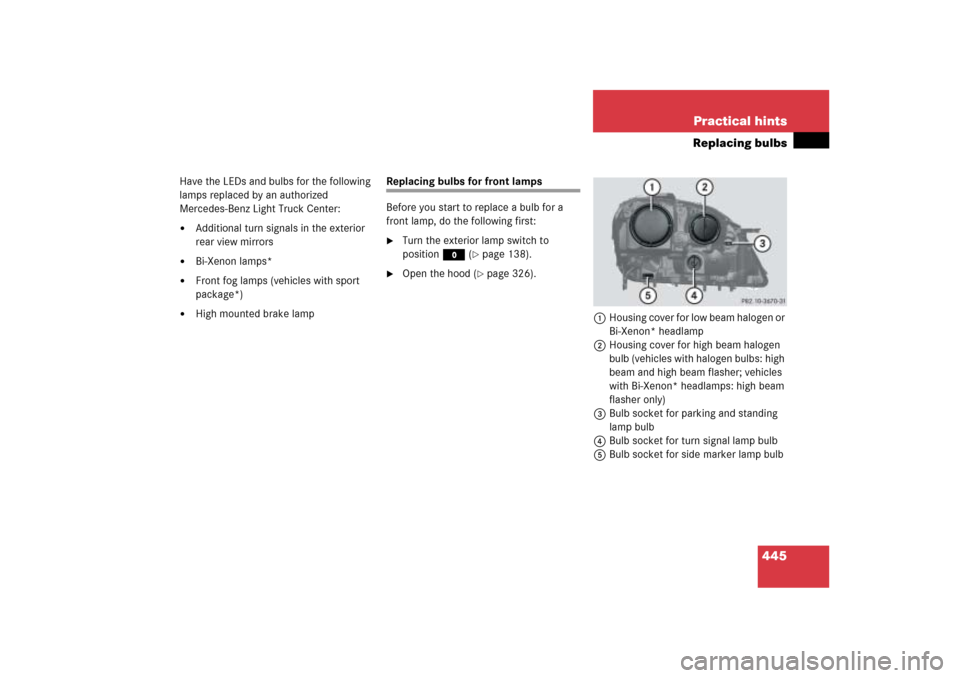
Have the LEDs and bulbs for the following
lamps replaced by an authorized
Mercedes-Benz Light Truck Center:�
Additional turn signals in the exterior
rear view mirrors
�
Bi-Xenon lamps*
�
Front fog lamps (vehicles with sport
package*)
�
High mounted brake lamp
Replacing bulbs for front lamps
Before you start to replace a bulb for a
front lamp, do the following first:�
Turn the exterior lamp switch to
positionM (
�page 138).
�
Open the hood (
�page 326).
1Housing cover for low beam halogen or
Bi-Xenon* headlamp
2Housing cover for high beam halogen
bulb (vehicles with halogen bulbs: high
beam and high beam flasher; vehicles
with Bi-Xenon* headlamps: high beam
flasher only)
3Bulb socket for parking and standing
lamp bulb
4Bulb socket for turn signal lamp bulb
5Bulb socket for side marker lamp bulb
Page 450 of 539
449 Practical hints
Replacing bulbs
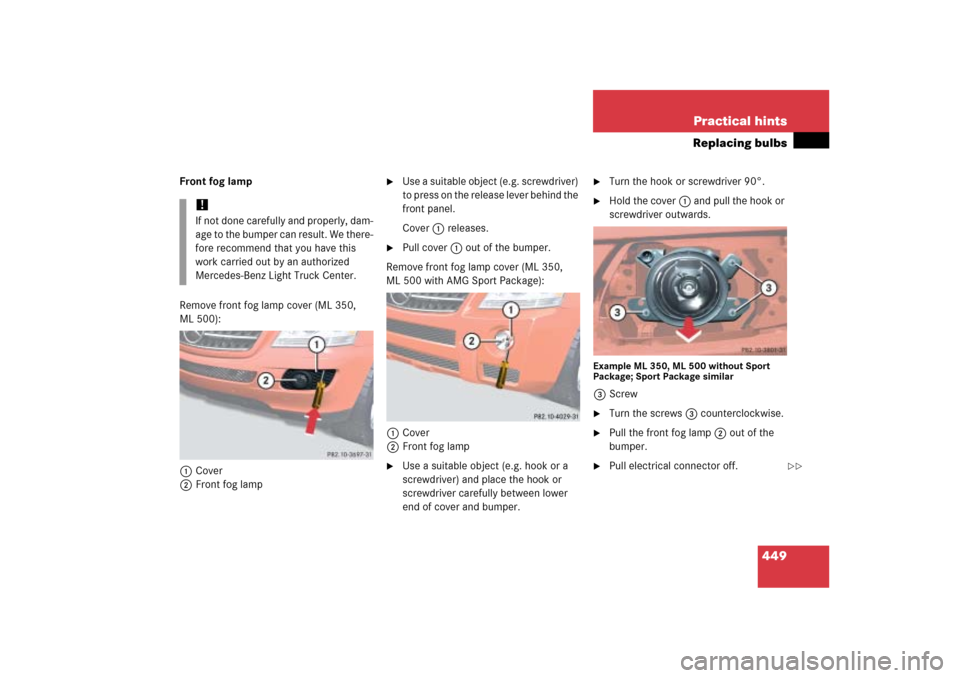
Front fog lamp
Remove front fog lamp cover (ML 350,
ML 500):
1Cover
2Front fog lamp
�
Use a suitable object (e.g. screwdriver)
to press on the release lever behind the
front panel.
Cover1 releases.
�
Pull cover1 out of the bumper.
Remove front fog lamp cover (ML 350,
ML 500 with AMG Sport Package):
1Cover
2Front fog lamp
�
Use a suitable object (e.g. hook or a
screwdriver) and place the hook or
screwdriver carefully between lower
end of cover and bumper.
�
Turn the hook or screwdriver 90°.
�
Hold the cover1 and pull the hook or
screwdriver outwards.
Example ML 350, ML 500 without Sport
Package; Sport Package similar3Screw�
Turn the screws3 counterclockwise.
�
Pull the front fog lamp2 out of the
bumper.
�
Pull electrical connector off.
!If not done carefully and properly, dam-
age to the bumper can result. We there-
fore recommend that you have this
work carried out by an authorized
Mercedes-Benz Light Truck Center.
��