Page 35 of 539

34 Getting startedUnlockingStarter switch positions SmartKey
Starter switch0For removing SmartKey
1Power supply for some electrical con-
sumers, such as seat adjustment
2Ignition (power supply for all electrical
consumers) and driving position
All lamps (except high beam headlamp
indicator lamp and turn signal indicator
lamps unless activated) in the instru-
ment cluster come on. If a lamp in the
instrument cluster fails to come on
when the ignition is switched on, have
it checked and replaced if necessary. If
a lamp in the instrument cluster re-mains on after starting the engine or
comes on while driving, refer to “Lamps
in instrument cluster” (
�page 382).
3Starting position
Warning!
G
When leaving the vehicle, always remove the
SmartKey or SmartKey with KEYLESS-GO*
from the starter switch, take it with you and
lock the vehicle. Do not leave children unat-
tended in the vehicle, or with access to an
unlocked vehicle. Unsupervised use of vehi-
cle equipment may cause an accident
and/or serious personal injury.
iWhen you switch on the ignition, the in-
dicator and warning lamps (except high
beam headlamp indicator lamp and
turn signal indicator lamps unless acti-
vated) in the instrument cluster come
on. The indicator and warning lamps
(except high beam headlamp indicator
lamp and turn signal indicator lamps if
activated) will go out when the engine
is running. This indicates that the
respective systems are operational.iWhen the SmartKey is removed from
the starter switch and the automatic
transmission is in a position other
thanP, the transmission automatically
shifts toP.
Page 36 of 539

35 Getting started
Unlocking
SmartKey with KEYLESS-GO*
Vehicles equipped with the KEYLESS-GO
feature are supplied with a SmartKey with
integrated KEYLESS-GO function and a
removable KEYLESS-GO start/stop
button.With the KEYLESS-GO start/stop button
inserted and the SmartKey with
KEYLESS-GO present in the vehicle, press-
ing the KEYLESS-GO start/stop button
�
without the brake pedal depressed cor-
responds to the various starter switch
positions (
�page 36)
�
with the brake pedal firmly depressed
will start the engine (
�page 49)
If you wish or should there be a need to
insert the SmartKey with KEYLESS-GO in
the starter switch, the start/stop button
can be easily removed by pulling it out of
the starter switch.
!If the SmartKey cannot be turned in the
starter switch, the battery may not be
sufficiently charged.�
Check the battery and charge it if
necessary (
�page 440).
�
Get a jump start (
�page 470).
To prevent accelerated battery dis-
charge or a completely discharged bat-
tery, always remove the SmartKey from
the starter switch when the engine is
not in operation.
iIf you firmly depress the brake pedal
while pressing the KEYLESS-GO
start/stop button, the engine starts
automatically.
iThe KEYLESS-GO start/stop button
does not need to be removed from the
starter switch when you leave the vehi-
cle. However, always take the
SmartKey with KEYLESS-GO with you
when you leave the vehicle. As long as
the SmartKey with KEYLESS-GO is in
your vehicle, the vehicle’s electrical
systems can be switched on or the
engine can be started using the
KEYLESS-GO start/stop button.Warning!
G
When leaving the vehicle, always take the
SmartKey with KEYLESS-GO with you and
lock the vehicle. Do not leave children unat-
tended in the vehicle, or with access to an
unlocked vehicle. Unsupervised use of vehi-
cle equipment may cause an accident
and/or serious personal injury.
Page 37 of 539

36 Getting startedUnlocking1KEYLESS-GO start/stop button
2Starter switchKEYLESS-GO start/stop button1USA only
2Canada onlyThe SmartKey with KEYLESS-GO must be
located in the vehicle.
�
Make sure the automatic transmission
is set toP.
�
Do not depress the brake pedal.
Position 0
Before you press the KEYLESS-GO
start/stop button, the vehicle’s on-board
electronics have status0 (as with
SmartKey removed).
Position 1
�
Press the KEYLESS-GO start/stop
button once.
This supplies power for some electrical
consumers, such as seat adjustment.Ignition (or Position 2)
�
Press the KEYLESS-GO start/stop
button twice.
All lamps in the instrument cluster
come on. If a lamp in the instrument
cluster fails to come on when the igni-
tion is switched on, have it checked
and replaced if necessary. If a lamp in
the instrument cluster remains on after
starting the engine or comes on while
driving, refer to “Lamps in instrument
cluster” (
�page 382).
iIf you now press the KEYLESS-GO
start/stop button�
once more, the ignition (position2)
is switched on
�
twice more, the power supply is
again switched off
Page 38 of 539
37 Getting started
Unlocking
For information on starting the engine
using the KEYLESS-GO start/stop button,
see “Starting with KEYLESS-GO*”
(�page 50).iIf you now press the KEYLESS-GO
start/stop button once more, the
power supply is again switched off.iWhen you switch on the ignition, the
indicator and warning lamps (except
high beam headlamp indicator lamp
and turn signal indicator lamps unless
activated) in the instrument cluster
come on. The indicator and warning
lamps (except high beam headlamp in-
dicator lamp and turn signal indicator
lamps if activated) should go out when
the engine is running. This indicates
that the respective systems are
operational.
Page 39 of 539

38 Getting startedAdjustingSeatsWarning!
G
All seat, head restraint, steering wheel, and
rear view mirror adjustments, as well as fas-
tening of seat belts, must be done before
the vehicle is put into motion.Warning!
G
Do not adjust the driver’s seat while driving.
Adjusting the seat while driving could cause
the driver to lose control of the vehicle.
Never ride in a moving vehicle with the seat
back in an excessively reclined position as
this can be dangerous. You could slide un-
der the seat belt in a collision. If you slide
under it, the belt would apply force at the ab-
domen or neck. That could cause serious or
fatal injuries. The seat backrest and seat
belts provide the best restraint when the
wearer is in a nearly upright position and
belts are properly positioned on the body.
Your seat must be adjusted so that you can
correctly fasten your seat belt (
�page 39).
Never place hands under the seat or near
any moving parts while a seat is being
adjusted.
Warning!
G
When leaving the vehicle, always remove the
SmartKey or SmartKey with KEYLESS-GO*
from the starter switch, take it with you, and
lock the vehicle.
Even with the SmartKey or the SmartKey
with KEYLESS-GO* removed from the
starter switch or the SmartKey with
KEYLESS-GO* removed from the vehicle,
the power seats can be operated when the
respective door is open.
Therefore, do not leave children unattended
in the vehicle, or with access to an unlocked
vehicle. Unsupervised use of vehicle equip-
ment may cause an accident and/or serious
personal injury.
Warning!
G
According to accident statistics, children
are safer when properly restrained in the
rear seating positions than in the front seat-
ing position. Thus, we strongly recommend
that children be placed in the rear seats
whenever possible. Regardless of seating
position, children 12 years old and under
must be seated and properly secured in an
appropriate infant, or toddler restraint, or
booster seat recommended for the size and
weight of the child. For additional
information, see “Children in the vehicle”
(�page 78).
A child’s risk of serious or fatal injuries is
significantly increased if the child restraints
are not properly secured in the vehicle
and/or the child is not properly secured in
the child restraint.
Page 40 of 539

39 Getting started
Adjusting
Seat adjustment
The seat adjustment switch is located on
the entry side of each front seat base.
1 Head restraint height*
2Seat cushion tilt
3Seat height
4Backrest tilt
5Seat fore and aft adjustment�
Switch on the ignition (
�page 34).
or
�
Open the respective door.Seat fore and aft adjustment
�
Press the switch forward or backward
in the direction of arrow5.
Adjust seat to a comfortable seating
position that still allows you to reach
the accelerator/brake pedal safely.
The position should be as far to the rear
as possible, consistent with ability to
properly operate controls.
Seat height
�
Press the switch up or down in the
direction of arrow3.
!When moving the seat, make sure
there are no items in the footwell or
behind the seat. Otherwise you could
damage the seat.
When the rear bench seat is folded for-
ward, the front seats cannot be moved
to the rearmost position. Otherwise
you could damage the front seats and
the rear bench seat.!When adjusting the backrest tilt and
head restraint height, make sure that
the sun visor is folded up. If the head
restraint is in the uppermost position, it
could hit and damage the sun visor.
iThe memory function* (
�page 135)
lets you store the setting for the seat
positions together with the setting for
the steering wheel and the exterior rear
view mirrors.
Page 41 of 539

40 Getting startedAdjustingSeat cushion tilt�
Press the switch up or down in the
direction of arrow2 until your upper
legs are lightly supported.
Seat backrest tilt
�
Press the switch forward or backward
in the direction of arrow4 until your
arms are slightly angled when holding
the steering wheel.Head restraint heightVehicles with memory function*:
�
Press switch1 (
�page 39) up or
down in the direction of arrow.
Vehicles without memory function*:
1Release button
Raising:
�
Manually adjust the height of the head
restraint by pulling it upward.
If the head restraint is fully retracted,
push release button1 in direction of
arrow and pull the head restraint up.
Warning!
G
For your protection, drive only with properly
positioned head restraints.
Adjust head restraint so that the center of
the head restraint supports the back of the
head at eye level. This will reduce the poten-
tial for injury to the head and neck in the
event of an accident or similar situation.
Do not drive the vehicle without the seat
head restraints. Head restraints are intend-
ed to help reduce injuries during an acci-
dent.iAdjust the head restraint in such a way
that it is as close to the head as possi-
ble.
Page 42 of 539
41 Getting started
Adjusting
Lowering:�
To lower the head restraint, push
release button1 in direction of arrow
and press down on the head restraint.
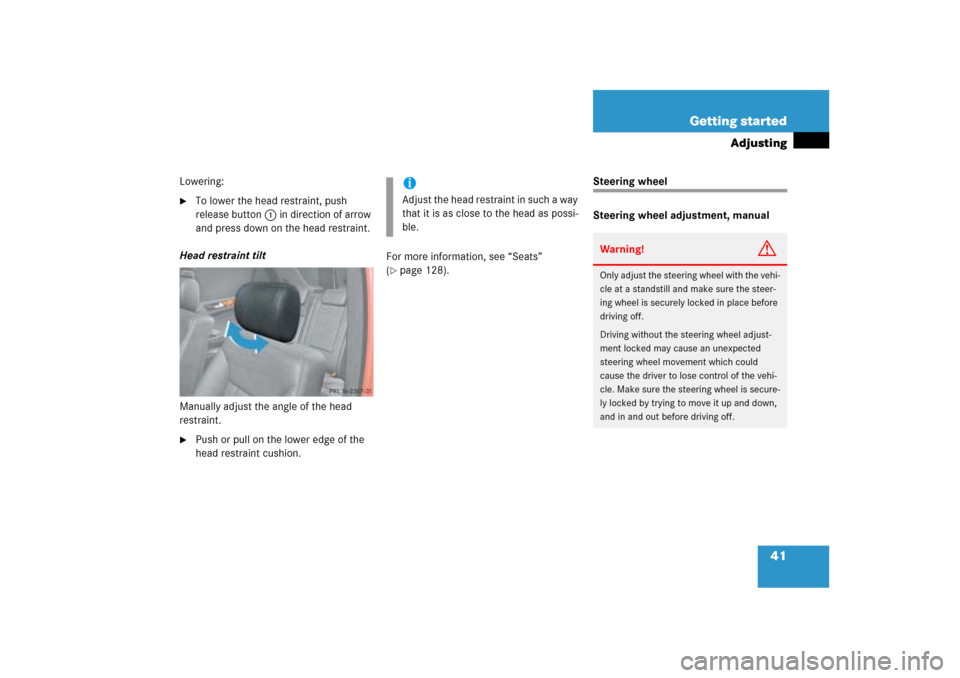
Head restraint tilt
Manually adjust the angle of the head
restraint.
�
Push or pull on the lower edge of the
head restraint cushion.For more information, see “Seats”
(
�page 128).
Steering wheel
Steering wheel adjustment, manual
iAdjust the head restraint in such a way
that it is as close to the head as possi-
ble.
Warning!
G
Only adjust the steering wheel with the vehi-
cle at a standstill and make sure the steer-
ing wheel is securely locked in place before
driving off.
Driving without the steering wheel adjust-
ment locked may cause an unexpected
steering wheel movement which could
cause the driver to lose control of the vehi-
cle. Make sure the steering wheel is secure-
ly locked by trying to move it up and down,
and in and out before driving off.