Page 8 of 417

Contents
Practical hints................................. 289
What to do if … .................................. 290
Lamps in instrument cluster ........ 290
Lamp in center console................ 297
Vehicle status messages in the
multifunction display .................... 298
Where will I find...? ............................ 323
First aid kit ................................... 323
Vehicle tool kit ............................. 323
Vehicle jack.................................. 324
CD changer .................................. 324
Spare wheel ................................. 325
Unlocking/locking in an emergency .. 327
Unlocking the vehicle ................... 327
Locking the vehicle ...................... 328
Fuel filler flap ............................... 328
Manually unlocking the
transmission gear selector lever .. 329Opening/closing in an emergency ..... 330
Tilt/sliding sunroof ....................... 330
Brush guard* ...................................... 331
Lowering and raising brush guard . 332
Replacing SmartKey batteries ............ 333
SmartKey ...................................... 334
Replacing bulbs .................................. 335
Bulbs ............................................. 336
Replacing bulbs for front lamps .... 338
Replacing bulbs for rear lamps ..... 343
Replacing wiper blades....................... 346
Removing wiper blades ................. 346
Installing wiper blades .................. 347
Flat tire ............................................... 348
Preparing the vehicle .................... 348
Mounting the spare wheel ............ 349
Battery................................................ 353
Charging the battery ..................... 353
Disconnecting the battery............. 354
Reconnecting the battery.............. 355Jump starting...................................... 356
Towing the vehicle.............................. 358
Transporting the vehicle ............... 360
Towing the vehicle - various
problem scenarios ........................ 360
Front towing eye ........................... 361
Rear towing eye ............................ 361
Freeing a stranded vehicle ............ 361
Fuses.................................................. 362
Fuse box in passenger
compartment ................................ 362
Fuse box in battery box ................ 362
Fuse box in front passenger
footwell ......................................... 363
Fuse box in middle tunnel ............. 364
Page 283 of 417

282 Operation
Maintenance
Resetting the maintenance service
indicator
In the event that the maintenance service
on your vehicle is not carried out by an au-
thorized Mercedes-Benz Light Truck
Center, you can have the maintenance ser-
vice indicator reset. The automotive main-
tenance facility carrying out the
maintenance service will find the informa-
tion for resetting the maintenance service
indicator in the maintenance-relevant in-
formation for your vehicle. Such informa-
tion is available from either your
authorized Mercedes-Benz Light Truck
Center or directly from Mercedes-Benz.i
If the battery is disconnected, the days
of disconnection will not be included in
the count shown by the maintenance
service indicator. To arrive at the true
maintenance service deadline, you will
need to subtract these days from the
days shown in the maintenance service
indicator.
Do not confuse the maintenance ser-
vice indicator with the engine oil level
indicator :.
i
If the maintenance service indicator
was inadvertently reset, have an autho-
rized Mercedes-Benz Light Truck
Center correct it.
Only reset if the proper maintenance
service has been performed. Resetting
the system without performing the
proper maintenance service as called
for by the maintenance service indica-
tor will result in engine damage and/or
other vehicle damage not covered by
the Mercedes-Benz Limited Warranty.
Page 286 of 417

285 Operation
Vehicle care
Engine cleaning
Prior to cleaning the engine compartment,
make sure to protect electrical compo-
nents and connectors from the intrusion of
water and cleaning agents.
Corrosion protection, such as
MB Anticorrosion Wax should be applied to
the engine compartment after every en-
gine cleaning. Before applying, all control
linkage bushings and joints should be lu-
bricated. The poly-V-belt and all pulleys
should be protected from any wax.Vehicle washing
Do not use hot water or wash your vehicle
in direct sunlight. Use only a mild car wash
detergent, such as Mercedes-Benz ap-
proved Car Shampoo.
Thoroughly spray the vehicle with a dif-
fused jet of water. Direct only a very weak
spray towards the ventilation intake. Use
plenty of water and rinse the sponge and
chamois frequently.
Rinse with clear water and thoroughly dry
with a chamois. Do not allow cleaning
agents to dry on the finish.
Due to the width of the vehicle, fold in ex-
terior rear view mirrors prior to running the
vehicle through an automatic car wash to
prevent damage to the mirrors.
In the winter, thoroughly remove all traces
of road salt as soon as possible.
When washing the underbody, do not for-
get to clean the inner sides of the wheels.Ornamental moldings
For regular cleaning and care of very dirty
chrome-plated parts, use a chrome
cleaner.
Headlamps, tail lamps, side marker,
turn signal lenses
�Use a mild car wash detergent, such as
Mercedes-Benz approved Car
Shampoo, with plenty of water.
To prevent scratches, never apply strong
force and use only a soft, non-scratchy
cloth when cleaning the lenses. Do not at-
tempt to wipe dirty lenses with a dry cloth
or sponge.
Page 290 of 417
289 Practical hints
What to do if …
Where will I find...?
Unlocking/locking in an emergency
Opening/closing in an emergency
Brush guard*
Replacing SmartKey batteries
Replacing bulbs
Replacing wiper blades
Flat tire
Battery
Jump starting
Towing the vehicle
Fuses
Page 324 of 417
323 Practical hints
Where will I find...?
�Where will I find...?
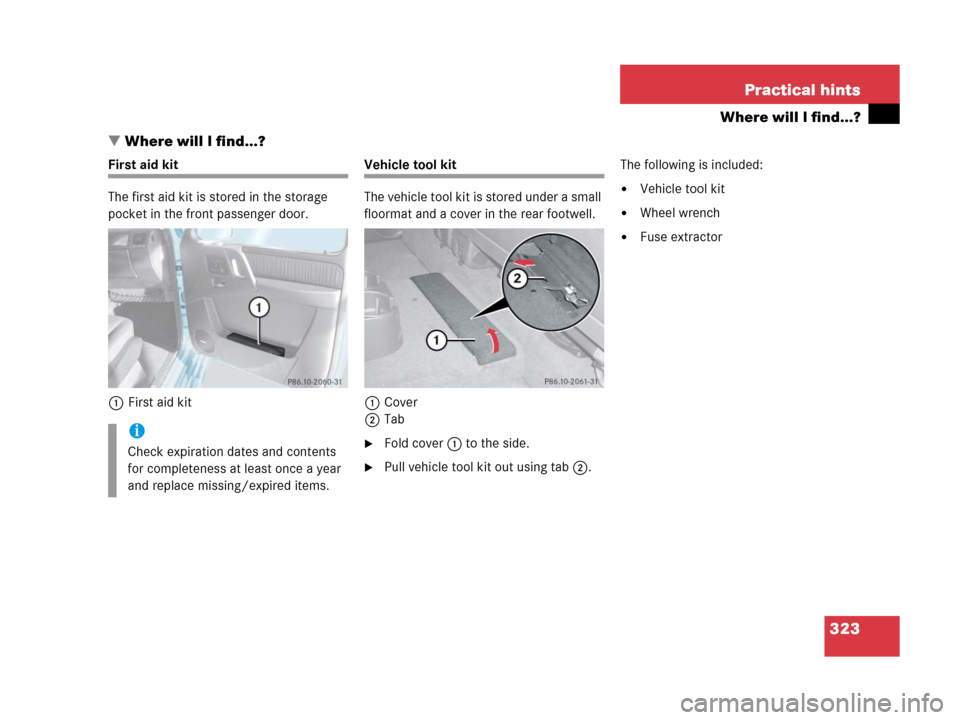
First aid kit
The first aid kit is stored in the storage
pocket in the front passenger door.
1First aid kitVehicle tool kit
The vehicle tool kit is stored under a small
floormat and a cover in the rear footwell.
1Cover
2Tab
�Fold cover1 to the side.
�Pull vehicle tool kit out using tab2.The following is included:
�Vehicle tool kit
�Wheel wrench
�Fuse extractor
i
Check expiration dates and contents
for completeness at least once a year
and replace missing/expired items.
Page 363 of 417
362 Practical hints
Fuses
The fuse box is located on the left side of
the cockpit in the passenger compart-
ment. It contains:
�Fuse chart
�Spare fuses
�Special spare extractor
Additional fuses are located in:
�Battery box
�Front passenger footwell under the
cockpit
�Middle tunnel
Fuse box in passenger compartment
Opening
1Cover
�Open the driver’s door.
�Remove cover1 in direction of ar-
rows.
Fuse box in battery box
The battery box is located under the cover
in the rear footwell.
Replacement of fuses can only be per-
formed by a Mercedes-Benz Light Truck
Center.i
Only install fuses that have been tested
and approved by Mercedes-Benz and
that have the specified amperage rat-
ing.
Never attempt to repair or bridge a
blown fuse. Have the cause determined
and remedied by an authorized
Mercedes-Benz Light Truck Center.
!
Do not use sharp objects such as a
screw driver to open fuse box cover1
in the dashboard, as this could damage
it.
Page 364 of 417
363 Practical hints
Fuses
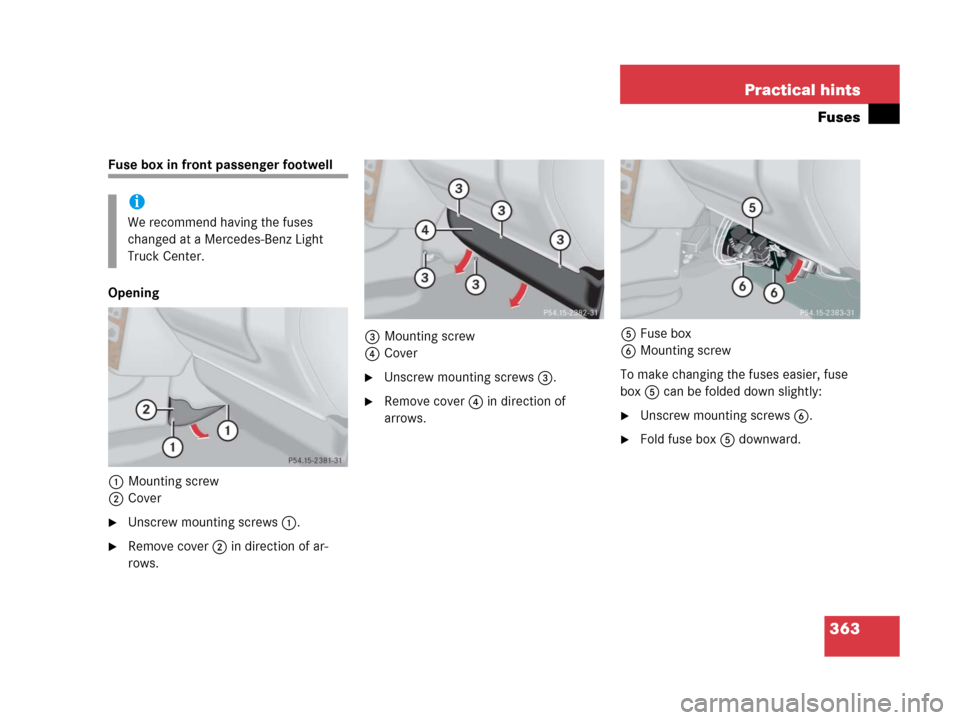
Fuse box in front passenger footwell
Opening
1Mounting screw
2Cover
�Unscrew mounting screws1.
�Remove cover2 in direction of ar-
rows.3Mounting screw
4Cover
�Unscrew mounting screws3.
�Remove cover4 in direction of
arrows.5Fuse box
6Mounting screw
To make changing the fuses easier, fuse
box5 can be folded down slightly:
�Unscrew mounting screws6.
�Fold fuse box5 downward.
i
We recommend having the fuses
changed at a Mercedes-Benz Light
Truck Center.
Page 365 of 417
364 Practical hints
Fuses
Fuse box in middle tunnel
Removing front end stops
Front end stop on the right seat rail, left
seat rail laterally reversed
1Front end stop
2Spacing
�Remove both front end stops1 of the
front passenger seat tracks with a
screwdriver.
�Move front passenger seat fully for-
ward.Opening fuse box
1Mounting screw
2Cover
�Unscrew mounting screws1.
�Remove cover2 in direction of
arrows.
i
We recommend having the fuses
changed at a Mercedes-Benz Light
Truck Center.
!
When reinstalling front passenger seat
track stops, place end stops in correct
position. For your safety, maintain
proper spacing2.
Warning!G
Do not drive the vehicle when the front end
stops are not correctly installed. Failure to
reinstall stops as indicated may result in se-
rious injury in certain frontal crashes.
Adjust the front passenger seat as far as
possible rearward from the dashboard when
the seat is occupied. Comply with informa-
tion on occupant safety (
�page 62).