Page 144 of 417

143 Controls in detail
Control system
Convenience submenu
Access the
CONVENIENCE submenu via the
SETTINGS menu. Use the CONVENIENCE sub-
menu to change the settings for a number
of convenience features. The following
functions are available:Activating easy-entry/exit feature
Use this function to activate and deacti-
vate the easy-entry/exit feature
(
�page 100).
�Move the selection marker with
theæ orç button to the
CONVENIENCE submenu.
�Press buttonj ork repeatedly
until you see this message in the dis-
play:
EASY-ENTRY FEATURE ACTIVATE.
The selection marker is on the current
setting.
�Pressæ orç to change the
easy-entry/exit setting.
The following settings are available for the
easy-entry/exit feature
FunctionPage
Activate easy-entry/exit feature143
Set key-dependency144
Set parking position for exterior
rear view mirror144
Warning!G
You must make sure no one can become
trapped or injured by the moving steering
wheel when the easy-entry/exit feature is
activated.
To cancel steering wheel movement, do one
of the following:
�Move steering column lever
(
�page 40).
�Press memory position switch
(
�page 108).
Do not leave children unattended in the ve-
hicle, or with access to an unlocked vehicle.
Children could open the driver’s door an un-
intentionally activate the easy-entry/exit
feature, which could result in an accident
and/or serious personal injury.
OFFThe easy-entry/exit
feature is deactivated
STEERING COLUMNThe easy-entry/exit
feature is activated
Page 145 of 417

144 Controls in detail
Control system
Setting key-dependency
Use this function to set whether the mem-
ory settings for the seats, the steering
wheel and the exterior mirrors should be
stored separately for each SmartKey
(
�page 107).
�Move the selection marker with
theæ orç button to the
CONVENIENCE submenu.
�Press buttonj ork repeatedly
until you see this message in the dis-
play:
SETTINGS KEY-DEPENDENT.
The selection marker is on the current
setting.
�Pressæ orç to set key depen-
dency to
ON or OFF. Setting parking position for exterior rear
view mirror
Use the
MIRROR SETTING WHEN PARKING
function to select whether the passen-
ger-side exterior rear view mirror should be
turned downward during parking maneu-
vers when reverse gear is engaged. For
more information, see “Activating exterior
rear view mirror parking position”
(
�page 164).
�Move the selection marker with
theæ orç button to the
CONVENIENCE submenu.
�Press buttonj ork repeatedly
until you see this message in the dis-
play:
MIRROR SETTING WHEN PARKING.
The selection marker is on the current
setting.
�Pressæ orç to switch function
ON or OFF.
i
For safety reasons, resetting the
SETTINGS KEY-DEPENDENT submenu to
factory settings will not reset while
driving.
In the display you will then see the mes-
sage:
CONVENIENCE – CANNOT BE
TOTALLY RESET TO FACTORY SETTINGS
WHILE DRIVING
.
Page 164 of 417
 and for
setting the exterior rear view mirrors, see
“Mirrors�")
163 Controls in detail
Good visibility
�Good visibility
For information on windshield wipers, see
“Windshield wipers” (
�page 53) and for
setting the exterior rear view mirrors, see
“Mirrors” (
�page 41).
Rear view mirrors
Auto-dimming mirrors
The reflection brightness of the exterior
rear view mirrors and the interior rear view
mirror will respond automatically to glare
when
�ignition is switched on, and
�incoming light from headlamps falls on
the sensor in the interior rear view
mirror
The interior rear view mirror will not react if
�reverse gear is engaged
�the interior lighting is turned on
Warning!G
The auto-dimming function does not react if
incoming light is not aimed directly at sen-
sors in the interior rear view mirror.
The interior rear view mirror and the exterior
rear view mirrors do not react, for example,
when transporting cargo which covers the
rear window.
Glare can endanger you and others.
Warning!G
In case of an accident, liquid electrolyte may
escape from the mirror housing if the mirror
glass breaks.
Electrolyte has an irritating effect. Do not al-
low the liquid to come into contact with
eyes, skin, clothing, or the respiratory sys-
tem. In case it does, immediately flush af-
fected area with water, and seek medical
help if necessary.
!
Electrolyte drops coming into contact
with the vehicle paint finish can be
completely removed only while in the
liquid state by applying plenty of water.
Page 165 of 417

164 Controls in detail
Good visibility
Activating exterior rear view mirror
parking position
Follow these steps to activate the mirror
parking position so that the passen-
ger-side exterior rear view mirror will be
turned downward to the stored position.
The buttons are located above the exterior
lamp switch.
1Driver’s side exterior rear view mirror
button
2Passenger-side exterior rear view
mirror button�Make sure you have stored a parking
position for the passenger-side exterior
rear view mirror (
�page 109).
�Make sure the MIRROR SETTING WHEN
PARKING
function in the CONVENIENCE
submenu of the control system is
switched to
ON (�page 144).
�Switch on the ignition (�page 35).
�Press button2 for the passenger-side
exterior rear view mirror.
�Place the gear selector lever in reverse
gear R.
The passenger-side exterior rear view
mirror will be turned downward to the
stored position.
Warning!G
Exercise care when using the passen-
ger-side exterior rear view mirror. The mirror
surface is convex (outwardly curved surface
for a wider field of view). Objects in mirror
are closer than they appear. Check your in-
side rear view mirror or glance over your
shoulder before changing lanes.
Page 166 of 417
165 Controls in detail
Good visibility
The exterior rear view mirror returns to its
previously stored driving position:
�ten seconds after you put the gear se-
lector lever out of position R
�immediately once you exceed a vehicle
speed of approx. 6 mph (10 km/h)
�immediately when you press button1
for driver’s side exterior rear view
mirror
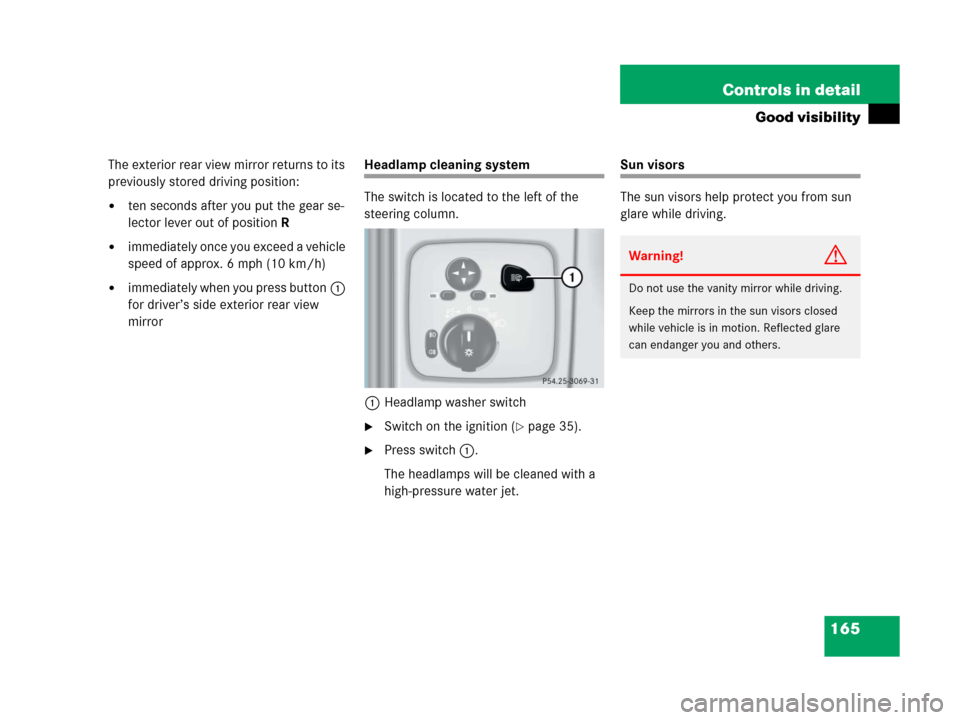
Headlamp cleaning system
The switch is located to the left of the
steering column.
1Headlamp washer switch
�Switch on the ignition (�page 35).
�Press switch1.
The headlamps will be cleaned with a
high-pressure water jet.
Sun visors
The sun visors help protect you from sun
glare while driving.
Warning!G
Do not use the vanity mirror while driving.
Keep the mirrors in the sun visors closed
while vehicle is in motion. Reflected glare
can endanger you and others.
Page 167 of 417
166 Controls in detail
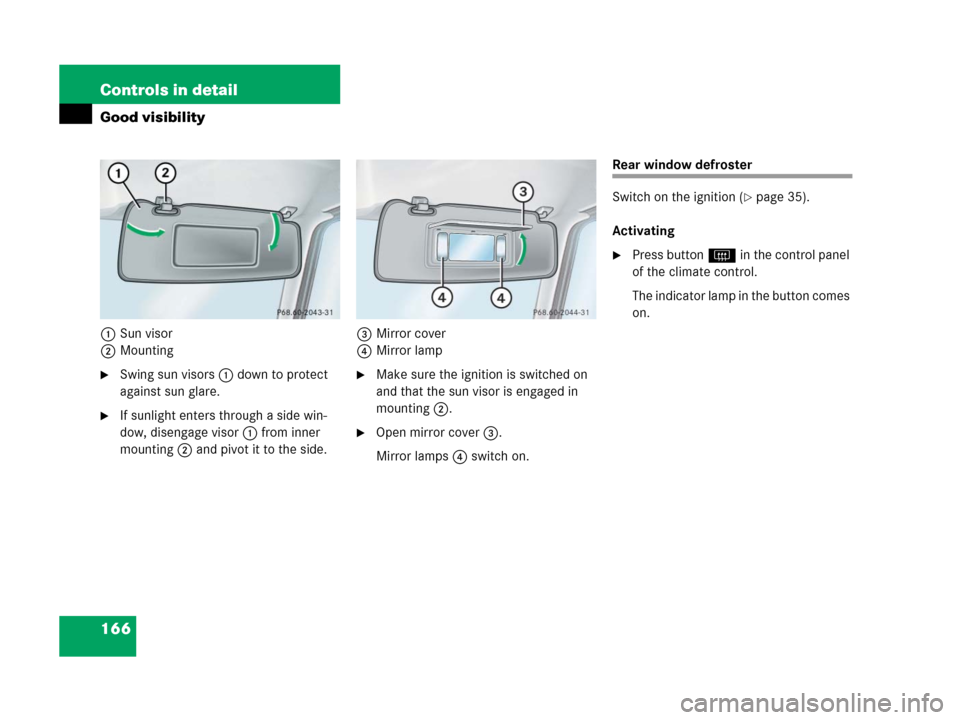
Good visibility
1Sun visor
2Mounting
�Swing sun visors1 down to protect
against sun glare.
�If sunlight enters through a side win-
dow, disengage visor1 from inner
mounting2 and pivot it to the side.3Mirror cover
4Mirror lamp
�Make sure the ignition is switched on
and that the sun visor is engaged in
mounting2.
�Open mirror cover3.
Mirror lamps4 switch on.
Rear window defroster
Switch on the ignition (
�page 35).
Activating
�Press button F in the control panel
of the climate control.
The indicator lamp in the button comes
on.
Page 204 of 417

203 Controls in detail
Useful features
Shortly after the completion of your ac-
quaintance call, you will receive a user ID
and password.
By visiting www.mbusa.com and selecting
“Tele Aid” (USA only), you will have access
to account information, remote door un-
lock, profile and more.System self-check
Initially, after switching on ignition, mal-
functions are detected and indicated (the
indicator lamps in the SOS button, the
Roadside Assistance button• and the
Information button¡ stay on longer
than 10 seconds or do not come on). The
message
TELE AID – DRIVE TO WORKSHOP!
appears for approx. ten seconds in the
multifunction display.
i
The SOS button is located above the in-
terior rear view mirror.
The Roadside Assistance button•
and the Information button¡ are
located below the center armrest
cover.
!
The Tele Aid system utilizes the cellular
network for communication and the
GPS (Global Positioning System) satel-
lites for vehicle location. If either of
these signals are unavailable, the
Tele Aid system may not function and if
this occurs, assistance must be sum-
moned by other means.
Warning!G
If the indicator lamps in the SOS button, in
the Roadside Assistance button and/or in
the Information button do not come on dur-
ing the system self-check or if any of these
indicators remain illuminated constantly in
red and/or the message
TELE AID -
DRIVE TO WORKSHOP
is displayed in the
multifunction display after the system
self-check, a malfunction in the system has
been detected.
If a malfunction is indicated as outlined
above, the system may not operate as ex-
pected. Have the system checked at the
nearest Mercedes-Benz Light Truck Center
as soon as possible.
Page 205 of 417

or airbags deploy
�if th")
204 Controls in detail
Useful features
Emergency calls
An emergency call is initiated
automatically:
�following an accident in which the
emergency tensioning devices (ETDs)
or airbags deploy
�if the anti-theft alarm or the tow-away
alarm stays on for more than
20 seconds. See anti-theft alarm sys-
tem (
�page 88) and tow-away alarm
(
�page 89)
An emergency call can also be initiated
manually by opening the cover next to the
interior rear view mirror labeled SOS, then
briefly pressing the button located under
the cover. See below for instructions on
initiating an emergency call manually.Once the emergency call is in progress, the
indicator lamp in the SOS button will begin
to flash. The message
EMERGENCY CALL –
CONNECTING CALL
appears in the multifunc-
tion display. When the connection is estab-
lished, the message
EMERGENCY CALL –
CALL CONNECTED
appears in the
multifunction display. All information rele-
vant to the emergency, such as the loca-
tion of the vehicle (determined by the GPS
satellite location system), vehicle model,
identification number and color are gener-
ated.
A voice connection between the Response
Center and the occupants of the vehicle
will be established automatically soon af-
ter the emergency call has been initiated.
When a voice connection is established the
audio system mutes and the message
TELE AID – EMERGENCY CALL ACTIVE ap-
pears in the multifunction display.The Response Center will attempt to deter-
mine more precisely the nature of the acci-
dent provided they can speak to an
occupant of the vehicle.
The Tele Aid system is available if:
�it has been activated and is operation-
al. Activation requires a subscription
for monitoring services, connection
and cellular air time
�the relevant cellular phone network
and GPS signals are available and pass
the information on to the Response
Center
i
Location of the vehicle on a map is only
possible if the vehicle is able to receive
signals from the GPS satellite network
and pass the information on to the
Response Center.