Page 300 of 417
299 Practical hints
What to do if …
On the pages that follow, you will find a
compilation of the most important warning
and malfunction messages that may ap-
pear in the multifunction display.
For your convenience the messages are
divided into two sections:
�Text messages (�page 300)
�Symbol messages (�page 304)
Warning!G
No messages will be displayed if either the
instrument cluster or the multifunction dis-
play is inoperative. Systems that have a sig-
nificant influence on handling performance
may not be functioning.
Contact your nearest authorized
Mercedes-Benz Light Truck Center.
i
Switching on ignition (�page 35),
causes all instrument cluster lamps
(except high beam headlamp indicator
lamp and turn signal indicator lamps
unless activated) as well as the multi-
function display to come on. Make sure
the lamps and multifunction display are
all in working order before starting your
journey.
Page 316 of 417

315 Practical hints
What to do if …
Display symbolDisplay messagePossible causePossible solution
. BRAKE LIGHT, R
CHECK LIGHT!
The right brake lamp is malfunctioning.�Visit an authorized Mercedes-Benz
Light Truck Center as soon as
possible.
FRONT FOGLIGHT, L
CHECK LIGHT!
The left front fog lamp is malfunctioning.�Replace the bulb as soon as possible.
FRONT FOGLIGHT, R
CHECK LIGHT!
The right front fog lamp is malfunctioning.�Replace the bulb as soon as possible.
FR. L. PARK. LAMP
CHECK LIGHT!
BACK-UP LIGHT ON!
The left parking lamps are malfunction-
ing. A backup bulb is being used.�Replace the bulb as soon as possible.
FR. R. PARK LAMP
CHECK LIGHT!
BACK-UP LIGHT ON!The right parking lamps are malfunction-
ing. A backup bulb is being used.�Replace the bulb as soon as possible.
HIGH BEAM, L
CHECK LIGHT!
The left high beam lamp is malfunction-
ing.�Replace the bulb as soon as possible.
HIGH BEAM, R
CHECK LIGHT!
The right high beam lamp is malfunction-
ing.�Replace the bulb as soon as possible.
Page 337 of 417
336 Practical hints
Replacing bulbs
Bulbs Front lamps Rear lamps
LampType
1Additional turn
signal lampLED
2Turn signal lamp1156 NA
3Side marker lampT 4 W
4High and low beamH4 60 (55 W)
Parking and
standing lampT 4 W
5Fog lampH3 (55 W)
LampType
6High mounted brake
lampLED
7Turn signal lampPY 21 W
Brake lampP 21 W
Tail, parking and
standing lampR 5 W
8Backup lampP 21 W
9License plate lampsC 5 W
aRear fog lampP 21 W
bSide marker lampT 4 W
Page 340 of 417
339 Practical hints
Replacing bulbs
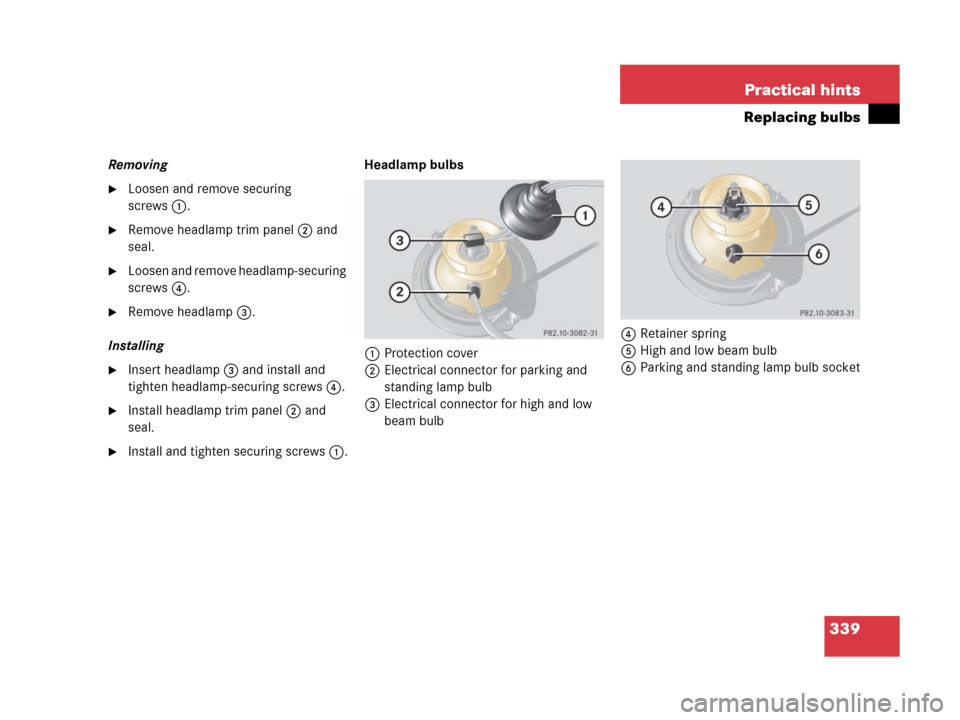
Removing
�Loosen and remove securing
screws1.
�Remove headlamp trim panel2 and
seal.
�Loosen and remove headlamp-securing
screws4.
�Remove headlamp3.
Installing
�Insert headlamp3 and install and
tighten headlamp-securing screws4.
�Install headlamp trim panel2 and
seal.
�Install and tighten securing screws1.Headlamp bulbs
1Protection cover
2Electrical connector for parking and
standing lamp bulb
3Electrical connector for high and low
beam bulb4Retainer spring
5High and low beam bulb
6Parking and standing lamp bulb socket
Page 341 of 417
340 Practical hints
Replacing bulbs
High and low beam bulb
�Remove protection cover1.
�Pull off electrical connector3.
�Unclip retainer spring4.
�Remove bulb5.
�Insert the new bulb so that its socket
locates in the recess of the lamp
housing.
�Clip on retainer spring4.
�Plug electrical connector3 onto
bulb5.
�Reinstall protection cover1.Parking and standing lamp bulb
�Pull off electrical connector2 from
bulb socket6.
�Turn bulb socket6 counterclockwise
out of the lamp housing.
�Insert a new bulb into bulb socket6.
�Insert bulb socket6 into the lamp
housing and turn clockwise until it
engages.
�Plug electrical connector2 onto bulb
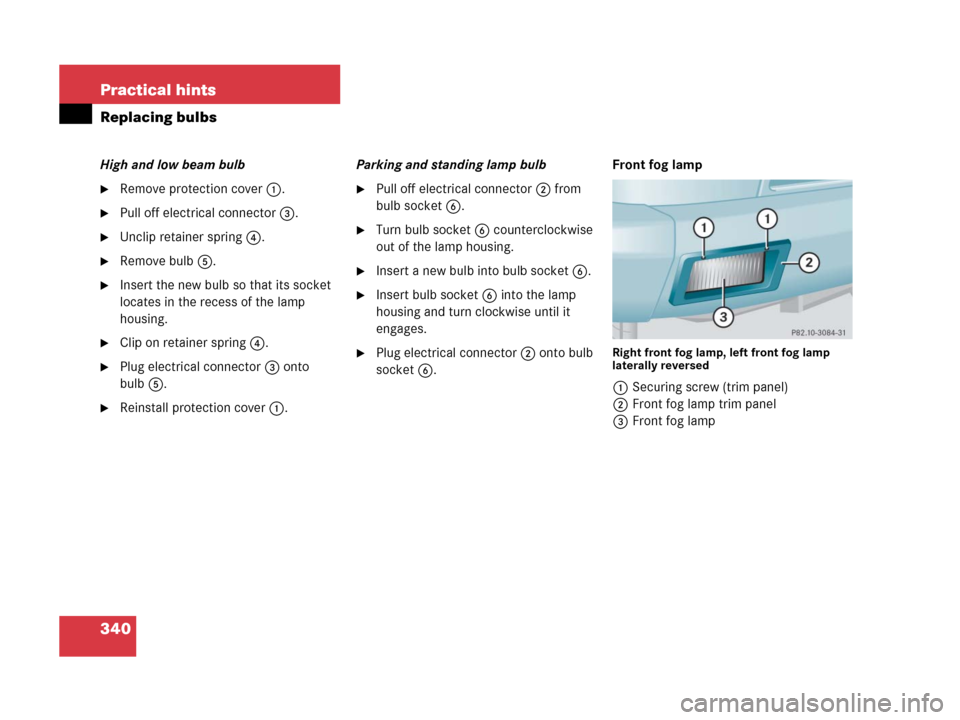
socket6.Front fog lampRight front fog lamp, left front fog lamp
laterally reversed
1Securing screw (trim panel)
2Front fog lamp trim panel
3Front fog lamp
Page 392 of 417
 279
Blocking rear door window operation 78
B-pillar")
391 Index
Battery, vehicle 251, 353
Charging 353
Disconnecting 354
Messages in display 304, 305
Reconnecting 355
Bead 273
Block heater (Canada only) 279
Blocking rear door window operation 78
B-pillar 368
Brake assist system (BAS) 383
Brake fluid 241, 378
Brake lamp bulbs, left and right 336
Brake lamp, high mounted 336
Brake pads
Message in display 305
Brakes 221
Warning lamp 292, 293
Break-in period 218
Brush guard* 331
Lowering 332
Raising and securing 332Bulbs, replacing
Additional turn signals 336
Backup lamps 336, 344
Brake lamps 336, 344
Front fog lamps 336, 340
Front lamps 335, 336
Front turn signal lamps 336, 342
High and low beam 338
High beam lamps 336
High mounted brake lamp 336
License plate lamps 336, 345
Low beam lamps 336
Parking lamps 336, 338
Rear fog lamp 336, 344
Rear turn signal lamps 336
Side marker lamps 336, 342
Standing lamps 336, 338
Tail lamp assemblies 336
Tail lamp unit 343C
CAC (Customer Assistance Center) 383
Call priority
Tele Aid 208
Calling up
Maintenance service indicator 281
Range (distance to empty) 146
CAN system 383
Capacities
Fuels, coolants, lubricants, etc. 376
Cargo area see Cargo compartment
Cargo compartment
Tailgate 97, 98
Tie-down rings 193
Cargo compartment cover 187
Installing 187
Removing 187
Cargo tie-down rings 193
Catalytic converter 236
CD changer 324
CD player
Operating 130
Page 394 of 417

393 Index
COMAND see separate operating instruc-
tions
Combination switch 23, 114
High beam flasher 52, 114
High beam headlamps 114
Turn signals 52
Windshield wipers 53
Control and operation of radio
transmitters 235
Control system 123, 384
AUDIO menu 128
Convenience submenu 143
Display digital speedometer 128
Functions 125, 127
Instrument cluster submenu 136
Lighting submenu 138
Menus 126, 127
Multifunction display 123
Multifunction steering wheel 124
NAVI menu 130
Satellite radio (USA only) 129
Selecting radio system 129Settings menu 132
Standard display menu 128
Submenus 125, 127
TEL menu 146
Trip computer menu 145
Vehicle status message memory
menu 131
Vehicle submenu 142
Convenience feature 177
Convenience submenu 143
Activating easy-entry/exit
feature 143
Setting key-dependency 144
Setting parking position for exterior
rear view mirror 144
Coolant 248, 380
Adding 249
Anticorrosion/antifreeze
quantity 380
Capacities 376
Checking level 248
Messages in display 307, 308, 309
Temperature 238
Temperature display 120
Warning lamp 307Coolant level
Checking 241, 248
Crossing obstacles 232
Cruise control 181, 384
Canceling 182
Driving downhill 182
Driving uphill 182
Fine adjustment 183
Messages in display 310
Setting current speed 182
Setting speed 183
Cruise control lever 181
Cup holder
In rear passenger footwell 197
Cup holders 196
Cleaning 287
In front passenger footwell 197
In glove box lid 196
Next to the armrest 196
Curb weight 273
Customer Assistance Center (CAC) 383
Page 399 of 417

398 Index
High beam flasher 52, 114
High beam headlamps
Messages in display 315
Replacing bulbs 336, 338
Switching on 114
High mounted brake lamp 336
Hood 242
Closing 243
Messages in display 313
Opening 242
Hydroplaning 224
I
Identification labels 368
Certification label 368
Vehicle identification number
(VIN) 368
Ignition
Switching on 49
Ignition (Position in starter switch) 35
Immobilizer 88
Activating 88
Deactivating 88
Infant and child restraint systems 72
Installing 76
LATCH child seat anchors 77Information
Button for Tele Aid 207
Inside rear view mirror
Auto-dimming 163
Installing
Cargo compartment cover 187
Infant and child restraint systems 76
Wiper blades 347
Instructions
Loading 192
Instrument cluster 24, 120, 385
Cleaning 287
Coolant temperature display 120
Illumination 120
Lamps in 296
Multifunction display 123
Outside temperature indicator 122
Selecting language 137
Instrument lighting 120
Instruments and controls see Cockpit
Interior lighting 116
Delayed shut-off 141
Manual operation 117
Interior rear view mirror
Adjusting 41
Intermittent wiping 54Interval wiping 55
Switching off 55
Switching on 55
J
Jack 324
Jump starting 356
K
Key, mechanical 327
Key, SmartKey
Battery check lamp 94
Checking the batteries 95
Factory setting 94
Global locking 94
Global unlocking 94
Loss of 96
Positions in starter switch 35
Remote controls 92
Restoring to factory setting 95
Selective setting 94
Starting the engine 49
Unlocking with 34
Key-dependency memory
Settings 144
Keys 92
Kickdown 385


Parking and")