Page 329 of 417

328 Practical hints
Unlocking/locking in an emergency
�Press lock cylinder2 and pull on tail-
gate handle3.
�Open the tailgate to the side.
Locking the vehicle
If you cannot lock the vehicle with the
SmartKey, lock it with the mechanical key
as follows:
�Close the passenger door, the rear
doors and the tailgate.
�Press the central locking switch in the
center console (
�page 99).
�Check to see whether the locking
knobs on the doors have moved down.
�If necessary, push them down manual-
ly.
�Slide the mechanical key2 out of the
SmartKey.
�Lock the driver’s door with the me-
chanical key.
�Check if the tailgate is locked. If neces-
sary lock the tailgate with the mechan-
ical key.
Fuel filler flap
The emergency release is in the cargo
compartment behind the rear panel trim.
1Edge protection
2Rear panel trim
�Open the tailgate.
�Remove edge protection1 from the
door pillar.
�Remove rear panel trim2.
Warning!G
The tailgate swings open to one side. Always
make sure there is sufficient clearance for
tailgate.
i
Unlocking your vehicle with the me-
chanical key will trigger the anti-theft
alarm system. To cancel the alarm, do
one of the following:
�Press button Œ or ‹ on the
SmartKey.
�Insert the SmartKey in the starter
switch.
��
Page 332 of 417
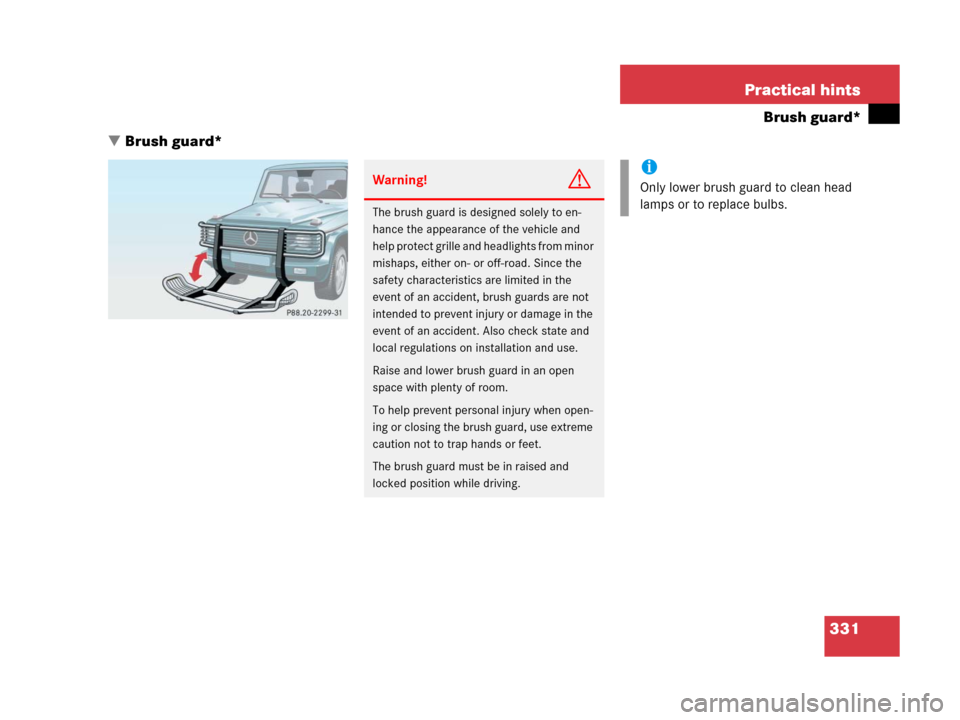
331 Practical hints
Brush guard*
�Brush guard*
Warning!G
The brush guard is designed solely to en-
hance the appearance of the vehicle and
help protect grille and headlights from minor
mishaps, either on- or off-road. Since the
safety characteristics are limited in the
event of an accident, brush guards are not
intended to prevent injury or damage in the
event of an accident. Also check state and
local regulations on installation and use.
Raise and lower brush guard in an open
space with plenty of room.
To help prevent personal injury when open-
ing or closing the brush guard, use extreme
caution not to trap hands or feet.
The brush guard must be in raised and
locked position while driving.
i
Only lower brush guard to clean head
lamps or to replace bulbs.
Page 334 of 417
333 Practical hints
Replacing SmartKey batteries
�Replacing SmartKey batteries
If the batteries in the SmartKey are dis-
charged, the vehicle can no longer be
locked or unlocked. It is recommended to
have the batteries replaced at an autho-
rized Mercedes-Benz Light Truck Center.Batteries contain materials that can harm
the environment if disposed of improperly.
Recycling of batteries is the preferred
method of disposal. Many states require
sellers of batteries to accept old batteries
for recycling.
Warning!G
Keep the batteries out of reach of children.
If a battery is swallowed, seek medical help
immediately.
i
When inserting the batteries, make
sure they are clean and free of lint.
i
When replacing batteries, always re-
place both batteries.
The required replacement batteries are
available at any Mercedes-Benz Light
Truck Center.
Page 338 of 417

337 Practical hints
Replacing bulbs
Notes on bulb replacement
�Use only 12 volt bulbs of the same type
and with the specified watt rating.
�Switch lights off before changing a bulb
to prevent short circuits.
�Always use a clean lint-free cloth when
handling bulbs.
�Your hands should be dry and free of oil
and grease.
�If the newly installed bulb does not
come on, visit an authorized
Mercedes-Benz Light Truck Center.
Have the LEDs for the following lamps re-
placed by an authorized Mercedes-Benz
Light Truck Center.
�Additional turn signals in the exterior
rear view mirrors
�High mounted brake lamp
�Lamps in the exterior rear view mirrors
Warning!G
Bulbs and bulb sockets can be very hot. Al-
low the lamp to cool down before changing
a bulb.
Keep bulbs out of reach of children.
Halogen lamps contain pressurized gas.
A bulb can explode if you:
�touch or move it when hot
�drop the bulb
�scratch the bulb
Wear eye and hand protection.
i
Have the headlamp adjustment
checked regularly by a Mercedes-Benz
Light Truck Center.
Do not turn the headlamp adjusting
screws. If the adjusting screws are
turned, the headlamp adjustment must
be checked by a Mercedes-Benz Light
Truck Center.
Page 347 of 417
346 Practical hints
Replacing wiper blades
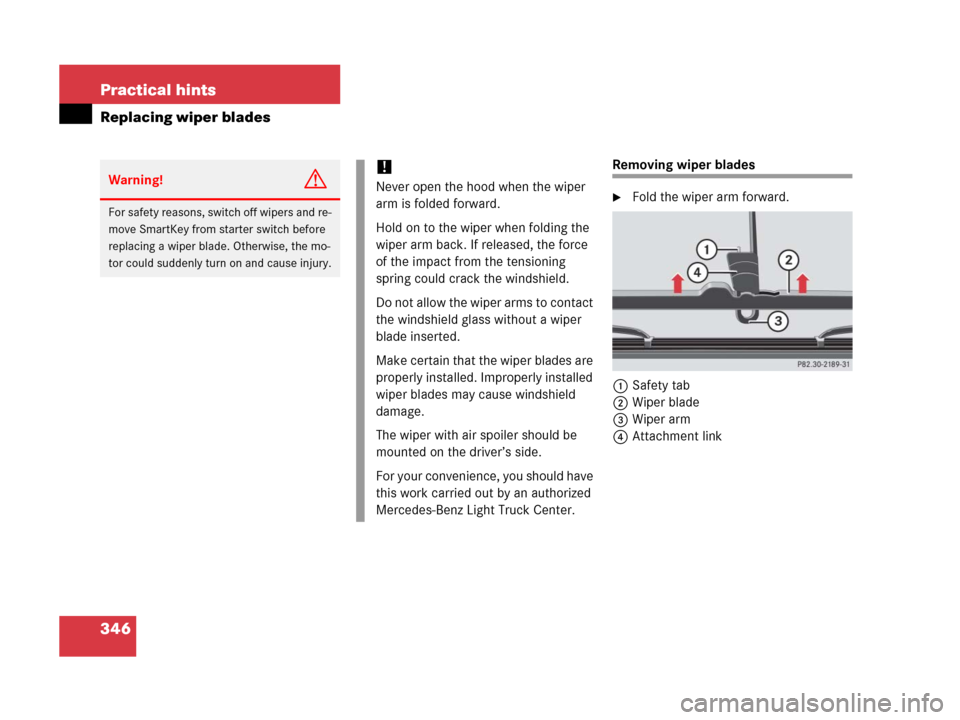
Removing wiper blades
�Fold the wiper arm forward.
1Safety tab
2Wiper blade
3Wiper arm
4Attachment link
Warning!G
For safety reasons, switch off wipers and re-
move SmartKey from starter switch before
replacing a wiper blade. Otherwise, the mo-
tor could suddenly turn on and cause injury.
!
Never open the hood when the wiper
arm is folded forward.
Hold on to the wiper when folding the
wiper arm back. If released, the force
of the impact from the tensioning
spring could crack the windshield.
Do not allow the wiper arms to contact
the windshield glass without a wiper
blade inserted.
Make certain that the wiper blades are
properly installed. Improperly installed
wiper blades may cause windshield
damage.
The wiper with air spoiler should be
mounted on the driver’s side.
For your convenience, you should have
this work carried out by an authorized
Mercedes-Benz Light Truck Center.
Page 349 of 417

348 Practical hints
Flat tire
Preparing the vehicle
�Park the vehicle as far as possible from
moving traffic on a hard surface.
�Turn on the hazard warning flashers.
�Turn the steering wheel so that the
front wheels are in a straight ahead
position.
�Set the parking brake (�page 57).
�Move the gear selector lever toP.
�Turn off the engine (�page 58).
�Have any passenger exit the vehicle at
a safe distance from the roadway.
�Remove the vehicle tool kit
(
�page 323) and the jack
(
�page 324).
�Remove the spare wheel from the
spare wheel mounting bracket
(
�page 325).Information on spare wheel
When you replace the vehicle’s tires, you
can use the spare wheel as a regular wheel
if:
�it is not more than six years old
�rim and tire are the same model as the
regular wheels
Warning!G
For your safety, remove spare wheel from
the spare wheel mounting bracket before
undertaking any further steps.
Warning!G
If the spare tire is more than six years old or
is not the same model as the regular tires,
have the spare tire replaced with a new tire
at the nearest Mercedes-Benz Light Truck
Center.
Never operate the vehicle with more than
one spare tire.
Warning!G
G55AMG:
Vehicles with different tire dimensions on
the front and rear axle: rim and tire size of
spare wheel and normal wheel differ.
Handling will be adversely affected when the
spare wheel is used.
Do not exceed the maximum speed of
50 mph (80 km/h).
Page 350 of 417
.
Lifting the vehicle
�Prevent the vehicle from rolling away
by blocking wheels with wheel chocks
(not included")
349 Practical hints
Flat tire
Mounting the spare wheel
�Prepare the vehicle (�page 348).
Lifting the vehicle
�Prevent the vehicle from rolling away
by blocking wheels with wheel chocks
(not included) or other sizable objects.
When changing wheel on a level surface:
�Place one chock in front of and one be-
hind the wheel that is diagonally oppo-
site to the wheel being changed.
Always try lifting the vehicle using the jack
on a level surface. However, should cir-
cumstances require you to do so on a hill,
place the wheel chocks as follows:
�Place chocks on the downhill side
blocking both wheels of the axle not
being worked on.
Wheel wrench
�On wheel to be changed, loosen but do
not yet remove the wheel bolts (ap-
proximately one full turn with wrench).
Warning!G
The jack is designed exclusively for jacking
up the vehicle under the axle housing. To
help avoid personal injury, use the jack only
to lift the vehicle during a wheel change.
Never get beneath the vehicle while it is sup-
ported by the jack. Keep hands and feet
away from the area under the lifted vehicle.
Always firmly set parking brake and block
wheels before raising vehicle with jack.
Do not disengage parking brake while the
vehicle is raised. Be certain that the jack is
always vertical (plumb line) when in use, es-
pecially on hills. Always try to use the jack
on level surface. Make sure the jack is posi-
tioned correctly under the axle housing. Al-
ways lower the vehicle onto sufficient
capacity jackstands before working under
the vehicle.
If the vehicle is not raised as described, it
could slip off the jack as a result of vibra-
tions (e.g. opening or closing a door or the
tailgate).
Page 351 of 417
350 Practical hints
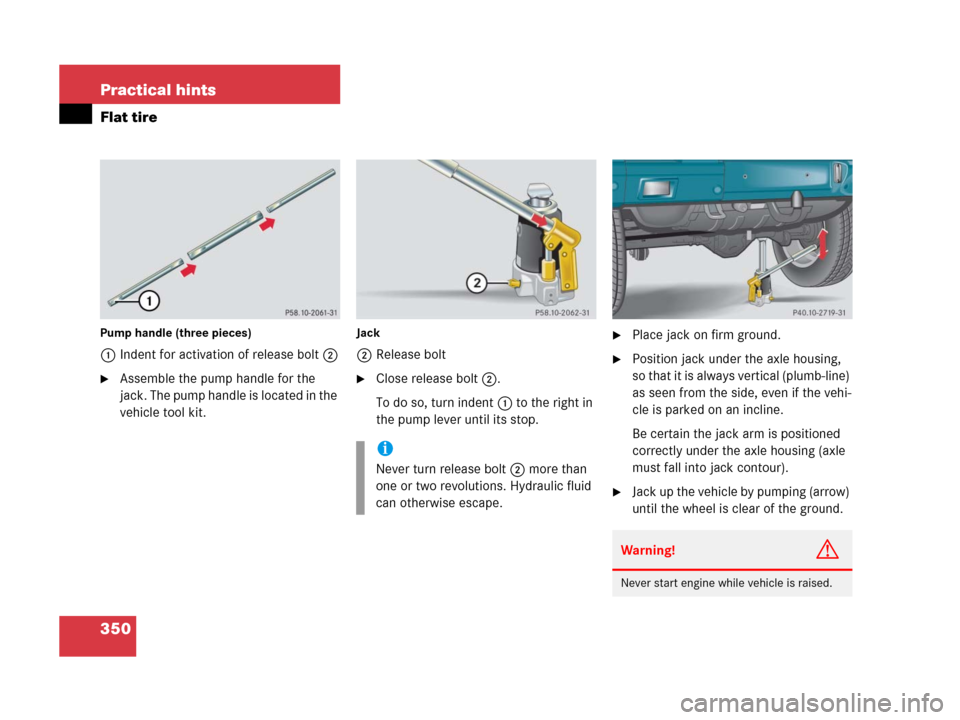
Flat tire
Pump handle (three pieces)
1Indent for activation of release bolt2
�Assemble the pump handle for the
jack. The pump handle is located in the
vehicle tool kit.
Jack
2Release bolt
�Close release bolt2.
To do so, turn indent1 to the right in
the pump lever until its stop.
�Place jack on firm ground.
�Position jack under the axle housing,
so that it is always vertical (plumb-line)
as seen from the side, even if the vehi-
cle is parked on an incline.
Be certain the jack arm is positioned
correctly under the axle housing (axle
must fall into jack contour).
�Jack up the vehicle by pumping (arrow)
until the wheel is clear of the ground.
i
Never turn release bolt2 more than
one or two revolutions. Hydraulic fluid
can otherwise escape.
Warning!G
Never start engine while vehicle is raised.