Page 285 of 521

284 Controls in detailUseful featuresSwitching off�
Turn switch at the tip of stalk in direc-
tion of arrow2.
The heated steering wheel is switched
off. Indicator lamp1 goes out.
For information on steering wheel, see
“Multifunction steering wheel”
(
�page 154).
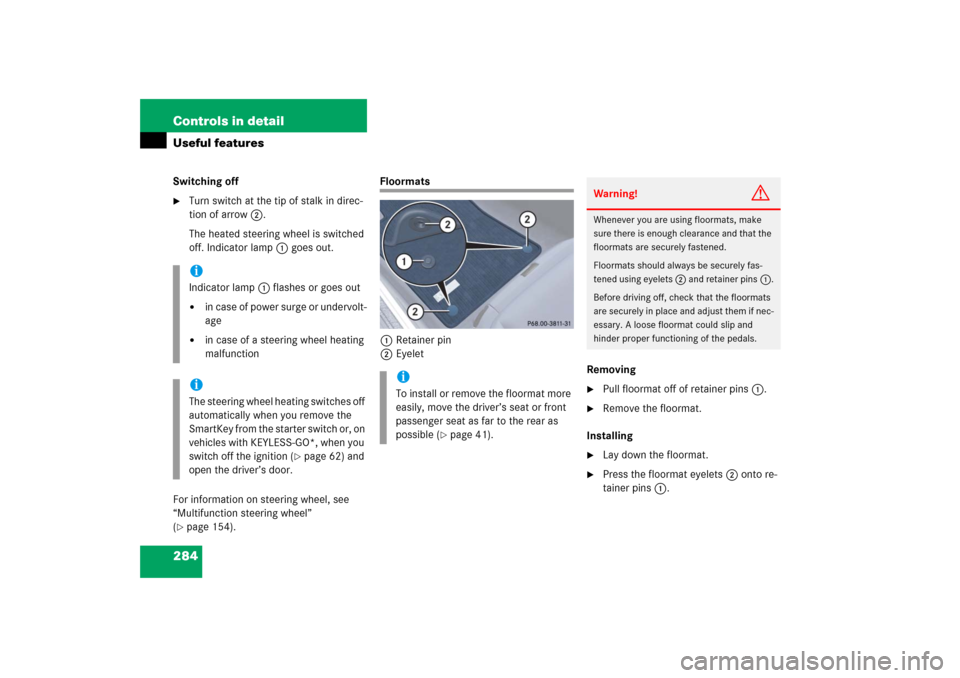
Floormats
1Retainer pin
2Eyelet
Removing
�
Pull floormat off of retainer pins1.
�
Remove the floormat.
Installing
�
Lay down the floormat.
�
Press the floormat eyelets2 onto re-
tainer pins1.
iIndicator lamp1 flashes or goes out�
in case of power surge or undervolt-
age
�
in case of a steering wheel heating
malfunction
iThe steering wheel heating switches off
automatically when you remove the
SmartKey from the starter switch or, on
vehicles with KEYLESS-GO*, when you
switch off the ignition (
�page 62) and
open the driver’s door.
iTo install or remove the floormat more
easily, move the driver’s seat or front
passenger seat as far to the rear as
possible (
�page 41).
Warning!
G
Whenever you are using floormats, make
sure there is enough clearance and that the
floormats are securely fastened.
Floormats should always be securely fas-
tened using eyelets 2 and retainer pins1.
Before driving off, check that the floormats
are securely in place and adjust them if nec-
essary. A loose floormat could slip and
hinder proper functioning of the pedals.
Page 334 of 521

333 Operation
Tires and wheels
The placard showing the load limit informa-
tion is located on the driver’s door B-pillar.
If your vehicle is equipped with the Tire and
Loading Information placard (Example A),
locate the statement “The combined
weight of occupants and cargo should
never exceed XXX kilograms or XXX lbs.”
on this placard. The combined weight of all
occupants, cargo/luggage and trailer
tongue load (if applicable) should never
exceed the weight referenced in that
statement.
Placard (Example B)
1Load limit information on the Vehicle
Tire Information placardThe placard showing the load limit informa-
tion is located on the driver’s door B-pillar.
If your vehicle is equipped with the Vehicle
Tire Information placard (Example B),
locate the heading “Vehicle Capacity
Weight” on this placard. The combined
weight of all occupants, cargo/luggage
and trailer tongue (if applicable) should
never exceed the weight listed next to
vehicle capacity weight.
Seating capacity
The seating capacity gives you important
information on the number of occupants
that can be in the vehicle. Observe front
and rear seating capacity. Your vehicle is
equipped with either placard Example A or
placard Example B located on the driver’s
door B-pillar (
�page 332).
Placard (Example A)1Seating capacity
iData shown on placard examples are
for illustration purposes only. Seating
data are specific to each vehicle and
may vary from data shown in the illus-
trations below. Refer to placard on ve-
hicle for actual data specific to your
vehicle.
Page 336 of 521
335 Operation
Tires and wheels
The higher the weight of all occupants, the
less cargo and luggage load capacity is
available.
For more information, see “Trailer tongue
load” (
�page 336).
Example
Combined
weight limit
of occu-
pants and
cargo from
placard
Number of
occupants
(driver and
passengers)
Seating
configura-
tion
Occupants weight
Combined
weight of all
occupants
Available cargo/luggage and trailer
tongue weight (total load limit or
vehicle capacity weight from plac-
ard minus combined weight of all
occupants)
1
1500 lbs
5
front: 2
rear: 3
Occupant 1: 150 lbs
Occupant 2: 180 lbs
Occupant 3: 160 lbs
Occupant 4: 140 lbs
Occupant 5: 120 lbs
750 lbs
1500 lbs - 750 lbs = 750 lbs
2
1500 lbs
3
front: 1
rear: 2
Occupant 1: 200 lbs
Occupant 2: 190 lbs
Occupant 3: 150 lbs
540 lbs
1500 lbs - 540 lbs = 960 lbs
3
1500 lbs
1
front:1
Occupant 1: 150 lbs
150 lbs
1500 lbs - 150 lbs = 1350 lbs
Page 357 of 521

356 OperationTires and wheelsTire speed rating
Part of tire designation; indicates the
speed range for which a tire is approved.
Traction
Force exerted by the vehicle on the road
via the tires. The amount of grip provided.
Tread
The portion of a tire that comes into
contact with the road.
Treadwear indicators
Narrow bands, sometimes called
“wear bars” that show across the tread of
a tire when only
1/16
in (1.6 mm) of tread
remains.Uniform Tire Quality Grading Standards
A tire information system that provides
consumers with ratings for a tire’s traction,
temperature and treadwear. Ratings are
determined by tire manufacturers using
government testing procedures. The
ratings are molded into the sidewall of the
tire.
Vehicle capacity weight
Rated cargo and luggage load plus
68 kilograms (150 lbs) times the vehicle’s
designated seating capacity.
Vehicle maximum load on the tire
Load on an individual tire that is
determined by distributing to each axle its
share of the maximum loaded vehicle
weight and dividing it by two.
Rotating tires
Tire rotation can be performed on vehicles
with tires of the same dimension all
around. If your vehicle is equipped with
tires of the same dimension all around,
tires can be rotated, observing a
front-to-rear rotation pattern that will
maintain the intended rotation (spinning)
direction of the tire (
�page 331).
In some cases, such as when your vehicle
is equipped with mixed-size tires (different
tire dimension front vs. rear), tire rotation
is not possible.
Warning!
G
Rotate front and rear wheels only if the tires
are of the same dimension.
If your vehicle is equipped with mixed-size
tires (different tire dimensions front vs.
rear), tire rotation is not possible.
Page 372 of 521

371 Operation
Vehicle care
Hard plastic trim items�
Use Pour Mercedes-Benz approved
Interior Care, a soft, lint-free cloth and
apply with light pressure onto.
Steering wheel and gear selector lever
�
Wipe with a damp cloth and dry thor-
oughly or clean with Mercedes-Benz
approved Leather Care.
Carpets
�
Use Mercedes-Benz approved Carpet
and Fabric Care for cleaning the car-
pets.
Headliner and shelf below rear window
�
Use a soft bristle brush or a dry-sham-
poo cleaner in case of excessive dirt. Seat belts
�
Only use clear, lukewarm water and
soap.Upholstery
Using aftermarket seat covers or wearing
clothing that have the tendency to give off
coloring (e.g. when wet, etc.) may cause
the upholstery to become permanently dis-
colored. By lining the seats with a proper
intermediate cover, contact-discoloration
will be prevented.
Leather upholstery
�
Wipe leather upholstery with a damp
cloth and dry thoroughly or clean with
Mercedes-Benz approved Leather
Care.
Exercise particular care when cleaning per-
forated leather as its underside should not
become wet.
!To prevent scratches, do not use scour-
ing agents.
!The webbing must not be treated with
chemical cleaning agents. Do not dry
the webbing at temperatures above
176°F (80°C) or in direct sunlight.Warning!
G
Do not bleach or dye seat belts as this may
severely weaken them. In a crash they may
not be able to provide adequate protection.
Page 394 of 521

393 Practical hints
What to do if …
Display messages
Possible cause/conse-
quence
Possible solution
Front passenger
airbag
activated
See Operator’s Manual
Front passenger front air bag is
activated while driving even
though a child, small individual,
or object below the system’s
weight threshold is on the front
passenger seat, or the front
passenger seat is empty. Ob-
jects on the seat or forces act-
ing on the seat may make the
system sense supplemental
weight.
Stop the vehicle in a safe location as soon as possible and check the
front passenger seat for the following:�
Switch off the ignition (
�page 36).
�
Open the front passenger door.
�
Remove child and child restraint from front passenger seat and
properly secure the child in rear seat employing the child restraint
if necessary.
�
Remove any other items from on and around the front passenger
seat and make sure the storage pocket on the back of the front pas-
senger seat is empty.
�
Make sure that no objects which apply forces to the seat are
present (e.g. objects such as books, briefcases etc. lodged behind
or around the seat, head restraints pushing against roof etc.). The
system may recognize such forces as supplemental weight and
sense that an occupant on the front passenger seat is of a greater
weight than actually present.
�
Keep the seat unoccupied, close the front passenger door and turn
on the ignition (
�page 36).
(Continued on next page)
Page 400 of 521

399 Practical hints
What to do if …
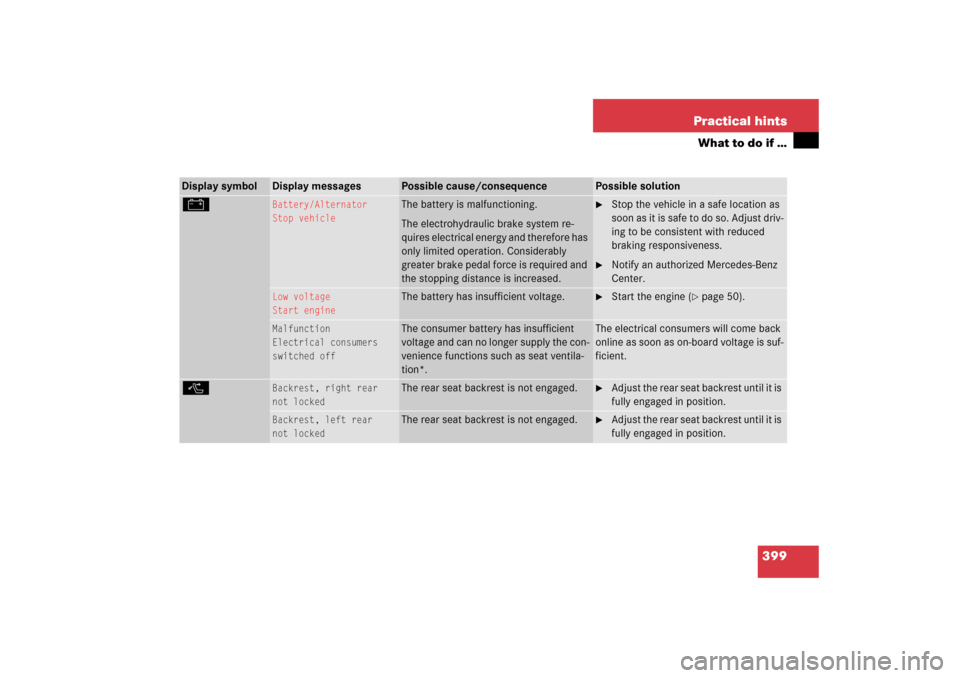
Display symbol
Display messages
Possible cause/consequence
Possible solution
#
Battery/Alternator
Stop vehicle
The battery is malfunctioning.
The electrohydraulic brake system re-
quires electrical energy and therefore has
only limited operation. Considerably
greater brake pedal force is required and
the stopping distance is increased.
�
Stop the vehicle in a safe location as
soon as it is safe to do so. Adjust driv-
ing to be consistent with reduced
braking responsiveness.
�
Notify an authorized Mercedes-Benz
Center.
Low voltage
Start engine
The battery has insufficient voltage.
�
Start the engine (
�page 50).
Malfunction
Electrical consumers
switched off
The consumer battery has insufficient
voltage and can no longer supply the con-
venience functions such as seat ventila-
tion*.
The electrical consumers will come back
online as soon as on-board voltage is suf-
ficient.
(
Backrest, right rear
not locked
The rear seat backrest is not engaged.
�
Adjust the rear seat backrest until it is
fully engaged in position.
Backrest, left rear
not locked
The rear seat backrest is not engaged.
�
Adjust the rear seat backrest until it is
fully engaged in position.
Page 431 of 521

430 Practical hintsResetting activated head restraintsIf the active head restraints have been trig-
gered in an accident, the active head re-
straints must be reset. Otherwise, the
active head restraints cannot offer any ad-
ditional protection in the event of another
rear-end collision.
�
Take the reset tool out of the
Mercedes-Benz vehicle literature
pouch.
�
Guide reset tool into center of head re-
straint between head restraint cushion
and rear head restraint cover.
�
Press reset tool forward in direction of
arrow.
�
Press reset tool downward until you
hear the head restraint release
mechanism audibly engage.
�
Pull out reset tool.
�
Firmly press head restraint cushion
backward towards the rear of the vehi-
cle until it engages.
�
Repeat this procedure on the active
head restraints for second head re-
straint.
For information on active head restraints,
see “Active head restraints” (
�page 77).
For information on head restraint adjust-
ment, see “Seats” (
�page 42).
iFor your convenience, we recommend
that you have this work carried out by
an authorized Mercedes-Benz Center.
You will find the reset tool for manually
operating the head restraints in the
Mercedes-Benz vehicle literature
pouch.
!Be careful not to damage upholstery.
Warning!
G
When pushing back the head restraint cush-
ion, take care that your fingers do not be-
come caught between the head restraint
cushion and the cover. Failing to do so may
lead to injury.