Page 133 of 521

132 Controls in detailSeats�
Press the symbol-side on switch1to
release the head restraints.
The head restraints will fold backward.Placing head restraints upright
�
Pull the head restraint forward until it
locks into position.Removing and installing rear seat head
restraints
Warning!
G
For safety reasons, always drive with the
rear head restraints in the upright position
when the rear seats are occupied.
Keep the area around head restraints clear
of articles (e.g. clothing) to not obstruct the
folding operation of the head restraints.
!Make sure the head restraints engage
when placing them upright. Otherwise
their protective function cannot be as-
sured.
Warning!
G
For your protection, drive only with properly
positioned head restraints.
Adjust head restraint so that the head re-
straint supports the back of the head at eye
level. This will reduce the potential for injury
to the head and neck in the event of an ac-
cident or similar situation.
Do not drive the vehicle without the seat
head restraints. Head restraints are intend-
ed to help reduce injuries during an acci-
dent.
Do not interchange head restraints from
front and rear seat.
��
Page 134 of 521
133 Controls in detailSeats
1Release catch
Removing rear seat head restraints�
Fold the backrest forward
(�page 271).
�
Fold back head restraint (
�page 131).
�
Press head restraint release catch1
and pull the head restraints out of the
guides.
�
Fold the backrest back to its original
position.Installing rear seat head restraints
Lumbar support
The curvature of the driver’s seat can be
adjusted to help enhance lower back sup-
port and seating comfort.
1Adjustment lever�
Move adjustment lever1 in direction
of the arrows until you have reached a
comfortable seating position.
iWhen installing the head restraints,
make sure that:�
you place the correct head restraint
on the middle seat. It is marked
with the letter “M” on the outside of
the metal bars.
�
the head restraints engage fully.
Page 139 of 521

138 Controls in detailMemory functionPrior to operating the vehicle, the driver
should check and adjust the seat height,
seat position fore and aft, and seat back-
rest angle if necessary, to ensure adequate
control, reach and comfort. The head re-
straint should also be adjusted for proper
height. See also the section on air bags
(�page 67) for more information on prop-
er seat positioning.
In addition, adjust the steering wheel to
ensure adequate control, reach, operation
and comfort. Both the interior and exterior
rear view mirrors should be adjusted for
adequate rear vision.
Fasten seat belts. Infants and small chil-
dren should be seated in a properly se-
cured restraint system that complies with
U.S. Federal Motor Vehicle Safety Stan-
dards 213 and 225 and Canadian Motor
Vehicle Safety Standards 213 and 210.2.The following settings are stored when us-
ing the buttons on the driver’s door:
�
Driver’s seat, backrest, head restraint
position and settings for multicontour
seat
�
Steering wheel position
�
Exterior rear view mirror positions
The following settings are stored when us-
ing the buttons on the front passenger
door:
�
Front passenger seat, backrest, head
restraint position and settings for mul-
ticontour seat
Warning!
G
Do not activate the memory function while
driving. Activating the memory function
while driving could cause the driver to lose
control of the vehicle.
Page 140 of 521
139 Controls in detail
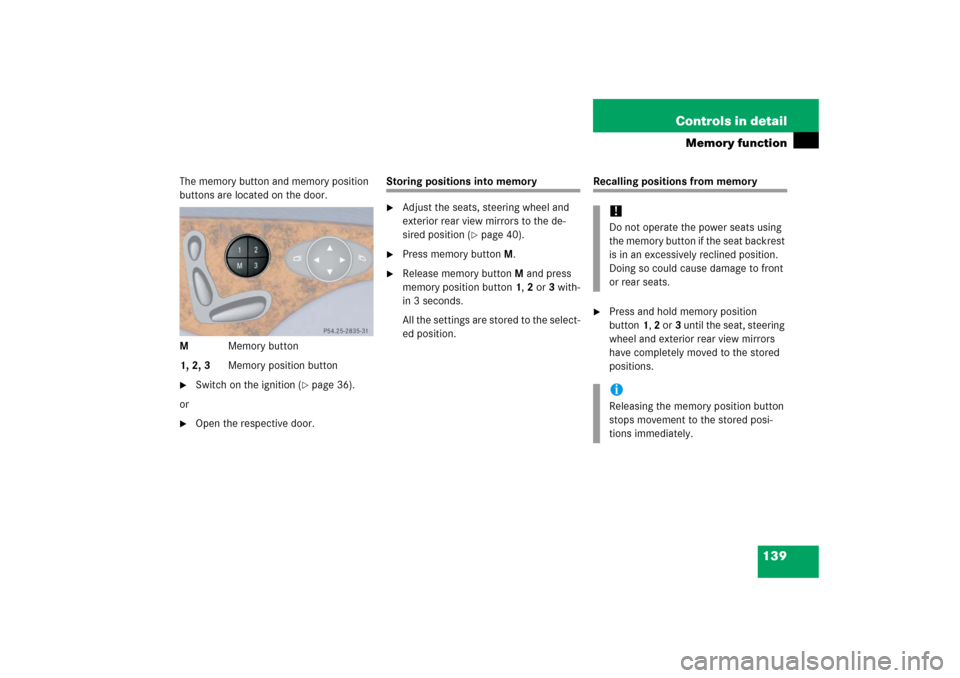
Memory function
The memory button and memory position
buttons are located on the door.
MMemory button
1, 2, 3Memory position button�
Switch on the ignition (
�page 36).
or
�
Open the respective door.
Storing positions into memory�
Adjust the seats, steering wheel and
exterior rear view mirrors to the de-
sired position (
�page 40).
�
Press memory buttonM.
�
Release memory buttonM and press
memory position button 1, 2 or 3 with-
in 3 seconds.
All the settings are stored to the select-
ed position.
Recalling positions from memory�
Press and hold memory position
button1, 2 or3 until the seat, steering
wheel and exterior rear view mirrors
have completely moved to the stored
positions.!Do not operate the power seats using
the memory button if the seat backrest
is in an excessively reclined position.
Doing so could cause damage to front
or rear seats.iReleasing the memory position button
stops movement to the stored posi-
tions immediately.
Page 150 of 521
149 Controls in detail
Lighting
Interior lighting in the rear
The overhead control panel is located
above the rear seat bench.
1Ambient lighting switch, to brighten
2Rear reading lamp
3Rear reading lamp on/off
4Rear interior lamp
5Ambient lighting
6Ambient lighting switch, to dimRear reading lamps
�
Press respective rear reading lamp
switch3 to switch on the correspond-
ing rear reading lamp.
�
Press respective rear reading lamp
switch3 again to switch off the corre-
sponding rear reading lamp.
Ambient lighting
�
Press ambient lighting switch1or6
repeatedly until ambient lighting5
has reached the desired intensity.
You can switch the ambient lighting on and
off, using the Control system
(
�page 172).
Trunk lamp
The trunk lamp switches on if the trunk is
opened.
If the trunk remains open, the trunk lamp
switches off automatically after approxi-
mately 10 minutes.
Page 166 of 521
165 Controls in detail
Control system
The table below shows what settings can
be changed within the various menus. De-
tailed instructions on making individual
settings can be found on the following pag-
es.INSTRUMENT CLUSTER
TIME/DATE
LIGHTING
VEHICLE
CONVENIENCE
DYNAMIC SEAT*
Select speedometer dis-
play mode
Synchronizing the
time
Set daytime running
lamp mode
(USA only)
Set automatic lock-
ing
Activate easy-en-
try/exit feature
Set level for
dynamic seat, driver
Select language
Set time (hours)
Set locator lighting
Set parking position
for exterior rear
view mirror
Set level for
dynamic seat, pas-
senger
Select display (speed dis-
play or outside tempera-
ture) for status line
Set time (minutes)
Ambient lighting
Select display (speed dis-
play or outside tempera-
ture) for basic display
Set date (month)
Setting headlamps
delayed shut-off
Set date (day)
Setting interior
lighting delayed
shut-off
Set date (year)
Page 237 of 521

236 Controls in detailPower tilt/sliding sunroof*Opening and closing the power tilt/sliding sunroof
The tilt/sliding sunroof is opened and
closed electrically. The switch for the
tilt/sliding sunroof is on the overhead con-
trol panel.Sunroof switch1Push back to slide sunroof open
2Push forward to slide sunroof closed
3Push up to raise sunroof at rear
4Pull down to lower sunroof at rearWith the sunroof closed or tilted open, a
screen can be slid into the sunroof opening
to guard against sun rays. When sliding the
sunroof open, the screen will also retract.
Warning!
G
When closing the tilt/sliding sunroof, make
sure there is no danger of anyone being
harmed by the closing procedure.
The opening/closing procedure of the
tilt/sliding sunroof can be immediately halt-
ed by releasing the switch or, if the switch
was moved past the resistance point and re-
leased, by moving the switch in any direc-
tion.
The tilt/sliding sunroof is made out of glass.
In the event of an accident, the glass may
shatter. This may result in an opening in the
roof.
In a vehicle rollover, occupants not wearing
their seat belts or not wearing them properly
may be thrown out of the opening. Such an
opening also presents a potential for injury
for occupants wearing their seat belts prop-
erly as entire body parts or portions of them
may protrude from the passenger compart-
ment.
Page 271 of 521
270 Controls in detailLoading�
Connect snap hook1 of front strap to
eye2 located on center tunnel in
front of rear seat bench.Unloading and folding
�
Loosen strap, open clasp by pressing
tabs together (arrows).
�
Unload skis.
�
Close flap in trunk.
�
Fold and flatten ski sack lengthwise
and place folded ski sack inside recess
of backrest.
�
Close ski sack compartment cover.
��