Page 174 of 521

173 Controls in detail
Control system
�
Move the selection marker with
buttonæ orç to the
Lighting
submenu.
�
Press buttonj ork repeatedly
until the message
Headlamps delayed
shut-off
appears in the multifunction
display.
The selection marker is on the current
setting.
�
Press buttonæ orç to switch Headlamps delayed shut-off
on or
off
.
�
Turn the exterior lamp switch to
positionU before turning off the en-
gine.
You can temporarily deactivate the de-
layed shut-off feature:
�
Before exiting the vehicle, turn the
SmartKey in the starter switch to
position0.
�
Then turn it to position2 and back to
position0.
The delayed shut-off feature is deacti-
vated. It will reactivate as soon as you
reinsert the SmartKey in the starter
switch.
Vehicles with KEYLESS-GO*:
�
Press the KEYLESS-GO start/stop but-
ton on the gear selector lever
(�page 37).Setting interior lighting delayed shut-off
Use this function to set whether you would
like the interior lighting to remain lit for
10 seconds during darkness after you have
removed the SmartKey from the starter
switch.
�
Move the selection marker with
buttonæ orç to the
Lighting
submenu.
�
Press buttonj ork repeatedly
until the message
Interior lighting
delayed shut-off appears in the mul-
tifunction display.
The selection marker is on the current
setting.
�
Press buttonæ orç to switch Interior lighting delayed shut-off
on or
off
.
iYou can reactivate this function within
10 minutes by opening a door.
Page 175 of 521
174 Controls in detailControl systemVehicle submenu
Access the
Vehicle
submenu via the
Set-
tings
menu. Use the
Vehicle
submenu to
make general vehicle settings. The follow-
ing function is available:Setting automatic locking
Use this function to activate or deactivate
the automatic central locking. With the au-
tomatic central locking system activated,
the vehicle is centrally locked at vehicle
speeds of approximately 9 mph
(15 km/h).
�
Move the selection marker with
buttonæ orç to the
Vehicle
submenu.
�
Press buttonj ork repeatedly
until the message
Automatic door
lock
. appears in the multifunction dis-
play.
The selection marker is on the current
setting.
�
Press buttonæ orç to switch Automatic door lock
on or
off
.
Function
Page
Set automatic locking
174
Page 176 of 521

175 Controls in detail
Control system
Convenience submenu
Access the
Convenience
submenu via the
Settings
menu. Use the
Convenience
sub-
menu to change the settings for a number
of convenience features. The following
functions are available:Activating easy-entry/exit feature
Use this function to activate and deacti-
vate the easy-entry/exit feature
(
�page 43).
�
Move the selection marker with
buttonæ orç to
the
Convenience
submenu.
Function
Page
Activate easy-entry/exit feature
175
Set parking position for exterior
rear view mirror
176
Warning!
G
You must make sure no one can become
trapped or injured by the moving steering
wheel when the easy-entry/exit feature is
activated.
To stop steering wheel adjustment, do one
of the following:�
Move steering column stalk
(�page 43).
�
Press one of the memory position but-
tons or the memory button M
(�page 139).
Do not leave children unattended in the ve-
hicle, or with access to an unlocked vehicle.
Children could open the driver’s door and
unintentionally activate the easy-entry/exit
feature, which could result in an accident
and/or serious personal injury.
��
Page 177 of 521
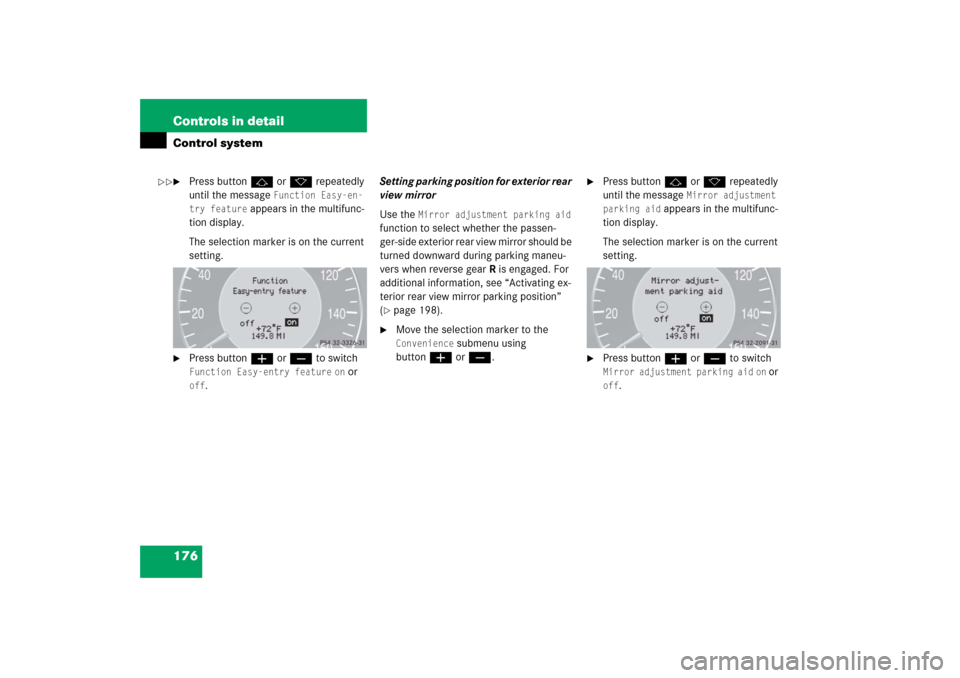
176 Controls in detailControl system�
Press buttonj ork repeatedly
until the message
Function Easy-en-
try feature
appears in the multifunc-
tion display.
The selection marker is on the current
setting.
�
Press buttonæ orç to switch Function Easy-entry feature
on or
off
.Setting parking position for exterior rear
view mirror
Use the
Mirror adjustment parking aid
function to select whether the passen-
ger-side exterior rear view mirror should be
turned downward during parking maneu-
vers when reverse gearR is engaged. For
additional information, see “Activating ex-
terior rear view mirror parking position”
(
�page 198).
�
Move the selection marker to the Convenience
submenu using
buttonæ orç.
�
Press buttonj ork repeatedly
until the message
Mirror adjustment
parking aid
appears in the multifunc-
tion display.
The selection marker is on the current
setting.
�
Press buttonæ orç to switch Mirror adjustment parking aid
on or
off
.
��
Page 178 of 521

177 Controls in detail
Control system
Dynamic seat* submenu
Access the
Dynamic Seat
submenu via the
Settings
menu. Use the
Dynamic Seat
submenu to change the settings for the dy-
namic seats. The following functions are
available:Adjusting the dynamic seat
The function dynamic seat adjustment lets
you determine the way the seat adjusts
while driving.
�
Move the selection marker with
buttonæ orç to the Dynamic Seat
submenu.
�
Press buttonj ork repeatedly
until the message
Dyn. multi-cont.
seat, driver
for the driver seat or
Dyn. multi-cont. seat, fr. pass.
for the passenger seat appears in the
multifunction display.
The selection marker is on the current
setting.
�
Press buttonæ orç to switch
function to
Weak
or
Powerful
.The following settings are available:
Function
Page
Adjust driver seat
177
Adjust passenger seat
177
Weak
(Comfort) Less lat-
eral support and
slow air pressure
build-up in the air
chambers of the
backrest side bol-
sters
Powerful
(Sporty) Strong lat-
eral support and
fast air pressure
build-up in the air
chambers of the
backrest side bol-
sters
Page 180 of 521

179 Controls in detail
Control system
Resetting fuel consumption statistics�
Press buttonÿ orè repeatedly
until you see the first function of the
trip computer menu.
�
Press buttonj ork repeatedly
until you see the reading that you want
to reset in the multifunction display.
�
Press and hold the reset button in the
instrument cluster (
�page 24) until
the value is reset to 0.Calling up range (distance to empty)
�
Press buttonÿ orè repeatedly
until you see the first function of the
trip computer menu.
�
Press buttonj ork repeatedly
until the message
Range:
appears in
the multifunction display.
In the multifunction display you will see
the calculated range based on the cur-
rent fuel tank level.
iAll statistics stored since the last en-
gine start will be reset approximately
4 hours after the SmartKey in the start-
er switch is turned to position0 or re-
moved from the starter switch.
Resetting will not occur if you turn the
SmartKey back to position1 or2 with-
in this time period.
Page 198 of 521
.
Headlamp cleaning system*
The button is located on the left side")
197 Controls in detail
Good visibility
�Good visibility
For information on windshield wipers, see
“Windshield wipers” (
�page 56).
Headlamp cleaning system*
The button is located on the left side of the
dashboard.
1Headlamp washer button�
Switch on the ignition (
�page 36).
�
Press button1.
The headlamps are cleaned with a
high-pressure water jet.For more information on filling up the
washer reservoir, see “Windshield washer
system and headlamp cleaning system*”
(
�page 327).
Rear view mirrors
For more information on setting the rear
view mirrors, see “Mirrors” (
�page 45).
Auto-dimming mirrors
The reflection brightness of the exterior
rear view mirror on the driver’s side and
the interior rear view mirror will respond
automatically to glare when
�
the ignition is switched on
and
�
incoming light from headlamps falls on
the sensor in the interior rear view mir-
ror.
The rear view mirrors will not react if
�
reverse gear is engaged
�
the interior lighting is turned on
iThe headlamps will automatically be
cleaned when you have�
switched on the headlamps
and
�
operated the windshield wipers
with windshield washer fluid
fifteen times
When you switch off the ignition, the
counter resets.
Page 206 of 521

The climate control is operational whenev-
er the engine is running. You can operate
the climate control system in either the au-")
205 Controls in detail
Dual-zone automatic climate control (USA only)
The climate control is operational whenev-
er the engine is running. You can operate
the climate control system in either the au-
tomatic or manual mode. The system cools
or heats the interior depending on the se-
lected interior temperature and the cur-
rent outside temperature.Nearly all dust particles, pollutants and
odors are filtered out before outside air en-
ters the passenger compartment through
the air distribution system.
The air conditioning will not engage (no
cooling) if the A/Cmode is deactivated
(
�page 212).
Warning!
G
When operating the climate control, the air
that enters the passenger compartment
through the air vents can be very hot or very
cold (depending on the set temperature).
This may cause burns or frostbite to unpro-
tected skin in the immediate area of the air
vents. Always keep sufficient distance be-
tween unprotected parts of the body and the
air vents. If necessary, use the air distribu-
tion control (
�page 204) to direct the air to
air vents in the vehicle interior that are not
in the immediate area of unprotected skin.
Warning!
G
Follow the recommended settings for heat-
ing and cooling given on the following pag-
es. Otherwise the windows could fog up,
impairing visibility and endangering you and
others.
iSevere conditions (e.g. strong air pollu-
tion) may require replacement of the fil-
ter before its scheduled interval.
A clogged filter will reduce the air vol-
ume to the interior.
If the vehicle interior is hot, ventilate
the interior before driving off, see
“Summer opening feature”
(�page 234). The climate control will
then adjust the interior temperature to
the set value much faster.
Keep the air intake grille in front of the
windshield free of snow and debris.
Do not obstruct air flow by placing ob-
jects on the air flow-through exhaust
slots below the rear window.