Page 101 of 521

100 Safety and SecurityDriving safety systems�
After hard braking, it is advisable to
drive on for some time so that the air
stream will cool down the brakes fast-
er.
�
Only Mercedes-Benz approved compo-
nents (e.g. brake pads) should be in-
stalled on your vehicle. Brake pads not
approved by Mercedes-Benz may im-
pair the safety of your vehicle.
Four wheel electronic traction system
(4MATIC) with the ESP
®
Models with all-wheel-drive only.
The 4MATIC improves vehicle’s ability to
use available traction, e.g. during winter
operation in mountains under snowy
conditions, by applying power to all four
wheels.
Warning!
G
If you see the ESP
® warning lampv
flashing in the speedometer, proceed as fol-
lows:
�
While driving off, apply as little throttle
as possible
�
While driving, ease up on the accelera-
tor
�
Adapt your speed and driving style to
the prevailing road conditions
Failure to observe these guidelines could
cause the vehicle to skid.
The ESP
® cannot prevent accidents result-
ing from excessive speed.
!Do not tow with one axle raised.
Otherwise the transfer case can be
damaged, which is not covered by the
Mercedes-Benz Limited Warranty.
!Performance testing must only be con-
ducted on a two-axle dynamometer.
Otherwise the transfer case can be
damaged, which is not covered by the
Mercedes-Benz Limited Warranty.!Because of the ESP’s
® automatic oper-
ation, the engine and the ignition must
be shut off (SmartKey in starter switch
position0 or1 or KEYLESS-GO
start/stop button* in position0 or1)
when the parking brake is being tested
on a brake test dynamometer.
Active braking action through ESP
®
may otherwise seriously damage the
front or rear axle brake system.
Operational tests with the engine
running can only be conducted on a
two-axle dynamometer.
Page 130 of 521

129 Controls in detail
Locking and unlocking
Automatic central locking
The doors and the trunk automatically lock
when the ignition is switched on and the
wheels are turning at vehicle speeds of ap-
proximately 9mph (15km/h) or more.
You can open a locked door from the in-
side. Open door only when conditions are
safe to do so.For more information on towing the vehi-
cle, see the “Practical hints” section
(
�page 457).
You can deactivate the automatic locking
mode using the control system
(�page 174).
Locking and unlocking from the inside
You can lock or unlock the doors and the
trunk from inside using the central locking
switch. This can be useful, for example, if
you want to lock the vehicle before starting
to drive.
The fuel filler flap cannot be locked or un-
locked with the central locking switch.
iThe doors unlock automatically after an
accident if the force of the impact ex-
ceeds a preset threshold.
The vehicle automatically locks when
the ignition is switched on and the
wheels are turning at vehicle speeds of
approximately 9 mph (15 km/h) or
more. You could therefore lock yourself
out when the vehicle�
is pushed or towed
�
is on a test stand
Warning!
G
When leaving the vehicle, always remove the
SmartKey or the SmartKey with
KEYLESS-GO* from the starter switch, take
it with you, and lock the vehicle. Do not
leave children unattended in the vehicle, or
with access to an unlocked vehicle. Unsu-
pervised use of vehicle equipment may
cause an accident and/or serious personal
injury.
Page 139 of 521

138 Controls in detailMemory functionPrior to operating the vehicle, the driver
should check and adjust the seat height,
seat position fore and aft, and seat back-
rest angle if necessary, to ensure adequate
control, reach and comfort. The head re-
straint should also be adjusted for proper
height. See also the section on air bags
(�page 67) for more information on prop-
er seat positioning.
In addition, adjust the steering wheel to
ensure adequate control, reach, operation
and comfort. Both the interior and exterior
rear view mirrors should be adjusted for
adequate rear vision.
Fasten seat belts. Infants and small chil-
dren should be seated in a properly se-
cured restraint system that complies with
U.S. Federal Motor Vehicle Safety Stan-
dards 213 and 225 and Canadian Motor
Vehicle Safety Standards 213 and 210.2.The following settings are stored when us-
ing the buttons on the driver’s door:
�
Driver’s seat, backrest, head restraint
position and settings for multicontour
seat
�
Steering wheel position
�
Exterior rear view mirror positions
The following settings are stored when us-
ing the buttons on the front passenger
door:
�
Front passenger seat, backrest, head
restraint position and settings for mul-
ticontour seat
Warning!
G
Do not activate the memory function while
driving. Activating the memory function
while driving could cause the driver to lose
control of the vehicle.
Page 140 of 521
139 Controls in detail
Memory function
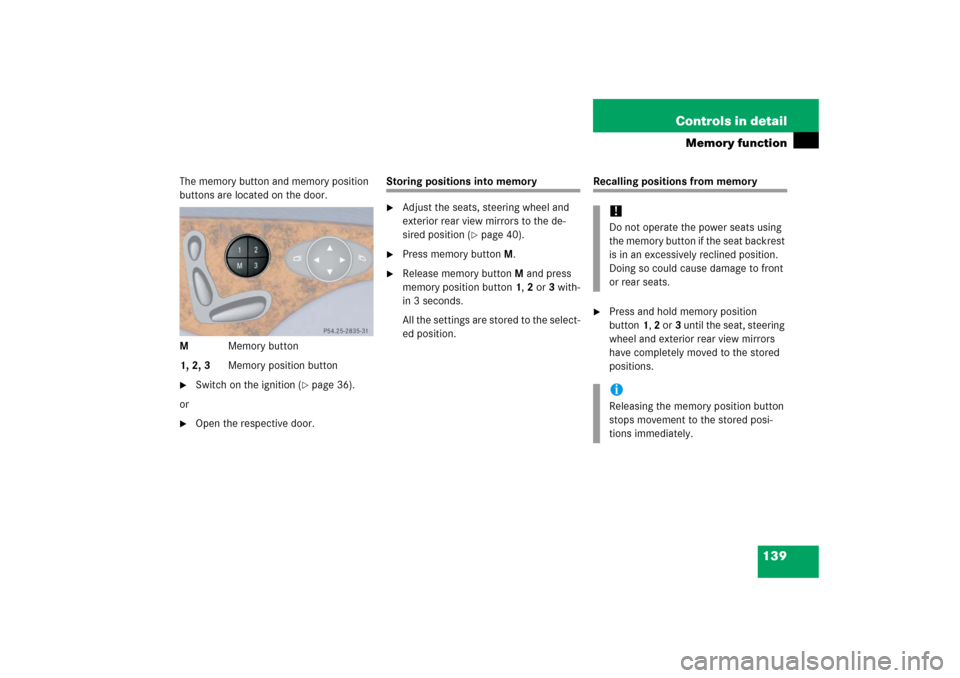
The memory button and memory position
buttons are located on the door.
MMemory button
1, 2, 3Memory position button�
Switch on the ignition (
�page 36).
or
�
Open the respective door.
Storing positions into memory�
Adjust the seats, steering wheel and
exterior rear view mirrors to the de-
sired position (
�page 40).
�
Press memory buttonM.
�
Release memory buttonM and press
memory position button 1, 2 or 3 with-
in 3 seconds.
All the settings are stored to the select-
ed position.
Recalling positions from memory�
Press and hold memory position
button1, 2 or3 until the seat, steering
wheel and exterior rear view mirrors
have completely moved to the stored
positions.!Do not operate the power seats using
the memory button if the seat backrest
is in an excessively reclined position.
Doing so could cause damage to front
or rear seats.iReleasing the memory position button
stops movement to the stored posi-
tions immediately.
Page 141 of 521
140 Controls in detailMemory functionStoring exterior rear view mirror park-ing position
For easier parking, you can adjust the pas-
senger-side exterior rear view mirror so
that you can see the right rear wheel as
soon as you engage reverse gearR.
For information on activating the parking
position, see “Activating exterior rear view
mirror parking position” (
�page 198).
1Passenger side, exterior rear view mir-
ror
2Adjustment button
�
Stop the vehicle.
�
Switch on the ignition (
�page 36).
�
Press button1.
The passenger-side exterior rear view
mirror is selected.
�
Adjust the exterior rear view mirror
with button2 so that you see the rear
wheel and the road curb.
�
Press memory button M.
�
Within 3 seconds, press bottom of ad-
justment button2.
The parking position is stored if the
mirror does not move.iIf the mirror does move, repeat the
above steps. After the setting is stored,
you can move the mirror again.
Page 142 of 521

and see “Turn signals” (
�page")
141 Controls in detail
Lighting
�Lighting
For information on how to switch on the
headlamps and use the turn signals, see
“Switching on headlamps” (
�page 54)
and see “Turn signals” (
�page 55).
Exterior lamp switch
The exterior lamp switch is located on the
dashboard to the left of the steering wheel.Exterior lamp switchMOff
Daytime running lamp mode
(
�page 142)
UAutomatic headlamp mode
Daytime running lamp mode
(�page 142)
CParking lamps (also tail lamps, li-
cense plate lamps, side marker
lamps, instrument panel lamps)BLow beam headlamps (or high
beam headlamps when the combi-
nation switch is pushed forward)
and parking lamps
ˆStanding lamps, right (turn left one
stop)
‚Standing lamps, left (turn left two
stops)
‡Indicator lamp for front fog lamps
†Indicator lamp for rear fog lamp
iIf you drive in countries where vehicles
drive on the other side of the road than
the country where the vehicle is regis-
tered, you must have the headlamps
modified for symmetrical low beams.
Relevant information can be obtained
at your authorized Mercedes-Benz
Center.iVehicles equipped with active Bi-Xe-
non* headlamps:
The active Bi-Xenon headlamps moni-
tor your steering angle and driving
speed, then automatically shift their
beams to either side to better follow
the curvature of the road ahead, in-
creasing usable illumination over con-
ventional headlamps.
iWith the SmartKey removed from the
starter switch or the engine turned off
with KEYLESS-GO* and the driver’s
door open, a warning sounds if the
parking lamps or low beam headlamps
are switched on.
The message
Switch off lamps
appears in the multifunction display.
Page 154 of 521

153 Controls in detail
Control system
�Control system
The control system is activated as soon as
the SmartKey in the starter switch is
turned to position1 or as soon as the
KEYLESS-GO start/stop button* is in
position1. The control system enables you
to:�
call up information about your vehicle
�
change vehicle settings.
For example, you can use the control sys-
tem to find out when your vehicle is next
due for service, to set the language for
messages in the instrument cluster dis-
play, and much more.
The control system relays information to
the multifunction display.
Multifunction display
1Outside temperature
2Trip odometer
3Automatic transmission program mode
4Main odometer
5Current gear selector lever position
Above illustration shows the standard
display.
For more information on menus displayed
in the multifunction display, see “Menus”
(�page 156).
iThe displays for the audio systems (ra-
dio, CD player) will appear in English,
regardless of the language selected.
Warning!
G
A driver’s attention to the road and traffic
conditions must always be his/her primary
focus when driving.
For your safety and the safety of others, se-
lecting features through the multifunction
steering wheel should only be done by the
driver when traffic and road conditions per-
mit it to be done safely.
Bear in mind that at a speed of just 30 mph
(approximately 50 km/h), your vehicle is
covering a distance of 44 feet (approximate-
ly 14 m) every second.
Page 155 of 521
 are controlled by the buttons
on the mu")
154 Controls in detailControl systemMultifunction steering wheel
The displays in the multifunction display
and the settings in the control system
(�page 153) are controlled by the buttons
on the multifunction steering wheel.
Pressing any of the buttons on the multi-
function steering wheel will alter what is
shown in the multifunction display.
The information available in the multifunc-
tion display is arranged in menus, each
containing a number of functions or sub-
menus.
The individual functions are then found
within the relevant menu (radio or CD op-
erations under
AUDIO
, for example). These
functions serve to call up relevant informa-
tion or to customize the settings for your
vehicle.
1
Multifunction display in the
speedometerOperating the control system
2
Selecting the submenu or setting
the volume:
Press buttonæup/to increaseçdown/to decrease
3
Telephone*:
Press buttonsto take a call
to dial a calltto end a call
to reject an incoming call
4
Menu systems:
Press buttonèfor next menuÿfor previous menu
5
Moving within a menu:
Press buttonjfor next displaykfor previous display