Page 267 of 521

266 Controls in detailDriving systemsEach warning indicator is divided into five
yellow and two red segments for either
side of the vehicle. The Parktronic system
is operational when the yellow readiness
indicators3 are illuminated.
The position of the gear selector lever de-
termines which warning indicators will be
activated.
As your vehicle approaches an object, one
or more segments will come on, depending
on the distance. When the seventh seg-
ment illuminates, you have reached the
minimum distance.
�
Front area: An intermittent acoustic
warning will sound as the first red dis-
tance segment illuminates and a con-
stant acoustic warning lasting a
maximum of 2 seconds will sound for
the second red distance segment. The
signal is canceled when the gear selec-
tor lever is placed in positionP or the
parking brake is activated.
�
Rear area: An intermittent acoustic
warning will sound as the first red dis-
tance segment illuminates and a con-
stant acoustic warning lasting a
maximum of 2 seconds will sound for
the second red distance segment. The
signal is canceled when the gear selec-
tor lever is placed in position D,P or
the parking brake is activated.Switching the Parktronic system
on/off
The Parktronic system can be switched off
manually.
The Parktronic switch is located in the low-
er part of the center console (
�page 28).
1Parktronic switch
2Indicator lamp
Gear selector
lever position
Warning indicator
D
Front area activated
R or N
Front and rear area
activated
P
Neither activated
Page 277 of 521

276 Controls in detailUseful featuresStorage compartments Glove box
1Glove box lid release
2Compartment for mobile phone/glass-
es
Opening the glove box
�
Push glove box lid release1.
The glove box lid opens downward.
Closing the glove box
�
Push glove box lid up to close.Storage compartment in the center
console (no CD changer* installed)
1Opening/closing button
�
Press button1 to open.
The control panel swings out upward
and the storage compartment extends
out.
�
Press button1 to close.
Warning!
G
To help avoid personal injury during a colli-
sion or sudden maneuver, exercise care
when storing objects in the vehicle. Put lug-
g a g e o r c a r g o i n t h e t r u n k i f p o s s i b l e . D o n o t
pile luggage or cargo higher than the seat
backs. Do not place anything on the shelf
below the rear window.
Luggage nets cannot secure hard or heavy
objects.
Keep compartment lids closed. This will help
to prevent stored objects from being thrown
around and injuring vehicle occupants dur-
ing an accident.
iClose the compartment for glasses2
first before closing the glove box.
iNever place any medications in the
storage compartment. If there is a pow-
er failure, the storage compartment
cannot be opened.
Page 282 of 521
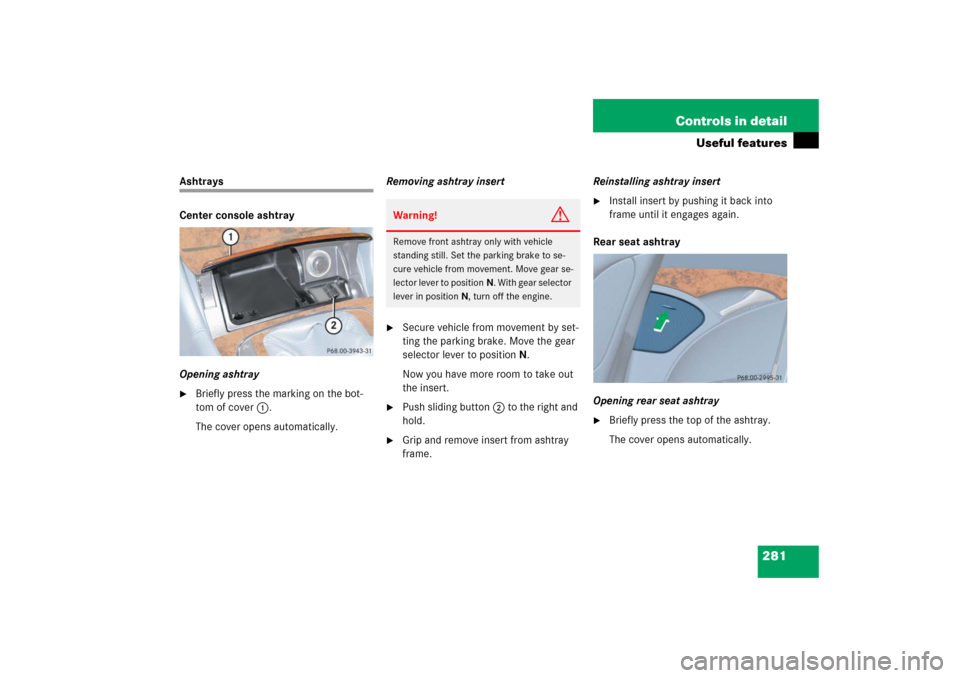
281 Controls in detail
Useful features
Ashtrays
Center console ashtray
Opening ashtray�
Briefly press the marking on the bot-
tom of cover1.
The cover opens automatically.Removing ashtray insert
�
Secure vehicle from movement by set-
ting the parking brake. Move the gear
selector lever to positionN.
Now you have more room to take out
the insert.
�
Push sliding button2 to the right and
hold.
�
Grip and remove insert from ashtray
frame.Reinstalling ashtray insert
�
Install insert by pushing it back into
frame until it engages again.
Rear seat ashtray
Opening rear seat ashtray
�
Briefly press the top of the ashtray.
The cover opens automatically.
Warning!
G
Remove front ashtray only with vehicle
standing still. Set the parking brake to se-
cure vehicle from movement. Move gear se-
lector lever to positionN. With gear selector
lever in positionN, turn off the engine.
Page 283 of 521
.
1Cigarette lighter
�
Switch on t")
282 Controls in detailUseful featuresCigarette lighterThe cigarette lighter is located in the cen-
ter console compartment in front of the
center armrest (
�page 28).
1Cigarette lighter
�
Switch on the ignition (
�page 36).
�
Push in cigarette lighter1.
The lighter will pop out automatically
when hot.
Warning!
G
Never touch the heating element or sides of
the lighter; they are extremely hot. Hold the
knob only.
When leaving the vehicle, always remove the
SmartKey or the SmartKey with
KEYLESS-GO* from the starter switch, take
it with you, and lock the vehicle. Do not
leave children unattended in the vehicle, or
with access to an unlocked vehicle. Unsu-
pervised use of vehicle equipment may
cause an accident and/or serious personal
injury.
!The lighter socket can be used to ac-
commodate 12V DC electrical acces-
sories (up to a maximum of 85 W)
designed for use with the standard
“cigarette lighter” plug type. Keep in
mind, however, that connecting acces-
sories to the lighter socket (for exam-
ple extensive connecting and
disconnecting, or using plugs that do
not fit properly) can damage the lighter
socket. With the socket damaged, the
lighter may no longer be able to be
placed in the heating (pushed-in) posi-
tion, or the lighter may pop out too ear-
ly with the lighter not hot enough.
To help avoid damaging the cigarette
lighter socket, we recommend con-
necting 12V DC electrical accessories
designed for use with a standard “ciga-
rette lighter” plug type to the 12V pow-
er outlets in your vehicle whenever
possible.
Page 385 of 521
384 Practical hintsWhat to do if …Lamp in center consoleProblem
Possible cause/consequence
Suggested solution
75The indicator lamp illuminates and remains
illuminated with the weight of a typical adult
or someone larger than a small individual on
the front passenger seat.
The system is malfunctioning.
�
Have the system checked as soon as
possible by an authorized
Mercedes-Benz Center.
�
Read and observe messages in the
multifunction display and follow cor-
rective steps (
�page 393).
Warning!
G
If the
75
indicator lamp
illuminates and remains illuminated with the
weight of a typical adult or someone larger
than a small individual on the front passen-
ger seat, do not have any passenger use the
front passenger seat until the system has
been repaired.
Page 395 of 521

394 Practical hintsWhat to do if …Display messages
Possible cause/con-
sequence
Possible solution
Front passenger
airbag
activated
See Operator’s Manual
Monitor the 75 indicator lamp on the center console (
�page 27) and
the multifunction display in the instrument cluster (
�page 26) for the following:
With the seat unoccupied and the ignition turned on,
�
the 75 indicator lamp on the center console should illuminate and re-
main illuminated, indicating that the OCS (
�page 81) has deactivated the front
passenger front air bag.
�
the message
Front passenger airbag activated See Operator’s Manual
or
the message
Front passenger airbag deactivated See Operator’s Manual
should not appear in the multifunction display at any time the seat is unoccu-
pied. Wait at last 60 seconds for the system to complete the necessary check
cycles and to make sure neither message appears in the multifunction display.
If above conditions are met, you can occupy the front passenger seat again. De-
pending on the front passenger classification sensed by the OCS (
�page 81), the
75 indicator lamp will remain illuminated or go out.
If above conditions are not met, the system is not working properly. Have the sys-
tem checked as soon as possible by an authorized Mercedes-Benz Center.
Warning!
G
If the
75
indicator lamp remains
out even after performing the above correc-
tive steps, do not have any children 12 years
old and under and other small individuals
use the front passenger seat until the sys-
tem has been repaired.
Page 397 of 521

396 Practical hintsWhat to do if …Display messages
Possible cause/con-
sequence
Possible solution
Front passenger
airbag
deactivated
See Operator’s Manual
Monitor the 75 indicator lamp on the center console (
�page 27) and the
multifunction display in the instrument cluster (
�page 26) for the following:
With the seat unoccupied and the ignition turned on,
�
the 75 indicator lamp on the center console should illuminate and re-
main illuminated, indicating that the OCS (
�page 81) has deactivated the front
passenger front air bag.
�
the message
Front passenger airbag activated See Operator’s Manual
or
the message
Front passenger airbag deactivated See Operator’s Manual
should not appear in the multifunction display at any time the seat is unoccu-
pied. Wait at last 60 seconds for the system to complete the necessary check
cycles and to make sure neither message appears in the multifunction display.
If above conditions are met, you can occupy the front passenger seat again. De-
pending on the front passenger classification sensed by the OCS (
�page 81), the
75 indicator lamp will remain illuminated or go out.
If above conditions are not met, the system is not working properly. Have the sys-
tem checked as soon as possible by an authorized Mercedes-Benz Center.
Warning!
G
If the 75 indicator lamp remains
illuminated with an adult occupant on the
front passenger seat even after performing
the above corrective steps, do not have any
passenger use the front passenger seat until
the system has been repaired.
Page 428 of 521
 is required to open the trunk lid.
The handle is located above the rear li-
c")
427 Practical hints
Unlocking/locking in an emergency
Unlocking the trunk
A minimum height clearance of 5.90 ft
(1.80 m) is required to open the trunk lid.
The handle is located above the rear li-
cense plate recess.
1Unlocking in an emergency
2Handle�
Insert the mechanical key into the
trunk lid lock until it stops.
�
Turn the mechanical key counterclock-
wise to position1 and hold it in this
position.
�
Pull the handle2 and lift the trunk lid.
The trunk opens.
�
Turn the mechanical key back and re-
move it from the trunk lid lock.
Locking the vehicle
If you are unable to lock the vehicle with
the SmartKey or SmartKey with
KEYLESS-GO*, do the following:�
Close the passenger door, the rear
doors and the trunk.
�
Press the central locking switch in the
center console (
�page 130).
�
Check to see whether the locking
knobs on the doors have moved down.
�
If necessary, push them down
manually.
�
Remove the mechanical key out of the
SmartKey (
�page 426).
�
Check whether the trunk is locked.
�
If necessary, lock the trunk with the
mechanical key (
�page 128).
Except for the driver’s door, the vehicle
should now be locked.
1Locking
�
Insert the mechanical key into the
driver’s door lock until it stops.
�
Turn the mechanical key clockwise to
position1.
The driver’s door is locked.
!Always make sure there is sufficient
overhead clearance.