Page 236 of 521
 until
the windows and the tilt/sliding sun-
roof* are completely")
235 Controls in detail
Power windows
Vehicles with KEYLESS-GO*:�
Press and hold the lock button on an
outside door handle (
�page 63) until
the windows and the tilt/sliding sun-
roof* are completely closed.
�
Release the lock button on the outside
door handle to interrupt procedure.
Warning!
G
When closing the side windows and the
tilt/sliding sunroof*, make sure that there is
no danger of anyone being harmed by the
closing procedure.
If potential danger exists, proceed as fol-
lows:�
Release button ‹ to s t op t h e c lo s in g
procedure. To open, press and hold
buttonŒ. To continue the closing
procedure after making sure that there
is no danger of anyone being harmed by
the closing procedure, press and hold
button‹.
Vehicles with KEYLESS-GO*:
�
Release the lock button (
�page 63) on
the outside door handle to stop the clos-
ing procedure.
�
Pull on the outside door handle and hold
firmly. The side windows and the
tilt/sliding sunroof* will open for as long
as the door handle is held but the door
not opened.
Page 238 of 521
.Opening and closing the power
tilt/sliding sunroof
�
To open, close, raise or lower the
tilt/sliding sunroof,")
237 Controls in detail
Power tilt/sliding sunroof*
�
Switch on the ignition (
�page 36).Opening and closing the power
tilt/sliding sunroof
�
To open, close, raise or lower the
tilt/sliding sunroof, move the sunroof
switch to resistance point in the re-
quired direction of arrows1to4.
Release the sunroof switch when the
tilt/sliding sunroof has reached the
desired position.
Fully opening (Express-open) and
closing (Express-close) the power
tilt/sliding sunroof
�
To open or close the tilt/sliding sun-
roof, move the sunroof switch past the
resistance point in direction of
arrow1to2 and release.
The tilt/sliding sunroof opens or closes
completely.
When leaving the vehicle, always remove the
SmartKey or the SmartKey with
KEYLESS-GO* from the starter switch, take
it with you, and lock the vehicle. Do not
leave children unattended in the vehicle, or
with access to an unlocked vehicle. Unsu-
pervised use of vehicle equipment can
cause an accident and/or serious personal
injury.!To avoid damaging the seals, do not
transport any objects with sharp edges
which can stick out of the tilt/sliding
sunroof.
Do not open the tilt/sliding sunroof if
there is snow or ice on the roof, as this
could result in malfunctions.
The tilt/sliding sunroof can be opened
or closed manually should an electrical
malfunction occur (
�page 427).
iYou can also open or close the tilt/slid-
ing sunroof using the SmartKey, see
“Summer opening feature”
(�page 234) and “Convenience clos-
ing feature” (
�page 234).
Depending on current position, the
tilt/sliding sunroof may also open or
close when the air recirculation
button, in the control panel of the
climate control (�page 204),
(
�page 216) or (
�page 217) is
pressed and held.
Page 269 of 521

268 Controls in detailLoading�
Insert one mounting element 2 into
each cargo rail.
�
Turn mounting element 2 in cargo rail
toN.
�
Insert telescoping rod 1 into mount-
ing element 2.
�
Turn mounting element 2 in cargo rail
until it engages in the‹ position.
You should be able to feel the mounting
element engage in the cargo rail.Storage box in cargo compartment
(Canada only)
1Storage boxWarning!
G
When you are using the storage box in the
cargo compartment, the backrests of the
seats in front of it must be completely en-
gaged to the rear, and the twin roller blind
must be installed.
Do not exceed the storage box’s maximum
load of 44 lbs (20 kg), as it could otherwise
become detached during an accident or
sharp braking maneuvers, and could injure
you or other passengers.
When leaving the vehicle, always remove the
SmartKey or the SmartKey with
KEYLESS-GO* from the starter switch, take
it with you, and lock the vehicle. Do not
leave children unattended in the vehicle, or
with access to an unlocked vehicle. Unsu-
pervised use of vehicle equipment may
cause an accident and/or serious personal
injury.
Page 279 of 521
278 Controls in detailUseful featuresReinstalling ashtray insert�
Install insert by pushing it back into
frame until it engages again.
Rear seat ashtray
Opening rear seat ashtray
�
Briefly press the top of the ashtray.
The cover opens automatically.
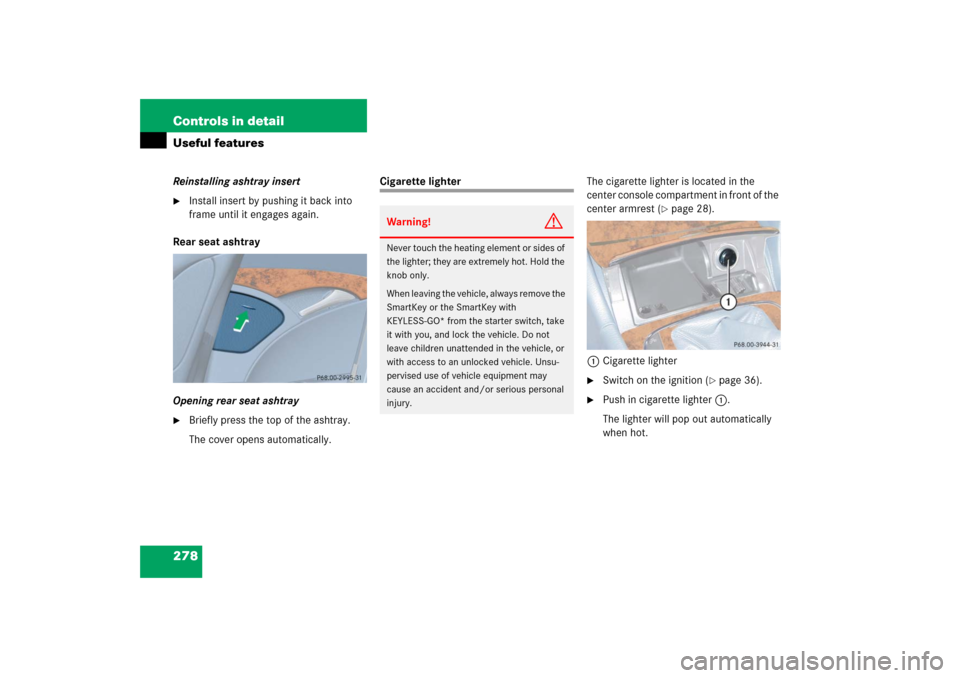
Cigarette lighterThe cigarette lighter is located in the
center console compartment in front of the
center armrest (
�page 28).
1Cigarette lighter
�
Switch on the ignition (
�page 36).
�
Push in cigarette lighter1.
The lighter will pop out automatically
when hot.
Warning!
G
Never touch the heating element or sides of
the lighter; they are extremely hot. Hold the
knob only.
When leaving the vehicle, always remove the
SmartKey or the SmartKey with
KEYLESS-GO* from the starter switch, take
it with you, and lock the vehicle. Do not
leave children unattended in the vehicle, or
with access to an unlocked vehicle. Unsu-
pervised use of vehicle equipment may
cause an accident and/or serious personal
injury.
Page 281 of 521
.
�
Turn switch at the tip of stalk in direc-
tion of arrow3.
The steering wheel is heated. Indicator
lamp1 comes")
280 Controls in detailUseful featuresSwitching on�
Switch on the ignition (
�page 36).
�
Turn switch at the tip of stalk in direc-
tion of arrow3.
The steering wheel is heated. Indicator
lamp1 comes on.Switching off
�
Turn switch at the tip of stalk in direc-
tion of arrow2.
The heated steering wheel is switched
off. Indicator lamp1 goes out.
For information on steering wheel, see
“Multifunction steering wheel”
(
�page 156).
Floormats
1Retainer pin
2Eyelet
iThe steering wheel heating is tempo-
rarily suspended while indicator
lamp1 remains on when�
the temperature of the vehicle inte-
rior is above 86°F (30°C)
�
the temperature of the steering
wheel is above 95°F (35°C)
When these conditions do not apply
anymore, steering wheel heating con-
tinues.
iIndicator lamp1 flashes or goes out�
in case of power surge or undervolt-
age
�
in case of a steering wheel heating
malfunction
iThe steering wheel heating switches off
automatically when you remove the
SmartKey from the starter switch or, on
vehicles with KEYLESS-GO*, when you
switch off the ignition (
�page 61) and
open the driver’s door.
iTo install or remove the floormat more
easily, move the driver’s seat or front
passenger seat as far to the rear as
possible (
�page 41).
Page 305 of 521

304 OperationDriving instructionsDriving off
Apply the brakes to test them briefly after
driving off. Perform this procedure only
when the road is clear of other traffic.
Warm up the engine smoothly. Do not
place full load on the engine until the oper-
ating temperature has been reached.
When starting off on a slippery surface, do
not allow a drive wheel to spin for an ex-
tended period with the ESP
® switched off.
Doing so may cause serious damage to the
drivetrain which is not covered by the
Mercedes-Benz Limited Warranty.
Parking
!Simultaneously depressing the acceler-
ator pedal and applying the brake re-
duces engine performance and causes
premature brake and drivetrain wear.
!Set the parking brake whenever park-
ing or leaving the vehicle. In addition,
move gear selector lever to position P.
When parking on hills, always set the
parking brake and turn front wheel
against road curb.Warning!
G
Do not park this vehicle in areas where com-
bustible materials such as grass, hay or
leaves can come into contact with the hot
exhaust system, as these materials could be
ignited and cause a vehicle fire.
To reduce the risk of personal injury as a re-
sult of vehicle movement, before turning off
the engine and leaving the vehicle always:�
Keep right foot on brake pedal.
�
Firmly depress parking brake pedal.
�
Move the gear selector lever to
positionP.
�
Slowly release brake pedal.
�
When parked on an incline, turn front
wheel towards the road curb.
�
Turn the SmartKey in the starter switch
to position0 and remove the SmartKey
from the starter switch, or press
KEYLESS-GO* start/stop button (vehi-
cles with KEYLESS-GO*).
�
Take the SmartKey or the SmartKey with
KEYLESS-GO* with you and lock vehicle
when leaving.
Page 313 of 521

312 OperationAt the gas stationRefueling
The fuel filler flap is located on the
right-hand side of the vehicle towards the
rear. Locking/unlocking the vehicle with
the remote control automatically
locks/unlocks the fuel filler flap.
�
Turn the engine off �
by turning the SmartKey to
position0.
�
by pressing the KEYLESS-GO*
start/stop button. Open the driv-
er’s door (with the driver’s door
open, starter switch is now in
position0, same as SmartKey re-
moved from starter switch).
�
Remove the SmartKey from the starter
switch.
�
Open the fuel filler flap by pushing at
the point indicated by the arrow.
The fuel filler flap springs open.
�
Turn the fuel cap to the left and hold on
to it until possible pressure is released.
�
Take off the cap and set it in the recess
on the fuel filler flap.
To prevent fuel vapors from escaping
into open air, fully insert filler nozzle
unit.
�
Only fill your tank until the filler nozzle
unit cuts out – do not top up or over-
fill.
�
Replace fuel cap by turning it clockwise
until it audibly engages.
�
Close the fuel filler flap.
Warning!
G
Gasoline is highly flammable and poisonous.
It burns violently and can cause serious
injury. Whenever you are around gasoline,
avoid inhaling fumes and skin contact, extin-
guish all smoking materials. Never allow
sparks, flame or smoking materials near
gasoline!
Warning!
G
Overfilling of the fuel tank may create pres-
sure in the system which could cause a gas
discharge. This could cause the gasoline to
spray back out when removing the fuel
pump nozzle, which could cause personal in-
jury.
Page 318 of 521

When checking the oil level�
the vehicle must be parked on level
ground
�
with the engine at ope")
317 Operation
Engine compartment
Checking engine oil level with the con-
trol system (E 500, E 55 AMG)
When checking the oil level�
the vehicle must be parked on level
ground
�
with the engine at operating tempera-
ture, the vehicle must have been
stationary for at least 5 minutes with
the engine turned off
�
with the engine not at operating tem-
perature yet, the vehicle must have
been stationary for at least 30 minutes
with the engine turned off
To check the engine oil level via the multi-
function display, do the following:
�
Switch on the ignition (
�page 36).
The standard display (
�page 155) should
appear in the multifunction display.
�
Press button k or j on the mul-
tifunction steering wheel until the fol-
lowing message is seen in the
multifunction display:One of the following messages will
subsequently appear in the multifunc-
tion display:
�
Engine oil level
ok
�
Add 1.0 Qt.
to reach max. oil level(Canada:
1.0 Liter
)
�
Add 1.5 Qts.
to reach max. oil level(Canada:
1.5 Liters
)
�
Add 2.0 Qts.
to reach max. oil level(Canada:
2.0 Liters
)
�
If necessary, add engine oil.
For adding engine oil, see (
�page 319).
For more information on engine oil, see the
“Technical data” section (
�page 482) and
(
�page 485).
Other display messages
If the SmartKey or KEYLESS-GO start/stop
button* is not in position 2, the following
message will appear:
Switch ignition on
to check engine oil level�
Switch on the ignition (
�page 36).
If you see the message:
Observe waiting period
iIf you want to interrupt the checking
procedure, press buttonk orj
on the multifunction steering wheel.
��