Page 237 of 521

236 Controls in detailPower tilt/sliding sunroof*Opening and closing the power tilt/sliding sunroof
The tilt/sliding sunroof is opened and
closed electrically. The switch for the
tilt/sliding sunroof is on the overhead con-
trol panel.Sunroof switch1Push back to slide sunroof open
2Push forward to slide sunroof closed
3Push up to raise sunroof at rear
4Pull down to lower sunroof at rearWith the sunroof closed or tilted open, a
screen can be slid into the sunroof opening
to guard against sun rays. When sliding the
sunroof open, the screen will also retract.
Warning!
G
When closing the tilt/sliding sunroof, make
sure there is no danger of anyone being
harmed by the closing procedure.
The opening/closing procedure of the
tilt/sliding sunroof can be immediately halt-
ed by releasing the switch or, if the switch
was moved past the resistance point and re-
leased, by moving the switch in any direc-
tion.
The tilt/sliding sunroof is made out of glass.
In the event of an accident, the glass may
shatter. This may result in an opening in the
roof.
In a vehicle rollover, occupants not wearing
their seat belts or not wearing them properly
may be thrown out of the opening. Such an
opening also presents a potential for injury
for occupants wearing their seat belts prop-
erly as entire body parts or portions of them
may protrude from the passenger compart-
ment.
Page 262 of 521

261 Controls in detail
Loading
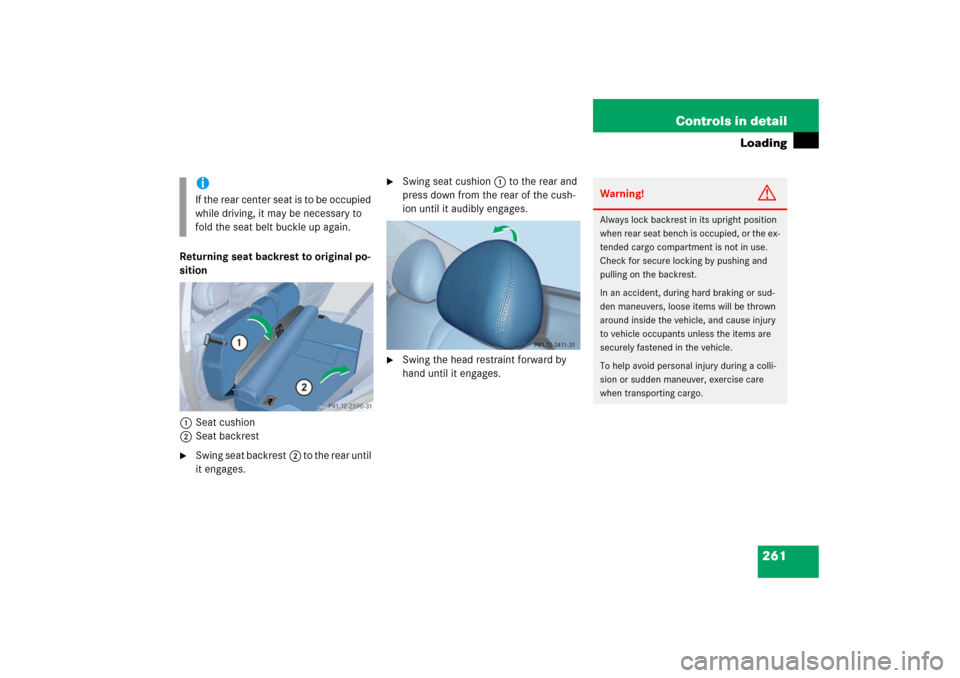
Returning seat backrest to original po-
sition
1Seat cushion
2Seat backrest�
Swing seat backrest2 to the rear until
it engages.
�
Swing seat cushion1 to the rear and
press down from the rear of the cush-
ion until it audibly engages.
�
Swing the head restraint forward by
hand until it engages.
iI f t h e r e a r ce n t e r s e a t i s t o b e o c c u p i e d
while driving, it may be necessary to
fold the seat belt buckle up again.
Warning!
G
Always lock backrest in its upright position
when rear seat bench is occupied, or the ex-
tended cargo compartment is not in use.
Check for secure locking by pushing and
pulling on the backrest.
In an accident, during hard braking or sud-
den maneuvers, loose items will be thrown
around inside the vehicle, and cause injury
to vehicle occupants unless the items are
securely fastened in the vehicle.
To help avoid personal injury during a colli-
sion or sudden maneuver, exercise care
when transporting cargo.
Page 267 of 521

266 Controls in detailLoading�
Turn mounting element 2 toL.
�
Insert mounting element 2 in cargo
rail 1.
�
Turn mounting element 2 until it en-
gages in the‹ position.
You should be able to feel the mounting
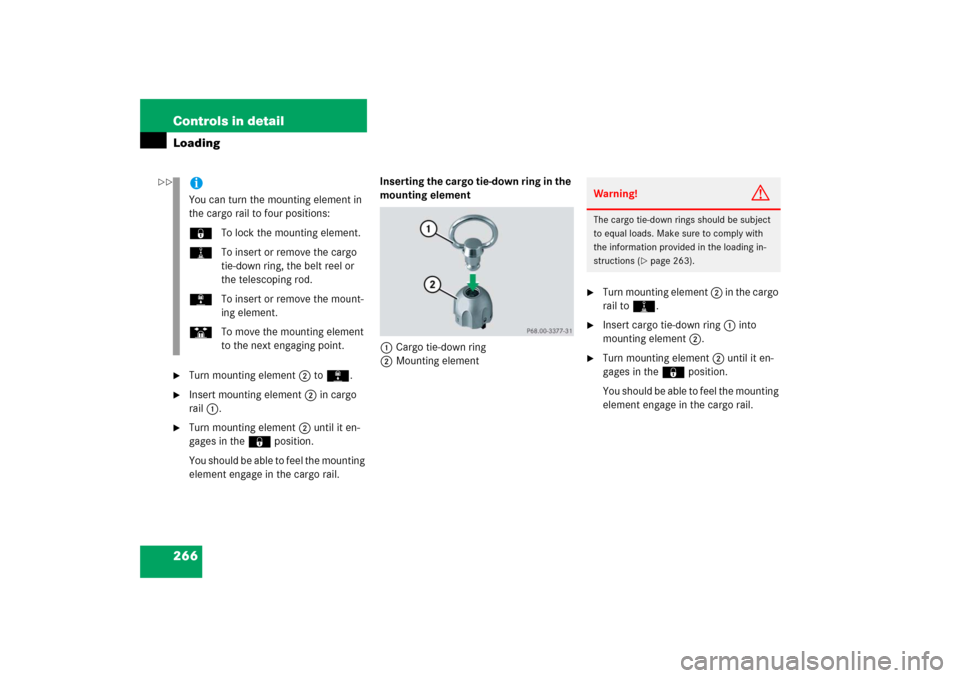
element engage in the cargo rail.Inserting the cargo tie-down ring in the
mounting element
1Cargo tie-down ring
2Mounting element
�
Turn mounting element 2 in the cargo
rail toN.
�
Insert cargo tie-down ring 1 into
mounting element 2.
�
Turn mounting element 2 until it en-
gages in the‹ position.
You should be able to feel the mounting
element engage in the cargo rail.
iYou can turn the mounting element in
the cargo rail to four positions:
‹To lock the mounting element.
NTo insert or remove the cargo
tie-down ring, the belt reel or
the telescoping rod.
LTo insert or remove the mount-
ing element.
STo move the mounting element
to the next engaging point.
Warning!
G
The cargo tie-down rings should be subject
to equal loads. Make sure to comply with
the information provided in the loading in-
structions (
�page 263).
��
Page 268 of 521
267 Controls in detail
Loading
Belt reel
1Belt reel
2Mounting element
3Locking button
�
Insert two mounting elements 2 into a
cargo rail.
�
Turn mounting element 2 in the cargo
rail toN.
�
Insert belt reel 1 into mounting ele-
ment 2.
�
Turn mounting element 2 in the cargo
rail until it engages in the‹ posi-
tion.
You should be able to feel the mounting
element engage in the cargo rail.
�
Press locking button 3 on the belt reel
and pull cargo net out in direction of ar-
row.
�
Place load between the cargo net and
the side wall of the cargo compart-
ment.
�
Press locking button 3 on belt reel.
With the other hand, slowly pull net
over load until it is taut.Telescoping rod
1Telescoping rod
2Mounting element
iThe belt reel can be used to tighten
light-weight loads against the side wall
of the cargo compartment, thus secur-
ing them from slipping.
iThe telescoping rod can be used to
tighten the load against the rear seats
so as to secure it from slipping.
Page 342 of 521

341 Operation
Tires and wheels
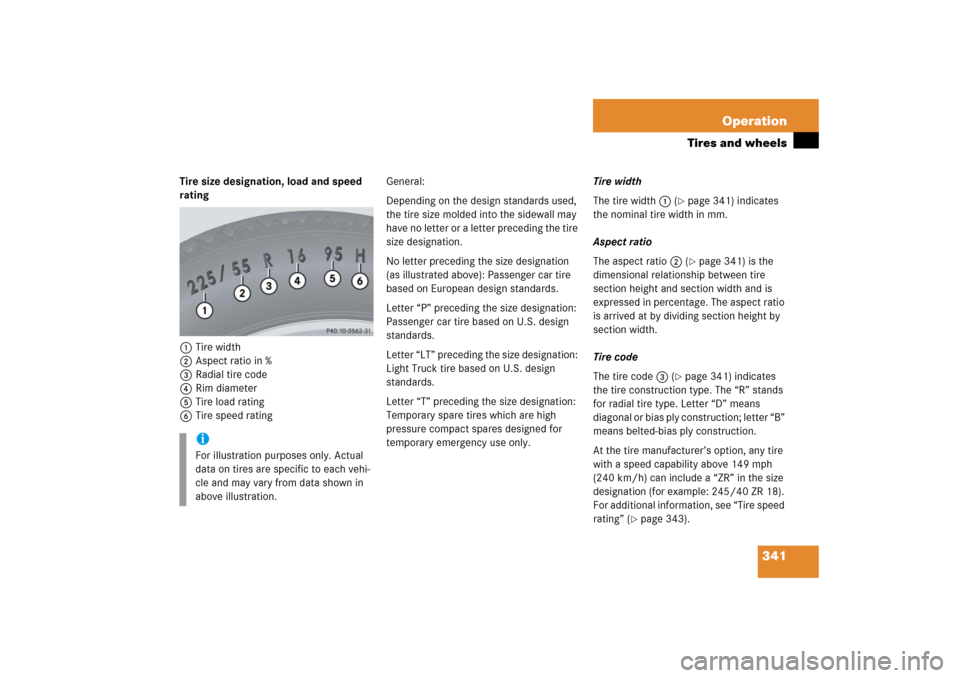
Tire size designation, load and speed
rating
1Tire width
2Aspect ratio in %
3Radial tire code
4Rim diameter
5Tire load rating
6Tire speed ratingGeneral:
Depending on the design standards used,
the tire size molded into the sidewall may
have no letter or a letter preceding the tire
size designation.
No letter preceding the size designation
(as illustrated above): Passenger car tire
based on European design standards.
Letter “P” preceding the size designation:
Passenger car tire based on U.S. design
standards.
Letter “LT” preceding the size designation:
Light Truck tire based on U.S. design
standards.
Letter “T” preceding the size designation:
Temporary spare tires which are high
pressure compact spares designed for
temporary emergency use only. Tire width
The tire width1 (
�page 341) indicates
the nominal tire width in mm.
Aspect ratio
The aspect ratio2 (�page 341) is the
dimensional relationship between tire
section height and section width and is
expressed in percentage. The aspect ratio
is arrived at by dividing section height by
section width.
Tire code
The tire code3 (
�page 341) indicates
the tire construction type. The “R” stands
for radial tire type. Letter “D” means
diagonal or bias ply construction; letter “B”
means belted-bias ply construction.
At the tire manufacturer’s option, any tire
with a speed capability above 149 mph
(240 km/h) can include a “ZR” in the size
designation (for example: 245/40 ZR 18).
For additional information, see “Tire speed
rating” (
�page 343).
iFor illustration purposes only. Actual
data on tires are specific to each vehi-
cle and may vary from data shown in
above illustration.
Page 365 of 521

364 OperationVehicle care�
Use the appropriate MB-Touch-Up
Stick for quick and provisional repairs
of minor paint damage (i.e. chips from
stones, vehicle doors, etc.).
Engine cleaning
Prior to cleaning the engine compartment,
make sure to protect electrical compo-
nents and connectors from contact with
water and cleaning agents.
Corrosion protection, such as MB Anticor-
rosion Wax should be applied to the engine
compartment after every engine cleaning.
Before applying, all control linkage bush-
ings and joints should be lubricated. The
poly-V-belt and all pulleys should be pro-
tected from any wax.
Vehicle washing
In the winter, thoroughly remove all traces
of road salt as soon as possible.
When washing the vehicle underbody, do
not forget to clean the inner sides of the
wheels.Hand-wash
Do not use hot water or wash your vehicle
in direct sunlight.
�
Only use a mild car wash detergent,
such as Mercedes-Benz approved Car
Shampoo.
�
Thoroughly spray the vehicle with a dif-
fused jet of water.
Direct only a very weak spray towards
the ventilation intake.
�
Use plenty of water and rinse the
sponge and chamois frequently.
�
Rinse with clean water and thoroughly
dry with a chamois.
Do not allow cleaning agents to dry on
the finish.
Automatic car wash
You can have your car washed in an auto-
matic car wash from the start. Automatic
car washes without brushes are prefera-
ble.
If the vehicle is very dirty, prewash it be-
fore running it through the automatic car
wash.
iVehicles with KEYLESS-GO*:
If a door handle is hit by a strong jet of
water, and a SmartKey with
KEYLESS-GO* is in close proximity, i.e.
within approximately 3 ft (approxi-
mately 1 m), the vehicle could be inad-
vertently locked or unlocked.
Page 369 of 521

368 OperationVehicle careHard plastic trim items�
Use Pour Mercedes-Benz approved
Interior Care, a soft, lint-free cloth and
apply with light pressure onto.
Steering wheel and gear selector lever
�
Wipe with a damp cloth and dry thor-
oughly or clean with Mercedes-Benz
approved Leather Care.
Carpets
�
Use Mercedes-Benz approved Carpet
and Fabric Care for cleaning the car-
pets.
Headliner and shelf below rear window
�
Use a soft bristle brush or a dry-sham-
poo cleaner in case of excessive dirt. Seat belts
�
Only use clear, lukewarm water and
soap.Upholstery
Using aftermarket seat covers or wearing
clothing that have the tendency to give off
coloring (e.g. when wet, etc.) may cause
the upholstery to become permanently dis-
colored. By lining the seats with a proper
intermediate cover, contact-discoloration
will be prevented.
Leather upholstery
�
Wipe leather upholstery with a damp
cloth and dry thoroughly or clean with
Mercedes-Benz approved Leather
Care.
Exercise particular care when cleaning per-
forated leather as its underside should not
become wet.
!To prevent scratches, do not use scour-
ing agents.
!The webbing must not be treated with
chemical cleaning agents. Do not dry
the webbing at temperatures above
176°F (80°C) or in direct sunlight.Warning!
G
Do not bleach or dye seat belts as this may
severely weaken them. In a crash they may
not be able to provide adequate protection.
Page 378 of 521

377 Practical hints
What to do if …
Problem
Possible cause/consequence
Suggested solution
l
Only vehicles with Distronic*:
The red distance warning lamp
comes on while driving.
You are too close to the vehicle in front of you
to maintain selected speed.
�
Apply the brakes immediately to in-
crease the following distance.
Only vehicles with Distronic*:
The red distance warning lamp
comes on while driving and you
hear a warning chime sound.
�
You are gaining too rapidly on the vehicle
ahead of you.
�
The distance warning system has recog-
nized a stationary obstacle on your prob-
able line of travel.
�
Apply the brakes immediately.
�
Carefully observe the traffic situation.
You may need to brake or maneuver
to avoid hitting an obstacle.
W
The yellow fuel tank reserve
warning lamp comes on while
driving.
The fuel level has gone below the reserve
mark.
�
Refuel at the next gas station
(�page 312).
<
The red seat belt telltale comes
on after starting the engine with
all doors closed.
The seat belt telltale reminds you and your
passengers to fasten your seat belts before
driving off.
�
Fasten your seat belts.
The red seat belt telltale flashes
and you additionally hear an in-
termittent warning signal with
increasing intensity for a maxi-
mum of 60 seconds when the
vehicle’s speed exceeds
15 mph (25 km/h).
You and/or your front passenger have for-
gotten to fasten your seat belts.
There are items placed on the front passen-
ger seat and therefore the system senses the
front passenger seat as being occupied.
�
Fasten your seat belts.
�
Remove the items from the front pas-
senger seat and put them in a safe
place.