Page 375 of 521

374 Practical hintsWhat to do if …Problem
Possible cause/conse-
quence
Suggested solution
;
(USA only)
3
(Canada only)
The red brake warning lamp
comes on while driving and
you hear a warning sound.
You are driving with the park-
ing brake set.
�
Release the parking brake.
�
Observe the additional message in
the multifunction display.
The red brake warning lamp
comes on while driving.
�
There is a malfunction in
the electrohydraulic brake
system.
�
There is insufficient brake
fluid in the reservoir.
�
Risk of accident! Do not drive any fur-
ther. Consult a Mercedes-Benz
Service Center. Under no circum-
stances should you top up the brake
fluid. This will not solve the problem.
Warning!
G
Driving with the brake warning lamp illumi-
nated can result in an accident. Have your
brake system checked immediately if the
brake warning lamp stays on. Do not add
brake fluid before checking the brake
system.
Overfilling the brake fluid reservoir can re-
sult in spilling brake fluid on hot engine
parts and the brake fluid catching fire. You
can be seriously burned.
!If you find that the brake fluid in the
brake fluid reservoir has fallen to the
minimum mark or below, have the
brake system checked for brake pad
thickness and leaks.
Page 376 of 521

375 Practical hints
What to do if …
Problem
Possible cause/consequence
Suggested solution
ú
(USA only)
±
(Canada only)
The yellow engine mal-
function indicator lamp
comes on while driving.
There is a malfunction in:�
The fuel management system
�
The ignition system
�
The emission control system
�
Systems which affect emissions
Such malfunctions may result in excessive
emissions values and may switch the engine
to its limp-home (emergency operation)
mode.
�
Have the vehicle checked as soon as possible
by an authorized Mercedes-Benz Center.
An on-board diagnostic connector is used by
the service station to link the vehicle to the
shop diagnostics system. It allows the accu-
rate identification of system malfunctions
through the readout of diagnostic trouble
c odes . I t is loc a ted i n the f ront l ef t a re a of the
footwell next to the parking brake.
A loss of pressure has been detected in the
fuel system. The fuel cap may not be closed
properly or the fuel system may be leaky.
�
Check the fuel cap.
If it is not closed properly:
�
Close the fuel cap.
If it is closed properly:
�
Have the fuel system checked by an autho-
rized Mercedes-Benz Center.
Your fuel tank is empty.
�
After refuelling start, turn off and restart the
engine three or four times in succession.
The limp-home mode is canceled. You do not
need to have your vehicle checked.
Page 399 of 521

398 Practical hintsWhat to do if …Display symbol
Display messages
Possible cause/consequence
Possible solution
(USA only);(Canada only)3
Reduced braking power
Visit workshop
The electrohydraulic brake system is in
emergency operation mode. Consider-
able brake pedal force is required and the
stopping distance is increased.
�
Continue driving with added caution.
�
Adjust driving to be consistent with
reduced braking responsiveness.
�
Visit an authorized Mercedes-Benz
Center as soon as possible.
Service brake
Visit workshop
There are malfunctions, but the electro-
hydraulic brake system is operating nor-
mally.
�
Visit an authorized Mercedes-Benz
Center as soon as possible.
Brake overheated
Drive on, but with
even greater care
The brake system is overheated due to an
excessive load on the brakes.
�
Relieve the load on the brake system.
�
Drive more smoothly and think ahead
to avoid unnecessary braking.
�
When driving down slopes, shift into a
lower gear to use the engine’s braking
power (
�page 191).
�
Cautiously continue driving so that
the air stream will cool down the
brakes.
Release parking
brake
You are driving with the parking brake
set.
�
Release the parking brake
(�page 52).
Page 422 of 521

421 Practical hints
Where will I find ...?
Vehicle tool kit (vehicles with TIREFIT)
1Vehicle tool kit and jack
2Electric air pump
3TIREFIT kitVehicle jackThe vehicle jack is located in the cargo
compartment underneath the third row
seat cushions and footwell (
�page 420) or
underneath the cargo compartment floor
(
�page 419).
Storage position�
Remove vehicle jack from its
compartment.
�
Turn crank handle in direction of arrow
as far as it will go.
Warning!
G
The jack is designed exclusively for jacking
up the vehicle at the jack take-up brackets
built into both sides of the vehicle. To help
avoid personal injury, use the jack only to lift
the vehicle during a wheel change. Never
get beneath the vehicle while it is supported
by the jack. Keep hands and feet away from
the area under the lifted vehicle. Always
firmly set parking brake and block wheels
before raising vehicle with jack.
Do not disengage parking brake while the
vehicle is raised. Be certain that the jack is
always vertical (plumb line) when in use,
especially on hills. Always try to use the jack
on level surface. Make sure the jack arm is
fully seated in the jack take-up bracket.
Always lower the vehicle onto sufficient
capacity jackstands before working under
the vehicle.
Page 433 of 521
432 Practical hintsReplacing bulbs
Front lamps Rear lamps
Lamp
Type
1
Additional turn signal
lamp
LED
2
Turn signal lamp
1156 NA
3
Side marker lamp
W 5 W
4
Halogen headlamp:
Low beam
Bi-Xenon* headlamp:
Low and high beam
1
1Vehicles with Bi-Xenon* headlamps: Low beam
and high beam use the same D2S-35W lamp. Do
not replace the Bi-Xenon bulbs yourself. Contact
your authorized Mercedes-Benz Center.
H7 (55 W)
D2S-35 W
5
Halogen headlamp:
High beam/high beam
flasher
Bi-Xenon* headlamp:
High beam flasher
H7 (55 W)
H7 (55 W)
Parking and standing
lamp
W 5 W
6
Front fog lamp
H1 (55 W)
Lamp
Type
7
High mounted brake
lamp
LED
8
Brake, tail, parking,
standing, backup lamp
and turn signal lamp.
Rear fog lamp (only
driver’s side)
HiP
LED*
9
License plate lamps
C 5 W
Page 441 of 521

440 Practical hintsFlat tirePreparing the vehicle�
Park the vehicle in a safe distance from
moving traffic on a hard, flat surface
when possible.
�
Turn on the hazard warning flasher
(�page 147).
�
Turn the steering wheel so that the
front wheels are in a straight ahead po-
sition.
�
Set the parking brake (
�page 60).
�
Move the gear selector lever toP.
Vehicles with SmartKey:
�
Turn off the engine (
�page 61).
�
Remove the SmartKey from the starter
switch.Vehicles with SmartKey with
KEYLESS-GO*:
�
Turn off the engine by pressing the
KEYLESS-GO* start/stop button on the
gear selector lever once (
�page 61).
�
Open the driver’s door (this puts the ig-
nition in position0, same as with the
SmartKey removed from the starter
switch). The driver’s door then can be
closed again.
�
Have any passenger exit the vehicle at
a safe distance from the roadway.
Sealing tires with TIREFIT
E 55 AMG vehicles with foldable third row
seat are equipped with TIREFIT.
Small tire punctures, particularly those in
the tread, can be sealed with TIREFIT.
TIREFIT can be used in ambient tempera-
tures down to -4°F (-20°C).
iOpen door only when conditions are
safe to do so.
Warning!
G
Keep TIREFIT away from sparks, open flame
or heat source.
Do not smoke.
Page 447 of 521

446 Practical hintsFlat tire
�
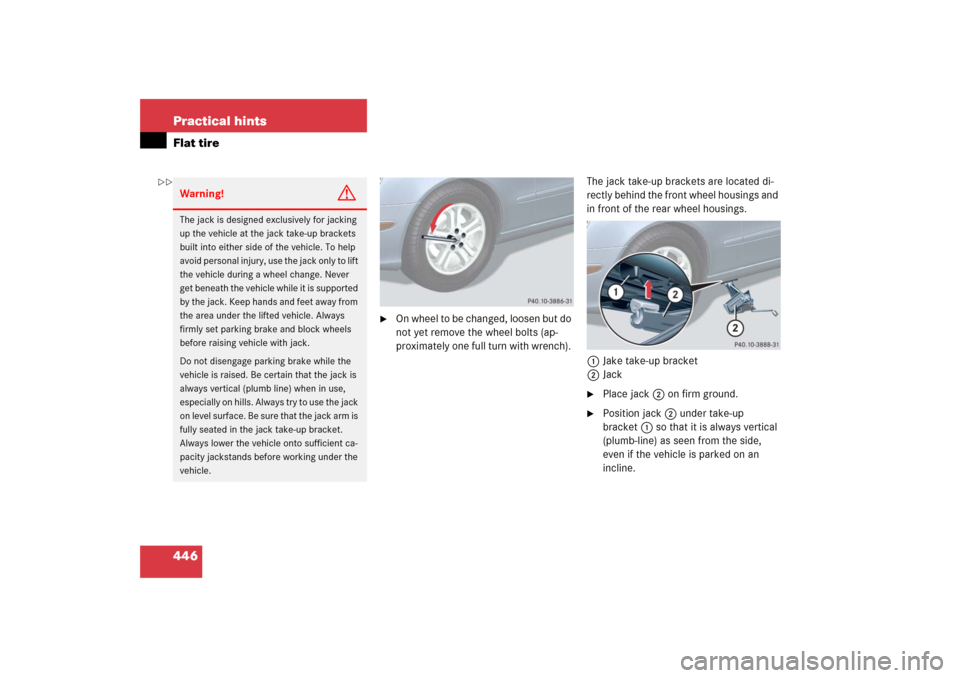
On wheel to be changed, loosen but do
not yet remove the wheel bolts (ap-
proximately one full turn with wrench). The jack take-up brackets are located di-
rectly behind the front wheel housings and
in front of the rear wheel housings.
1Jake take-up bracket
2Jack
�
Place jack2 on firm ground.
�
Position jack2 under take-up
bracket1 so that it is always vertical
(plumb-line) as seen from the side,
even if the vehicle is parked on an
incline.
Warning!
G
The jack is designed exclusively for jacking
up the vehicle at the jack take-up brackets
built into either side of the vehicle. To help
avoid personal injury, use the jack only to lift
the vehicle during a wheel change. Never
get beneath the vehicle while it is supported
by the jack. Keep hands and feet away from
the area under the lifted vehicle. Always
firmly set parking brake and block wheels
before raising vehicle with jack.
Do not disengage parking brake while the
vehicle is raised. Be certain that the jack is
always vertical (plumb line) when in use,
especially on hills. Always try to use the jack
on level surface. Be sure that the jack arm is
fully seated in the jack take-up bracket.
Always lower the vehicle onto sufficient ca-
pacity jackstands before working under the
vehicle.
��
Page 454 of 521

453 Practical hints
Batteries
Disconnecting the battery�
Depress parking brake firmly or move
gear selector lever to positionP.
�
Turn off all electrical consumers.
!Never loosen or detach battery termi-
nal clamps while the engine is running
or the SmartKey is in the starter switch.
Otherwise the alternator and other
electronic components could be se-
verely damaged.
Have the battery checked regularly by
an authorized Mercedes-Benz Center.
Refer to Maintenance Booklet for main-
tenance intervals or contact an autho-
rized Mercedes-Benz Center for further
information.Warning!
G
Do not place metal objects on the battery as
this could result in a short circuit.
Use leak-proof battery only to avoid the risk
of acid burns in the event of an accident.
Warning!
G
The electrohydraulic brake system requires
electrical power to operate.
A malfunction in the vehicle’s power supply
or electrical system may impair brake sys-
tem operation and switch it into its emer-
gency operation mode. The same applies if
battery is disconnected. To brake, the driver
must then apply significantly greater brake
pedal pressure and depress the pedal much
further to obtain the expected braking ef-
fect. If necessary, apply full pressure to the
brake pedal. Brakes may only be applied to
the front wheels. Stopping distance is in-
creased! Adjust your driving style according-
ly. For more information, refer to
“Electrohydraulic brake system”
(�page 96).
Warning!
G
With a disconnected battery�
you will no longer be able to turn the
SmartKey in the starter switch and
pressing the KEYLESS-GO* start/stop
button on the gear selector lever will
have no effect
�
the gear selector lever will remain
locked in positionP
��