Page 268 of 521
267 Controls in detail
Loading
Belt reel
1Belt reel
2Mounting element
3Locking button
�
Insert two mounting elements 2 into a
cargo rail.
�
Turn mounting element 2 in the cargo
rail toN.
�
Insert belt reel 1 into mounting ele-
ment 2.
�
Turn mounting element 2 in the cargo
rail until it engages in the‹ posi-
tion.
You should be able to feel the mounting
element engage in the cargo rail.
�
Press locking button 3 on the belt reel
and pull cargo net out in direction of ar-
row.
�
Place load between the cargo net and
the side wall of the cargo compart-
ment.
�
Press locking button 3 on belt reel.
With the other hand, slowly pull net
over load until it is taut.Telescoping rod
1Telescoping rod
2Mounting element
iThe belt reel can be used to tighten
light-weight loads against the side wall
of the cargo compartment, thus secur-
ing them from slipping.
iThe telescoping rod can be used to
tighten the load against the rear seats
so as to secure it from slipping.
Page 274 of 521
273 Controls in detail
Useful features
Storage compartment in the rear cen-
ter console�
Briefly press the top of the compart-
ment.
It extends automatically.Ruffled storage bags
Ruffled storage bags are located on the
back of the front seats.
Warning!
G
Do not place objects with a combined
weight of more than 4.4 lbs (2 kg) into the
ruffled storage bag. Otherwise, the Occu-
pant Classification System OCS (
�page 81)
may not be able to properly approximate the
occupant weight category.
The ruffled storage bag is intended for stor-
ing light-weight items only.
Heavy objects, objects with sharp edges or
fragile objects may not be transported in the
ruffled storage bag. In an accident, during
hard braking, or sudden maneuvers, they
could be thrown around inside the vehicle
and cause injury to vehicle occupants.
The ruffled storage bag cannot protect
transported goods in the event of an acci-
dent.
Page 275 of 521

274 Controls in detailUseful featuresParcel net in front passenger footwell
A small convenience parcel net is located
in the front passenger footwell. It is for
small and light items, such as road maps,
mail, etc.
Cup holders
Warning!
G
The parcel net is intended for storing
light-weight items only.
Heavy objects, objects with sharp edges or
fragile objects may not be transported in the
parcel net. In an accident, during hard brak-
ing, or sudden maneuvers, they could be
thrown around inside the vehicle and cause
injury to vehicle occupants.
The parcel net cannot protect transported
goods in the event of an accident.
Warning!
G
In order to help prevent spilling liquids on
vehicle occupants and/or vehicle equip-
ment, only use containers that fit into the
cup holder. Use lids on open containers and
do not fill containers to a height where the
contents, especially hot liquids, could spill
during braking, vehicle maneuvers, or in an
accident. Liquids spilled on vehicle occu-
pants may cause serious personal injury.
Liquids spilled on vehicle equipment may
cause damage not covered by the
Mercedes-Benz Limited Warranty.
When not in use, keep the cup holder
closed. An open cup holder may cause injury
to you or others when contacted during
braking, vehicle maneuvers, or in an acci-
dent.
Page 328 of 521

327 Operation
Tires and wheels
Direction of rotation
Unidirectional tires offer added advan-
tages, such as better hydroplaning perfor-
mance. To benefit, however, you must
make sure the tires rotate in the direction
specified.
An arrow on the sidewall indicates the
intended direction of rotation (spinning) of
the tire.
Loading the vehicle
Two labels on your vehicle show how much
weight it may properly carry. �
The Tire and Loading Information
placard (Example A) or the Vehicle Tire
Information placard (Example B) can be
found on the driver’s door B-pillar. This
placard tells you important information
about the number of people that can be
in the vehicle and the total weight that
can be carried in the vehicle. It also
contains information on the proper size
and recommended tire inflation
pressures for the original equipment
tires on your vehicle.
�
The Certification label, also found on
the driver’s door B-pillar tells you about
the gross weight capacity of your vehi-
cle, called the Gross Vehicle Weight
Rating (GVWR). The GVWR includes the
weight of the vehicle, all occupants,
fuel and cargo. The Certification label
also tells you about the front and rear
axle weight capacity, called the Gross
Axle Weight Rating (GAWR). The GAWR
is the total allowable weight that can be
carried by a single axle (front or rear).
Never exceed the GVWR or GAWR for
either the front axle or rear axle.
iSpare wheels may be mounted against
the direction of rotation (spinning) even
with a unidirectional tire for temporary
use only until the regular drive wheel
has been repaired or replaced. Always
observe and follow applicable tempo-
rary use restrictions and speed limita-
tions indicated on the spare wheel.
Page 329 of 521

328 OperationTires and wheels1Driver’s door B-pillar
Following is a discussion on how to work
with the information contained on the two
placards with regards to loading your vehi-
cle.Tire and Loading Information
Your vehicle is equipped with either the
Tire and Loading Information placard
(Example A) or the Vehicle Tire Information
placard (Example B). Placard (Example A)
1Load limit information on the Tire and
Loading Information placard
Warning!
G
Do not overload the tires by exceeding the
specified load limit or vehicle capacity
weight as indicated on the placard on the
driver’s door B-pillar. Overloading the tires
can overheat them, possibly causing a
blowout. Overloading the tires can also
result in handling or steering problems, or
brake failure.
iData shown on placard examples are
for illustration purposes only. Load lim-
it data are specific to each vehicle and
may vary from data shown in the illus-
trations below. Refer to placard on ve-
hicle for actual data specific to your
vehicle.
Page 330 of 521

329 Operation
Tires and wheels
The placard showing the load limit informa-
tion is located on the driver’s door B-pillar.
If your vehicle is equipped with the Tire and
Loading Information placard (Example A),
locate the statement “The combined
weight of occupants and cargo should
never exceed XXX kilograms or XXX lbs.”
on this placard. The combined weight of all
occupants, cargo/luggage and trailer
tongue load (if applicable) should never
exceed the weight referenced in that
statement.
Placard (Example B)
1Load limit information on the Vehicle
Tire Information placardThe placard showing the load limit informa-
tion is located on the driver’s door B-pillar.
If your vehicle is equipped with the Vehicle
Tire Information placard (Example B),
locate the heading “Vehicle Capacity
Weight” on this placard. The combined
weight of all occupants, cargo/luggage
and trailer tongue (if applicable) should
never exceed the weight listed next to
vehicle capacity weight.
Seating capacity
The seating capacity gives you important
information on the number of occupants
that can be in the vehicle. Observe front
and rear seating capacity. Your vehicle is
equipped with either placard Example A or
placard Example B located on the driver’s
door B-pillar (
�page 328).
Placard (Example A)1Seating capacity
iData shown on placard examples are
for illustration purposes only. Seating
data are specific to each vehicle and
may vary from data shown in the illus-
trations below. Refer to placard on ve-
hicle for actual data specific to your
vehicle.
Page 331 of 521
1Seating capacity
Steps for determining correct load limit
The following steps have been developed
as required of all manufacturers under
Title 49, Co")
330 OperationTires and wheelsPlacard (Example B)1Seating capacity
Steps for determining correct load limit
The following steps have been developed
as required of all manufacturers under
Title 49, Code of U.S. Federal Regulations,
Part 575 pursuant to the “National Traffic
and Motor Vehicle Safety Act of 1966”.
Step 1 (Vehicles equipped with placard
Example A)�
Locate the statement “The combined
weight of occupants and cargo should
never exceed XXX kg or XXX lbs.” on
your vehicle’s placard.Step 1 (Vehicles equipped with placard
Example B)
�
Locate the heading “Vehicle Capacity
Weight” on your vehicle’s placard.
Step 2
�
Determine the combined weight of the
driver and passengers that will be
riding in your vehicle.
Step 3
�
Subtract the combined weight of the
driver and passengers from XXX kilo-
grams or XXX lbs.
Step 4
�
The resulting figure equals the avail-
able amount of cargo and luggage load
capacity. For example, if the “XXX”
amount equals 1400 lbs. and there will
be five 150 lbs. passengers in your
vehicle, the amount of available cargo
and luggage load capacity is 650 lbs.
(1400-750 (5 x150) = 650 lbs.).Step 5
�
Determine the combined weight of
luggage and cargo being loaded on the
vehicle. That weight may not safely
exceed the available cargo and luggage
load capacity calculated in step 4.
Step 6 (if applicable)
�
If your vehicle will be towing a trailer,
load from your trailer will be trans-
ferred to your vehicle. Consult this
manual to determine how this reduces
the available cargo and luggage load
capacity of your vehicle (
�page 332).
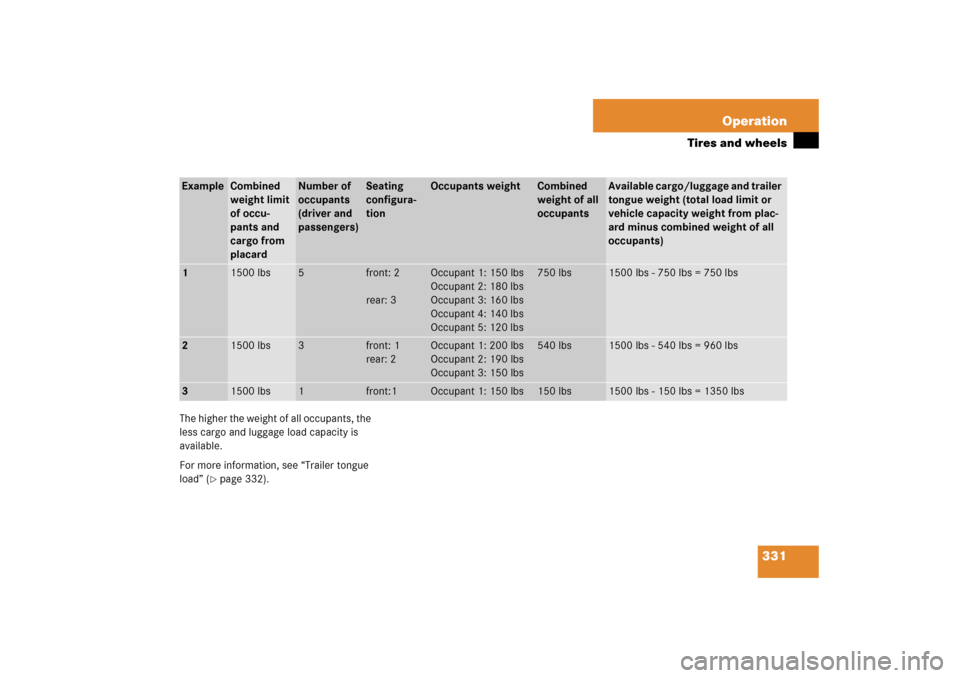
The following table shows examples on
how to calculate total and cargo load
capacities with varying seating configura-
tions and number and size of occupants.
The following examples use a load limit
of 1500 lbs. This is for illustration
purposes only. Make sure you are using
the actual load limit for your vehicle stated
on the vehicle’s placard (
�page 328).
Page 332 of 521
331 Operation
Tires and wheels
The higher the weight of all occupants, the
less cargo and luggage load capacity is
available.
For more information, see “Trailer tongue
load” (
�page 332).
Example
Combined
weight limit
of occu-
pants and
cargo from
placard
Number of
occupants
(driver and
passengers)
Seating
configura-
tion
Occupants weight
Combined
weight of all
occupants
Available cargo/luggage and trailer
tongue weight (total load limit or
vehicle capacity weight from plac-
ard minus combined weight of all
occupants)
1
1500 lbs
5
front: 2
rear: 3
Occupant 1: 150 lbs
Occupant 2: 180 lbs
Occupant 3: 160 lbs
Occupant 4: 140 lbs
Occupant 5: 120 lbs
750 lbs
1500 lbs - 750 lbs = 750 lbs
2
1500 lbs
3
front: 1
rear: 2
Occupant 1: 200 lbs
Occupant 2: 190 lbs
Occupant 3: 150 lbs
540 lbs
1500 lbs - 540 lbs = 960 lbs
3
1500 lbs
1
front:1
Occupant 1: 150 lbs
150 lbs
1500 lbs - 150 lbs = 1350 lbs