Page 38 of 521
.SmartKey with KEYLESS-GO*
Pressing the KEYLESS-GO start/stop")
37 Getting started
Unlocking
For information on starting the engine
using the SmartKey, see “Starting with the
SmartKey” (
�page 50).SmartKey with KEYLESS-GO*
Pressing the KEYLESS-GO start/stop but-
ton on the gear selector lever corresponds
to turning the SmartKey to the various
starter switch positions.
If you firmly depress the brake pedal dur-
ing pressing the KEYLESS-GO start/stop
button, the engine starts automatically.
iWhen you switch on the ignition, the in-
dicator and warning lamps (except low
beam headlamp indicator lamp, high
beam headlamp indicator lamp, and
turn signal indicator lamps unless acti-
vated) in the instrument cluster come
on. The indicator and warning lamps
(except low beam headlamp indicator
lamp, high beam headlamp indicator
lamp, and turn signal indicator lamps if
activated) should go out when the en-
gine is running. This indicates that the
respective systems are operational.iThe SmartKey can only be removed
from the starter switch with the gear
selector lever in position P.
!If the SmartKey cannot be turned in the
starter switch, the starter battery may
not be sufficiently charged.�
Check the battery and charge it if
necessary (
�page 429).
�
Get a jump start (
�page 456).
To prevent accelerated battery dis-
charge or a completely discharged bat-
tery, always remove the SmartKey from
the starter switch when the engine is
not in operation.
iThe function of the SmartKey overrules
the KEYLESS-GO function.
Page 39 of 521

38 Getting startedUnlockingKEYLESS-GO start/stop button1USA only
2Canada only
The SmartKey with KEYLESS-GO must be
located in the vehicle.�
Make sure the gear selector lever is set
toP.
�
Do not depress the brake pedal.Position 0
Before you press the KEYLESS-GO start/
stop button, the vehicle’s on-board elec-
tronics have status 0 (as with SmartKey
removed).
Position 1
�
Press KEYLESS-GO start/stop button
once.
This supplies power for some electrical
consumers, such as seat adjustment.Ignition (or position 2)
�
Press KEYLESS-GO start/stop button
twice.
This supplies power for all electrical
consumers. All lamps in the instrument
cluster (except low beam headlamp in-
dicator lamp, high beam headlamp
indicator lamp, and turn signal indica-
tor lamps unless activated) come on. If
a lamp in the instrument cluster fails to
come on when the ignition is switched
on, have it checked and replaced if nec-
essary. If a lamp in the instrument clus-
ter remains on after starting the engine
or comes on while driving, see “Lamps
in instrument cluster” (
�page 372).
iIf you now press the KEYLESS-GO
start/stop button�
once again, the ignition (position2)
is switched on.
�
twice, the power supply is again
switched off.
iIf you now press the KEYLESS-GO
start/stop button once, the power sup-
ply is again switched off.
Page 40 of 521
39 Getting started
Unlocking
For information on starting the engine us-
ing the KEYLESS-GO start/stop button,
see “Starting with KEYLESS-GO*”
(�page 51).iWhen you switch on the ignition, the in-
dicator and warning lamps (except low
beam headlamp indicator lamp, high
beam headlamp indicator lamp, and
turn signal indicator lamps unless acti-
vated) in the instrument cluster come
on. The indicator and warning lamps
(except low beam headlamp indicator
lamp, high beam headlamp indicator
lamp, and turn signal indicator lamps if
activated) should go out when the en-
gine is running. This indicates that the
respective systems are operational.
Page 44 of 521

43 Getting started
Adjusting
Steering wheel adjustment
The stalk for steering wheel adjustment is
located on the lower left of the steering
column.
1Adjusting steering column, in or out
2Adjusting steering column, up or down�
Switch on the ignition (
�page 36).
or
�
Open the driver’s door.Adjusting steering column in or out
�
Move stalk in direction of arrows1
until a comfortable steering wheel posi-
tion is reached with your arms slightly
bent at the elbow.
Adjusting steering column up or down
�
Move stalk in direction of arrows2.
Make sure your legs can move freely
and all the displays (incl. malfunction
and indicator lamps) on the instrument
cluster are clearly visible.Easy-entry/exit feature
This feature allows for easier entry into and
exit from the vehicle. When entering and
exiting the vehicle, the steering wheel is in
its uppermost position.
The easy-entry/exit feature can be activat-
ed or deactivated in the
Convenience
sub-
menu of the control system (
�page 177).
iThe memory function (
�page 140) lets
you store the settings for the steering
wheel together with the settings for the
exterior rear view mirrors and the
driver’s seat position.
Warning!
G
You must make sure no one can become
trapped or injured by the moving steering
wheel when the easy-entry/exit feature is
activated.
To stop steering wheel movement, do one of
the following:�
Move steering column stalk.
�
Press one of the memory buttons or the
memory button M (
�page 140).
��
Page 53 of 521
52 Getting startedDrivingIf the engine does not start after several
starting attempts, there could be a mal-
function in the engine electronics or in the
fuel supply system.�
Notify an authorized Mercedes-Benz
Center.
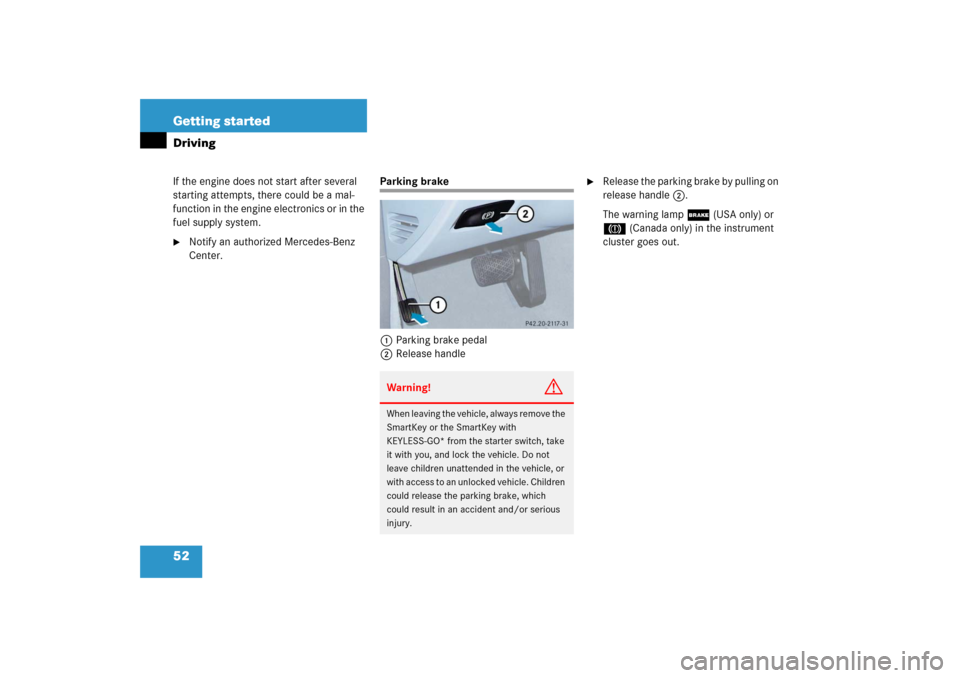
Parking brake
1Parking brake pedal
2Release handle
�
Release the parking brake by pulling on
release handle2.
The warning lamp ; (USA only) or
3 (Canada only) in the instrument
cluster goes out.
Warning!
G
When leaving the vehicle, always remove the
SmartKey or the SmartKey with
KEYLESS-GO* from the starter switch, take
it with you, and lock the vehicle. Do not
leave children unattended in the vehicle, or
w i t h a c c e s s t o a n u n l o c k e d v e h i c l e . C h i l d r e n
could release the parking brake, which
could result in an accident and/or serious
injury.
Page 55 of 521
54 Getting startedDrivingSwitching on headlamps
Low beam headlamps
The exterior lamp switch is located on the
dashboard to the left of the steering wheel.Exterior lamp switch1Off
2Low beam headlamps on�
Turn the exterior lamp switch to
positionB.
The low beam headlamp indicator
lampB in the instrument cluster
comes on (
�page 143).High beam
The combination switch is located on the
left of the steering column.
Combination switch1High beam
2High beam flasher�
Push the combination switch in direc-
tion of arrow1.
The high beam headlamp indicator
lampA in the instrument cluster
comes on (
�page 24).
For more information on headlamps, see
“Lighting” (
�page 143).
Turn signals
The combination switch is located on the
left of the steering column.Combination switch1Turn signals, right
2Turn signals, left�
Press the combination switch in direc-
tion of arrow1 or2.
The corresponding turn signal indicator
lamp L or K in the instrument
cluster flashes.
Page 61 of 521
 or 3
(Canada")
60 Getting startedParking and lockingParking brake
1Parking brake pedal
2Release handle�
Step firmly on parking brake pedal1.
When the engine is running, the warn-
ing lamp ; (USA only) or 3
(Canada only) in the instrument cluster
will be illuminated.
Warning!
G
When leaving the vehicle, always remove the
SmartKey or the SmartKey with
KEYLESS-GO* from the starter switch, take
it with you and lock the vehicle. Do not leave
children unattended in the vehicle, or with
access to an unlocked vehicle. Children
could release the parking brake and/or
move the gear selector lever from
positionP, either of which could result in an
accident and/or serious injury.
Warning!
G
Getting out of your vehicle with the gear se-
lector lever not fully engaged in positionP is
dangerous. Also, when parked on an incline,
positionP alone may not prevent your vehi-
cle from moving, possibly hitting people or
objects.
Always set the parking brake in addition to
shifting to positionP.
When parked on an incline, turn front wheels
towards the road curb.
Page 67 of 521

�
Child restraints (
�page")
66 Safety and SecurityOccupant safetyIn this section you will learn the most
important facts about the restraint system
components of the vehicle.�
Seat belts (
�page 72)
�
Child restraints (
�page 78)
�
Lower anchors and tethers for children
(LATCH) (
�page 88)
Supplemental Restraint System (SRS) with
�
Air bags (
�page 67)
�
Air bag control unit (with crash
sensors)
�
Emergency tensioning device (ETD) for
seat belts (
�page 76)
Air bag system components with
�
75indicator lamp
(�page 84)
�
Front passenger seat with Occupant
Classification System (OCS)
(�page 81)
As independent systems, their protective
functions work in conjunction with each
other. The SRS system conducts a self-test when
the ignition is switched on and in regular
intervals while the engine is running. This
facilitates early detection of malfunctions.
The
1
indicator lamp in the instrument
cluster lights up when the ignition is
switched on and goes out no later than a
few seconds after the engine has been
started.
The SRS components are in operational
readiness if the
1
indicator lamp is not
lit when the engine is running.
A malfunction in the system has been
detected if the
1
indicator lamp:
�
fails to go out after approximately
4 seconds after the engine was started
�
does not come on at all
�
comes on after the engine was started
or while driving
iFor information on infants and children
traveling with you in the vehicle and
restraint systems for infants and chil-
dren, see “Children in the vehicle”
(�page 77).
Warning!
G
In the event that the 1 indicator lamp
comes on during driving or does not come
on at all, the SRS self-check has detected a
malfunction. For your safety, we strongly
recommend that you visit an authorized
Mercedes-Benz Center immediately to have
the system checked; otherwise the SRS may
not be activated when needed in an acci-
dent, which could result in serious or fatal
injury, or it might deploy unexpectedly and
unnecessarily which could also result in
injury.
In addition, improper repair work on the SRS
creates a risk of rendering the SRS inopera-
tive or causing unintended air bag deploy-
ment. Work on the SRS must therefore only
be performed by qualified technicians. Con-
tact an authorized Mercedes-Benz Center.